Jumper Cable Comparison
#16
Jumper cables
The big ones look good! You will find that the light ones will lose there grip soon and be good for ...... Stay with the heavier ones. I got an Arctic set years ago and they have the ends that are heavier and rounder they hold very well. Paint on a lifting eye has enought resistance to stop current flow on an engine. Had that experiance once. As oxodized termainal between post and terminal to have 10.47 volts between the two. It looked good althought.
#17
Any suggestion for a set of cables that open far enough to clamp down and hold on the post? I have trouble with my cables wanting to fall off because of how wide the battery cable connections are. The wieght of the cables often time is enough to make one or both clamps slip off while I'm going to hook up to my truck. Very annoying... especially if I'm jumping a vehicle by myself...
#18
The heavy duty napa cables have pretty good ends. They don't look like the ends pictured above, they are more rounded and have a lot of spring pressure. You can also buy just the ends and make your own cables with them.
#20
If you don't want to make some you can carefully shop and find decent cables. I have a set that were made with welding cable that I bought in 1975 and I still use them. The problem I have is that the insulation is starting to crack on them. I paid something like $20 for them in 1975 so they were kind of expensive at the time.
A few years ago I bought a second set that probably cost me $30 and they have been a good set also. Neither set I have came from NAPA but from KMart or WalMart. Just be selective of what you spend your money on.
A few years ago I bought a second set that probably cost me $30 and they have been a good set also. Neither set I have came from NAPA but from KMart or WalMart. Just be selective of what you spend your money on.
#21
Mike,
They look good, keep a good battery in your truck then during the cold months you could be your own Auto Club.
Here is what I made for my truck, on this set I took 2) 25' lengths of #2 welding cable and with my crimping tool I swaged on the ends for my Anderson Connector and then I sealed them with adhesive filled shrink tubing.
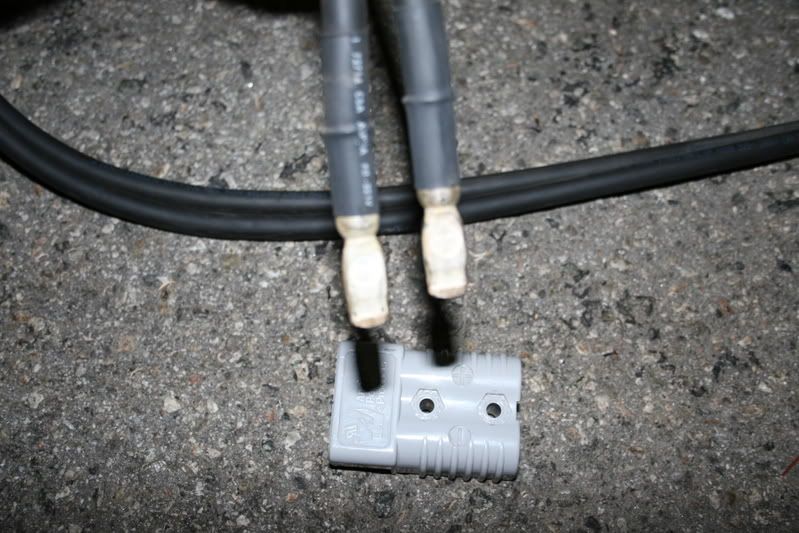
Then I inserted them into the Anderson Connector body, which will mate into is’t identical twin mounted onto my truck. The handle makes it easier to connect but I like it better without it.
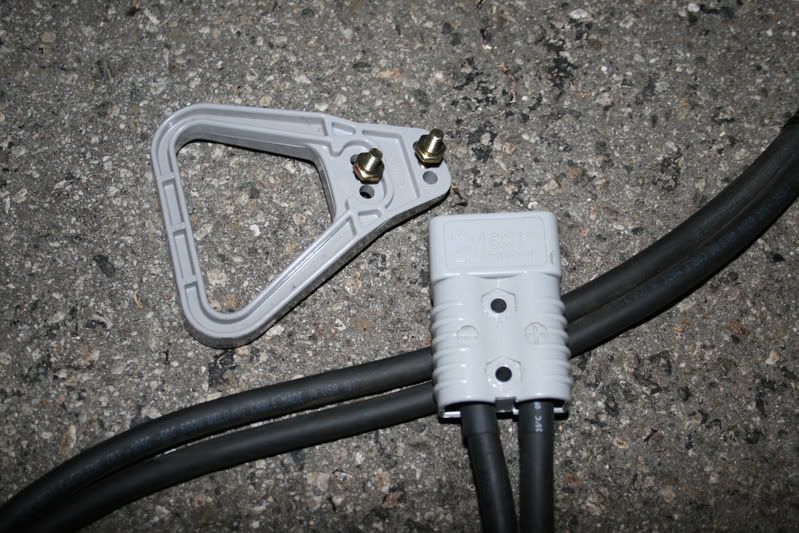
Then on the working end I installed a pair of 500-amp Parrot Clamps.
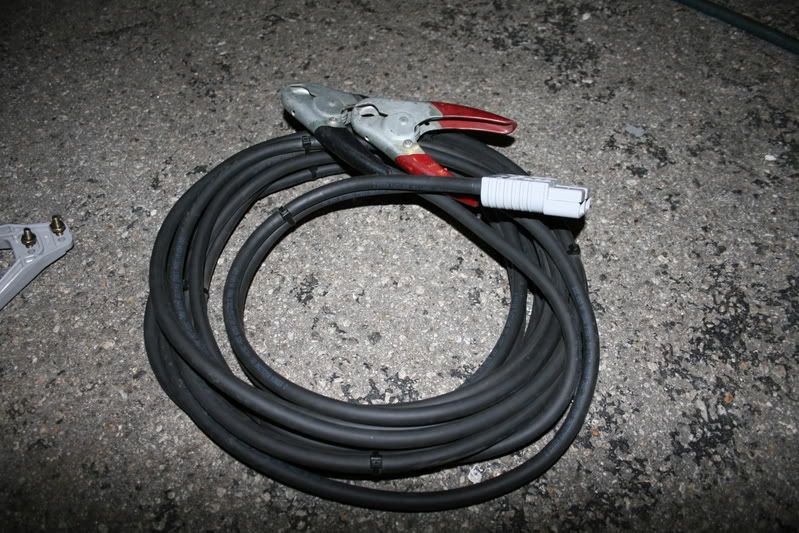
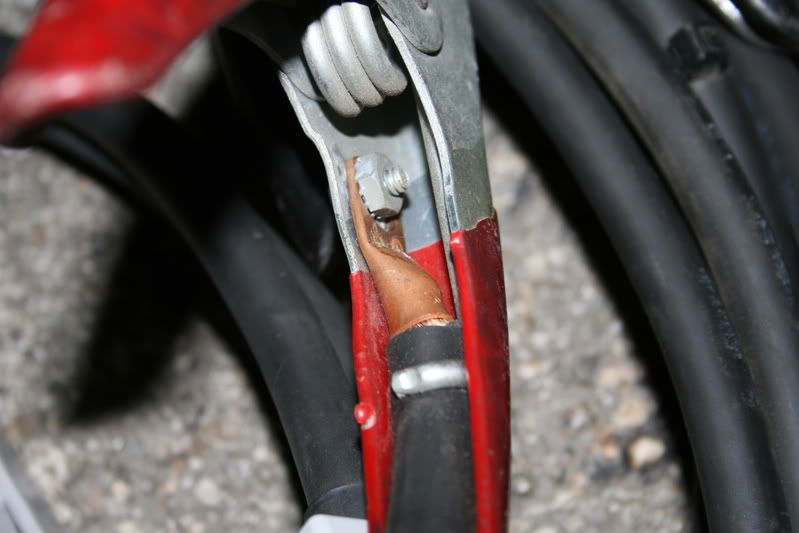
Here is a better close-up of the clamps as they are installed, these have a huge spring in them and as the name implies, these things have a nasty bite to them and although they feel different they clamp on tight.
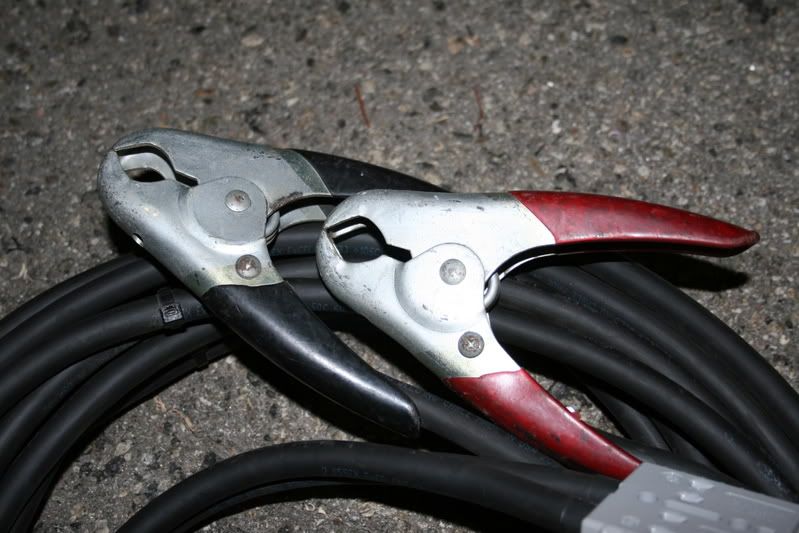
Here is where the secret lies in successful cables,
Make a Good Connection, I again crimped on the copper lug and then bolted it onto the clamp.
I have seen so many of them just crimped under a strip of metal in the handle and worse off there were commercially made ones.
I have used other people’s jumper cables to try and start a diesel and have them light up in my hands and got burned.
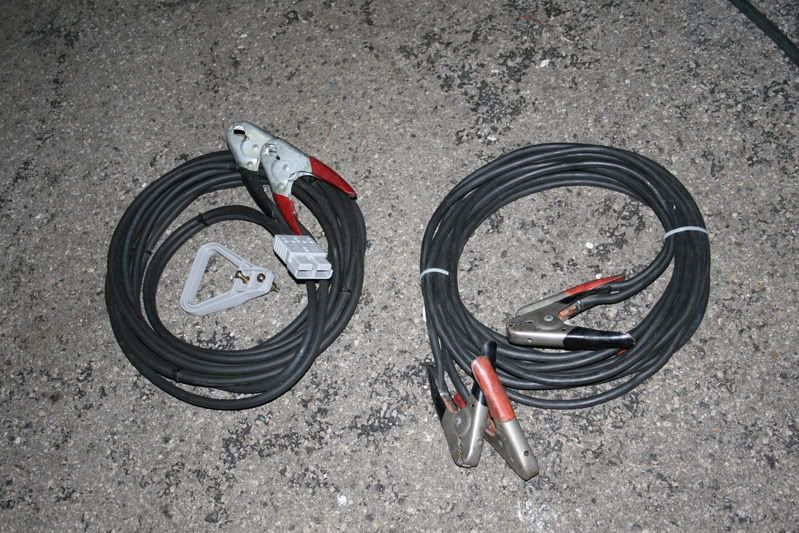
Here are my companion sets of cables I carry in my truck.
The cables on the Left are #2-gauge welding cable 30’ long and you need to plug them into the mating Anderson Connector under the hood.
I have the mating Anderson Connector connected to the Main battery capable of providing 1000 amps of current to the recipient vehicle, if I find this not enough then by pressing 2 switches I can connect 2 additional batteries into the system providing upwards of nearly 3800 amps of current.
The cables on the Right are #1-gauge welding cable 25’ long and have 500-amp clamps installed on both ends.
I use these as separate cables and did not bundle them together because the #1 cable gets a bit heavy and awkward when you are trying to uncoil it with the ends catching on everything within reach.
The other set is obviously tandem because of the Anderson. but I could have made them separate.
Andersons, I use a lot of these connectors in my projects.
With my cables I can pull up behind any full sized vehicle and easily connect to the battery without putting myself in danger.
I have started semi tractors with these jumpers off my truck with ease, I made the last set when I serviced Class-A (country singer type) coaches most were 3208 Cat pushers that would be in storage, they would go dead and I could drive up near them and reach the battery trays even having to drag the cables under the coach.
I have easily started 3208 Cat engines with completely dead batteries.
The battery packs are nice and I seen a lot of them being used by out local tow trucks but you have to keep them charged properly after each use.
I do not really understand how they can give the outrageous Ampere ratings like 3200 Peak Amps? Our truck batteries are only around 1000CCA or cold cranking amps @ a specific voltage but most of the smaller packs rated around 1000 PEAK Amps are using a small 17ah Gell or AGM battery like the ones I have in UPS units but since they are only meant to jump a discharged battery and not a dead battery so maybe a PEAK amp is the same as Short Circuit Current, useless except for a big number.
Maybe this when the automotive industry doesn’t know anything about electrical industry?
Does anyone know the theory on this?
Again Mike, you did well, sorry for the long winded post.
Jim
http://djvmerchandise.com/pro1242645.html
They look good, keep a good battery in your truck then during the cold months you could be your own Auto Club.
Here is what I made for my truck, on this set I took 2) 25' lengths of #2 welding cable and with my crimping tool I swaged on the ends for my Anderson Connector and then I sealed them with adhesive filled shrink tubing.

Then I inserted them into the Anderson Connector body, which will mate into is’t identical twin mounted onto my truck. The handle makes it easier to connect but I like it better without it.

Then on the working end I installed a pair of 500-amp Parrot Clamps.

Here is a better close-up of the clamps as they are installed, these have a huge spring in them and as the name implies, these things have a nasty bite to them and although they feel different they clamp on tight.

Here is where the secret lies in successful cables,
Make a Good Connection, I again crimped on the copper lug and then bolted it onto the clamp.
I have seen so many of them just crimped under a strip of metal in the handle and worse off there were commercially made ones.
I have used other people’s jumper cables to try and start a diesel and have them light up in my hands and got burned.

Here are my companion sets of cables I carry in my truck.
The cables on the Left are #2-gauge welding cable 30’ long and you need to plug them into the mating Anderson Connector under the hood.
I have the mating Anderson Connector connected to the Main battery capable of providing 1000 amps of current to the recipient vehicle, if I find this not enough then by pressing 2 switches I can connect 2 additional batteries into the system providing upwards of nearly 3800 amps of current.
The cables on the Right are #1-gauge welding cable 25’ long and have 500-amp clamps installed on both ends.
I use these as separate cables and did not bundle them together because the #1 cable gets a bit heavy and awkward when you are trying to uncoil it with the ends catching on everything within reach.
The other set is obviously tandem because of the Anderson. but I could have made them separate.
Andersons, I use a lot of these connectors in my projects.
With my cables I can pull up behind any full sized vehicle and easily connect to the battery without putting myself in danger.
I have started semi tractors with these jumpers off my truck with ease, I made the last set when I serviced Class-A (country singer type) coaches most were 3208 Cat pushers that would be in storage, they would go dead and I could drive up near them and reach the battery trays even having to drag the cables under the coach.
I have easily started 3208 Cat engines with completely dead batteries.

The battery packs are nice and I seen a lot of them being used by out local tow trucks but you have to keep them charged properly after each use.
I do not really understand how they can give the outrageous Ampere ratings like 3200 Peak Amps? Our truck batteries are only around 1000CCA or cold cranking amps @ a specific voltage but most of the smaller packs rated around 1000 PEAK Amps are using a small 17ah Gell or AGM battery like the ones I have in UPS units but since they are only meant to jump a discharged battery and not a dead battery so maybe a PEAK amp is the same as Short Circuit Current, useless except for a big number.
Maybe this when the automotive industry doesn’t know anything about electrical industry?
Does anyone know the theory on this?
Again Mike, you did well, sorry for the long winded post.
Jim
http://djvmerchandise.com/pro1242645.html
#22
Those are some very nice cables. I have thought many times about doing exactly what you have done with the anderson connectors but just haven't gotten around to it.
The jumper packs have a very high peak rating but their total storage is quite low and they can't take many cycles. The easiest way to understand it is by visualizing a standard lead acid battery. If you make big thick plates, you won't get as much surface area but the battery will last a lot longer due to there being more material there. If you are simply looking for the maximum current for a brief instant, then you want to maximize your plate surface area, so you make them very thin. This difference is what seperates storage batteries and starting batteries. The "starting batteries" used in cars need to have a lifetime of more than 100 starts, so they make the plates a little thicker, reducing the surface area and bringing down the peak rating.
The jumper packs have a very high peak rating but their total storage is quite low and they can't take many cycles. The easiest way to understand it is by visualizing a standard lead acid battery. If you make big thick plates, you won't get as much surface area but the battery will last a lot longer due to there being more material there. If you are simply looking for the maximum current for a brief instant, then you want to maximize your plate surface area, so you make them very thin. This difference is what seperates storage batteries and starting batteries. The "starting batteries" used in cars need to have a lifetime of more than 100 starts, so they make the plates a little thicker, reducing the surface area and bringing down the peak rating.
#24
#25
Well the small cables are too small to make good jumper cables but are plenty heavy for powering an inverter thats mounted under the seat of the truck. I'm getting ready to install my 500 watt inverter as follows.
1.Remove jack from beneath the passenger seat
2.Toss jack in trash because it's an accident waiting to happen
3.Drill one of the jack mounting holes large enough for one of the two wires in a cheap set of jumper cables to pass through.
4.Run the wire through the new larger hole using a grommet to seal it up and make it look nice.
5.Run the wire along the frame of the truck in the route of your choice ending up at the battery.
6.I'm going to use a large fuse and holder thats designed for an audio amplifier at the battery.
7.Using a short piece of the jumper cable wire I will ground my inverter at the seat mounting bolt. I've got my C.B and scanner grounded there and it's a good solid spot to ground.
I got the idea of using the jumper cable wire from a friend and it worked well for him but the mounting location and method I decided on myself. I'm a little nervous about drilling the hole bigger in the floor of the truck but I've studied it closely and I think it's doable. I'll post pics if I can get a few hours free to do the install. I've priced the regular install kits for inverters and most are 30 to 40 bucks and are only 6 feet long! 12.95 gets me a pair of cheapo cables that I can cut the ends off of and use them for the wire!
#26
A lot of the cheap I mean inexpensive cables (Harbor Freight, Wal-Mart) can be real deceiving, they will have a big and fat cable but when you cut them open some are barely a 10-gauge wire inside.
They will work fine as cables for inverters up to around 500 watts but when you move up into some serious sized inverters you need to supply more current.
On my 3000-watt inverter (full load can exceed 100 amps) I connected it to my 8-D Deep Cycle battery using #2 Welding cable and properly crimped lugs and a 200 amp "T" fuse at the battery.
Those install kits for the inverters are a bit overpriced for what they are, welding cable is not really that expensive, I bought the sizes I use most frequently in a 100' roll but you can go to most welding shops and get it for under $2.00 a foot.
I get a lot of my cables from a friends company that refurbishes UPS systems and he gives me short pieces of cable #4, #2, #1/0, #2/0 about 8-10 ' long for free and a lot of them have a silicone jacket and various ends on them.
Also I do not like connecting anything to the battery terminals because it chews them up especially the Lead ones.
#28
They should work fine, just be sure it is fused properly but it sounds like you already have that planned.
A cheaper route for the fuse is to go the you local auto parts and get the ones that go into most every new car now for the alternator, you can get them from 50-amps on up to around 150-amps and they look like a big ATO fuse.
How big of a fuse do they recommend for your unit about 70 amps?
Anytime you are playing with big cables be careful that there is no way it can chafe where it passes through any hole because a #2 gauge cable will carry a serious amount of current and do some spectacular arcing when it contacts the ground. Another way to get the power through the floorboard is to use a feedthrough or a bulkhead terminal.
Anytime I have to route heavy cables under the chassis I protect it inside of some convoluted tubing or lacquered loom for protection. You can go to Napa and get metal clips that will secure it to the frame rail for added protection.
What you are doing looks good.
Jim
Thread
Thread Starter
Forum
Replies
Last Post
Kirk T
1st Gen. Ram - All Topics
2
09-20-2006 07:19 AM
hellotbone
Performance and Accessories 2nd gen only
8
10-07-2003 06:54 AM


