
Fusible Link Abatement
 02-04-2007, 08:39 PM
#1
Registered User
Thread Starter
Fusible Link Abatement
OK, so I finally got rid of SOME of the FLs. What I've got now is not what i want in the long run, though. Eventually I am going to put one of those bus bars in here with a rubber cover on it (available from the boating stores) or a fused distribution block, and run all the hot side stuff out of it, including things like trailer brakes power. But for now, I needed my truck back and so I took what I was able to find in town and got rid of the four most troublesome ones.
I had a hard time finding exactly what I was looking for. No regular auto parts stores stocked fuse holders for any of the bigger styles of fuses. I was eventually able to get something suitable from a car stereo shop, but it still was not what I would have preferred.
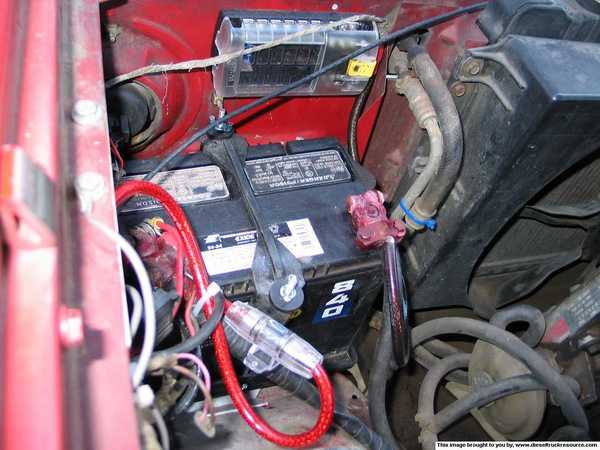
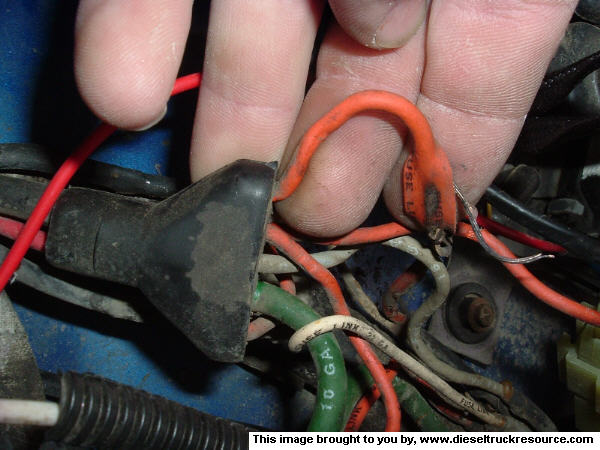
Here's what I started with. I had already replaced some of the FLs with new FL material a few months ago, but even some of the ones that looked OK from the outside turned out to be all crumbly and weak way down inside the rubber block. And I really just don't like crimped butt connectors, for reasons that the second picture shows...


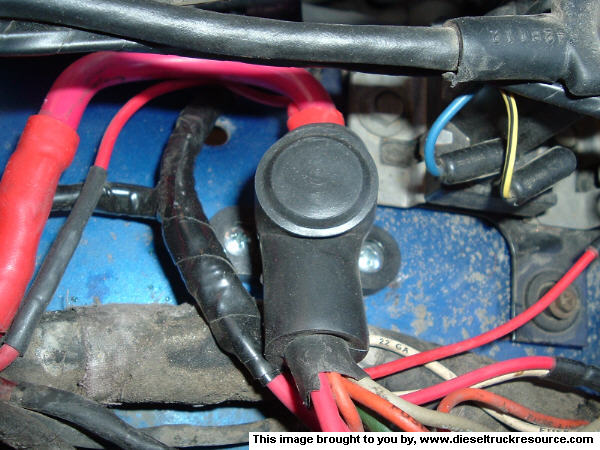
So I was able to get some maxifuse holders from the stereo shop for $5 each, and a mini ANL fuse holder as well. The alternator wire that comes through this FL block is a big one, 8 AWG, and the the FSM showed that FL to be a 120 amp one, so I got a 125 amp mini ANL style fuse for that one. Maxifuses only go up to 80 amp.
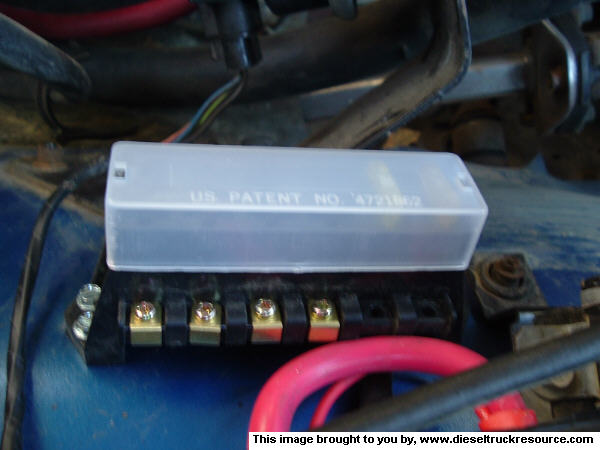
Instead of butt connectors, or trying to solder different sizes of wire together with a too small soldering iron, I went with split bolt connectors from Home Depot. These things rock! When it comes time to re-upgrade this set up, I will just unscrew the connectors and won't have to worry about the wire getting shorter. Plus it is easy to put several wires of different sizes together. The draw back is they are bulky and not so streamlined looking, but for now, it is just what I needed. I used plenty of wire so that I could position the fuse holders where they can be easily gotten at if I need to.


Could have been prettier, I know, and someday it will be, but now I finally have a truck again, and I know I won't have to worry about those FLs again anyway. There are still a few more that will get replaced in the future.
I had a hard time finding exactly what I was looking for. No regular auto parts stores stocked fuse holders for any of the bigger styles of fuses. I was eventually able to get something suitable from a car stereo shop, but it still was not what I would have preferred.
Here's what I started with. I had already replaced some of the FLs with new FL material a few months ago, but even some of the ones that looked OK from the outside turned out to be all crumbly and weak way down inside the rubber block. And I really just don't like crimped butt connectors, for reasons that the second picture shows...
So I was able to get some maxifuse holders from the stereo shop for $5 each, and a mini ANL fuse holder as well. The alternator wire that comes through this FL block is a big one, 8 AWG, and the the FSM showed that FL to be a 120 amp one, so I got a 125 amp mini ANL style fuse for that one. Maxifuses only go up to 80 amp.
Instead of butt connectors, or trying to solder different sizes of wire together with a too small soldering iron, I went with split bolt connectors from Home Depot. These things rock! When it comes time to re-upgrade this set up, I will just unscrew the connectors and won't have to worry about the wire getting shorter. Plus it is easy to put several wires of different sizes together. The draw back is they are bulky and not so streamlined looking, but for now, it is just what I needed. I used plenty of wire so that I could position the fuse holders where they can be easily gotten at if I need to.
Could have been prettier, I know, and someday it will be, but now I finally have a truck again, and I know I won't have to worry about those FLs again anyway. There are still a few more that will get replaced in the future.
 02-04-2007, 10:01 PM
#2
Registered User

What is the clear looking gizmo in the center picture??
Also, how did you insulate those clamping wire nut thingies??
I am gonna search for a couple of those under-hood fuse boxes from a later model vehicle and route a lot of my stuff through it.
Thanks.
Also, how did you insulate those clamping wire nut thingies??
I am gonna search for a couple of those under-hood fuse boxes from a later model vehicle and route a lot of my stuff through it.
Thanks.
02-04-2007, 10:25 PM
#3
Registered User
Thread Starter
the clear looking gizmo is the fuse holder and housing for the 125 amp mini-ANL style fuse.
Split bolts are insulated with electrical tape. Not real purty looking, but cheap and fast...
Split bolts are insulated with electrical tape. Not real purty looking, but cheap and fast...
02-04-2007, 10:37 PM
#4

That was my solution. Not really "soluded" yet, but I'm planning on wiring a bunch of stuff through that fuse box. Of course, the amp and heater grids take more juice than the box is good for, so those need to stay on the terminal...

 02-04-2007, 11:34 PM
#7
Registered User
Join Date: Dec 2005
Location: cornelius oregon
Posts: 912
Likes: 0
Received 0 Likes
on
0 Posts
looks like it will work good to me . but what the heck do i know. throw some of that split loom over it and drive it. does that get you back to square one. every day driver as far as you know.?
Trending Topics
02-05-2007, 12:20 AM
#8
Registered User
Thread Starter
Yeah I'm back driving it again as of today. Still needs heaps of work and improvements, as always, but it is a reliable truck again. I went on a long back hills logging road drive to look at the lastest mega-clearcut and scout some firewood, that's how confident I am in her now... 
Yeah, I'm going to pick up some of that spilt plastic tubing stuff in the AM.
Yeah, I'm going to pick up some of that spilt plastic tubing stuff in the AM.
02-05-2007, 12:04 PM
#9
Registered User

Join Date: Aug 2005
Location: over yonder back there
Posts: 463
Likes: 0
Received 0 Likes
on
0 Posts
wow, does anyone want to start a "rewiring the truck club"?
Im trying to get my wiring under control also. ive gotten two fuse panels from DelCity, both have 6 places for fuses, powered my a large gauge wire from the battery. The fuse panels also have built in grounding studs, if needed. i plan on totally rewiring almost all of my truck. None of my gauges work, so i have a bunch of aftermarket stuff (oil pressure, fuel, batt voltage, coolant temp, as well as a CAT hourmeter), that will be mounted into the dash where the vents would be if i had vents. all the wring for these guages will run through one of the fuse panels for ease of connecting to power/ground. I am also going to fix the mess i made when i wired in my pioneer cd player and amp by routing all that wiring through these fuse panels. these fuse panels will be mounted on the plastic heater duct behind the glove box, for ease of installation, being that it is a reativly accessible area, its flat, sort of isolated from the engine, and will be out of site when the glove box is closed. also, it will be easy to run the wiring behind the dash and into the engine bay and keep it out of site.
i am starting to get really tired of having wiring all over the truck to make simple things work when they dont.
i also have a set of 5 relays and matching plug-in connectors, also from DelCity, that will be used to control the running lights, low/high beams on plow frame, and forward/reverse facing lights on my headache rack. these will most likely mounted on the drivers front fender, for closeness to the battery.
when i get going into this major undertaking, hopefully next weekend, i will take pics for all to see.
02-06-2007, 12:34 AM
#10
Registered User
What would be wrong with replacing fusible-links with circuit-breakers, like on big trucks??
02-06-2007, 01:05 PM
#11
Registered User
Join Date: Dec 2006
Location: Jonesboro, TEXAS
Posts: 1,269
Likes: 0
Received 0 Likes
on
0 Posts
When I have the time I will order a Painless wiring kit for a 76 Chevy like i had before and replace every wire in the truck and put Auto meter gages in a dash panel I have made and be done with all the factory Dodge wires. That will cure all wiring probs that Dodge had. Put the heater grid on a push button switch and an external voltage regulator on and be good to go. All the other computer stuff is for people that want to turn the key and have the truck do it all for them. Don't care about the ABS any way just put pressure regulator on the rear brake line like a friend of mine.
02-08-2007, 04:42 PM
#12
Registered User
Here is some good info:
Check this out:
http://www.autoshop101.com/trainmodu...ction/113.html
You click on the < and > to turn the pages.
02-08-2007, 05:54 PM
#13
Registered User
Join Date: Aug 2005
Location: over yonder back there
Posts: 463
Likes: 0
Received 0 Likes
on
0 Posts
Check this out:
http://www.autoshop101.com/trainmodu...ction/113.html
You click on the < and > to turn the pages.
Nice link, good reading there
02-08-2007, 10:00 PM
#15
Registered User
Thread Starter
the big green one is from the alternator, the orange one on the bottom I think is for the hazards, two of the other ones are feeding the ignition switch and then one of those feeds the AC as well, and the other one also feeds the engine controller. the last one feeds to the headlight switch and associated stuff.
If yours are torn out, then someone must have bypassed them or you would be missing some critical functions. These feed power into the harness, and a couple of secondary FLs near the drivers side hood hinge. I hate the FLs, but I would advise scoping it out and making sure whoever bypassed them put SOMETHING in there for protection.
the ronfrancis wiring site was great! I ordered the catalog and it was here in a day and a half, and it has a ton of good info and products in it. Highly recommended!