
Fusable Links STINK !
 04-02-2014, 06:46 PM
#1
Registered User
Thread Starter
Join Date: Dec 2010
Location: Land of the Toxic Avenger
Posts: 6,790
Received 1,648 Likes
on
1,121 Posts
Fusable Links STINK !
As the title says....
Today, about 45 minutes from home, I noticed my speedo wasn't working after I got back in the truck from a stop. I realized my Voltmeter gauge wasn't working either, so immediately I thought .... turn off all accessories.
So about a mile up the road back home, I realized I had a spare relay in my tool box just for this occasion. Pulled over, pulled the first relay for the FSS, and swapped it out. NOTHING.
So, back on the road, and home I went. When I finally had the time to spend figuring out what it was, I went through the motions.
1. Replaced the relay with another good relay I had....... Nope..
2. Checked the connections to the CPS, and found them a little loose. Cleaned them, put them back together..... NOPE.
3. Removed the CPS and replaced it with a used good one I had.... NOPE.
4. Checked the fuse box...... All fuses working..... NOPE.
5. Fusable links.... (AKA FL)
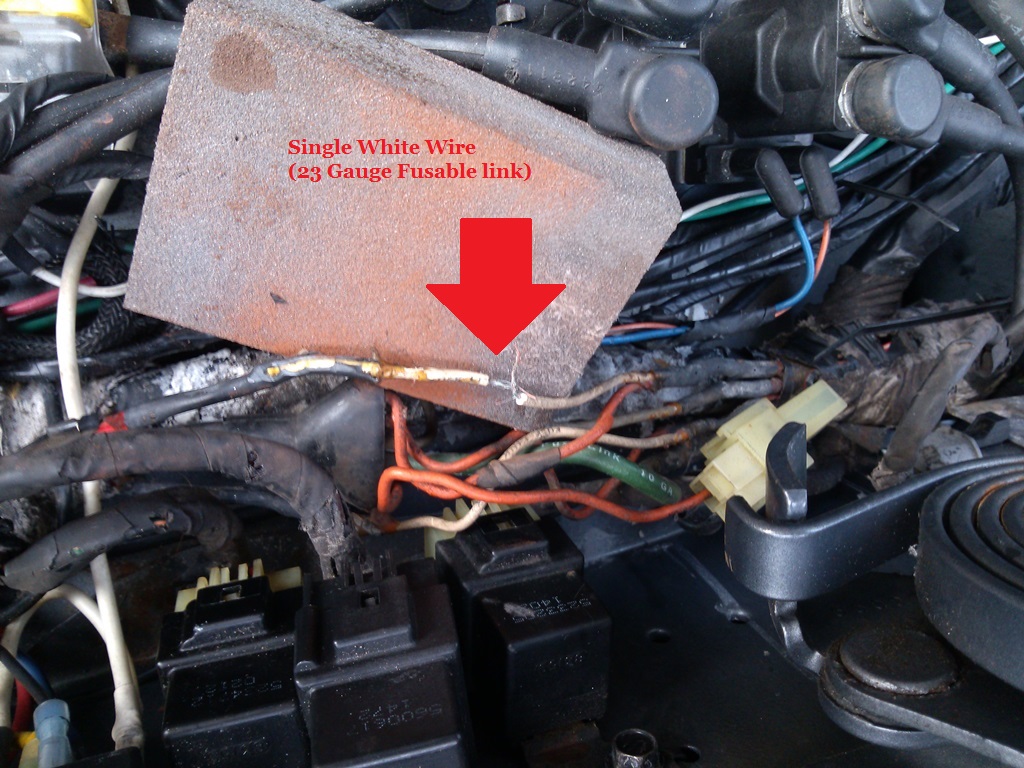
I went from link to link, and the main harness checked out okay. I went to the last one in the picture, and although from the exterior, it was in perfect condition, I soon realized, through using my test light connected to the negative side of the battery, that it had power on one side, but failed to have it on the other side closest to the battery.
I kept moving my tester about 2 MM towards the battery, testing positive for power until I got to the mid way point, and when I pulled the tester out of the casing of the FL, a bluish dust fell out of the casing. I realized that the inside of the FL casing had turned to some sort of dust and wasn't continuing it's pathway of voltage across it's full length, and this was it's failure point. I took my snips, and cut it at that point, and I found there was nothing but corrosion dust in there. One MM to the left, and there was the 23Gauge wire. One MM to the right was the same. I peeled back the casing, temporarily twisted the wires together, and ..... what do you know.... My alternator worked again.
Apparently, this single wire leads to the ECM. It allows the ECM to do it's job, and then tells the things which weren't working.... to start working..
So..... Does anyone have a very nice .... super clean designed fuse block they can recommend ? Something that will conform to 23 GA wires and also the other larger GA wires as well...
Thanks !
Today, about 45 minutes from home, I noticed my speedo wasn't working after I got back in the truck from a stop. I realized my Voltmeter gauge wasn't working either, so immediately I thought .... turn off all accessories.
So about a mile up the road back home, I realized I had a spare relay in my tool box just for this occasion. Pulled over, pulled the first relay for the FSS, and swapped it out. NOTHING.
So, back on the road, and home I went. When I finally had the time to spend figuring out what it was, I went through the motions.
1. Replaced the relay with another good relay I had....... Nope..
2. Checked the connections to the CPS, and found them a little loose. Cleaned them, put them back together..... NOPE.
3. Removed the CPS and replaced it with a used good one I had.... NOPE.
4. Checked the fuse box...... All fuses working..... NOPE.
5. Fusable links.... (AKA FL)
I went from link to link, and the main harness checked out okay. I went to the last one in the picture, and although from the exterior, it was in perfect condition, I soon realized, through using my test light connected to the negative side of the battery, that it had power on one side, but failed to have it on the other side closest to the battery.
I kept moving my tester about 2 MM towards the battery, testing positive for power until I got to the mid way point, and when I pulled the tester out of the casing of the FL, a bluish dust fell out of the casing. I realized that the inside of the FL casing had turned to some sort of dust and wasn't continuing it's pathway of voltage across it's full length, and this was it's failure point. I took my snips, and cut it at that point, and I found there was nothing but corrosion dust in there. One MM to the left, and there was the 23Gauge wire. One MM to the right was the same. I peeled back the casing, temporarily twisted the wires together, and ..... what do you know.... My alternator worked again.
Apparently, this single wire leads to the ECM. It allows the ECM to do it's job, and then tells the things which weren't working.... to start working..
So..... Does anyone have a very nice .... super clean designed fuse block they can recommend ? Something that will conform to 23 GA wires and also the other larger GA wires as well...
Thanks !


 04-02-2014, 08:23 PM
#3
Registered User
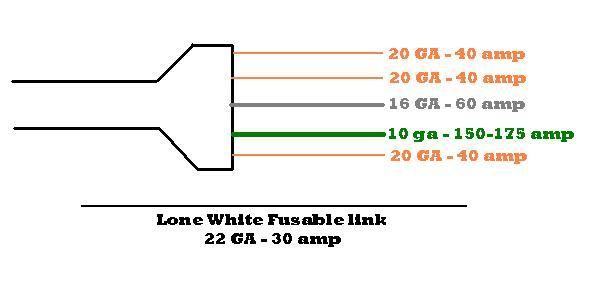
The fusible links are rated in amps, like fuses. The color is a code.
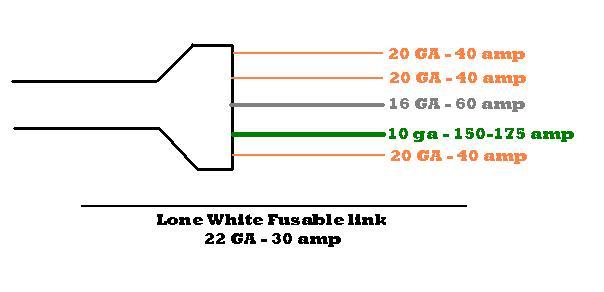
You could use a 30 amp ATC or ATO fuse, but I'd recommend a 30 amp MAXI fuse and holder. Del City has them. The 40's and 60's also could use a Maxi. Use a Mega Fuse block and a 175 amp mega fuse for the green one.
FYI. when you pierce an insulated wire for testing, and don't immediately repair the wound, water and salt get in causing the green demise. You may have done this to yourself.
04-02-2014, 10:26 PM
#4
Registered User
Thread Starter
Join Date: Dec 2010
Location: Land of the Toxic Avenger
Posts: 6,790
Received 1,648 Likes
on
1,121 Posts
The fusible links are rated in amps, like fuses. The color is a code.
You could use a 30 amp ATC or ATO fuse, but I'd recommend a 30 amp MAXI fuse and holder. Del City has them. The 40's and 60's also could use a Maxi. Use a Mega Fuse block and a 175 amp mega fuse for the green one.
FYI. when you pierce an insulated wire for testing, and don't immediately repair the wound, water and salt get in causing the green demise. You may have done this to yourself.
Great info Mr. J.
Just curious. If ive never tested these fusable links previousle, then how did i cause the lunk to fail this morning on the way back home
04-02-2014, 10:35 PM
#5
Registered User
Thread Starter
Join Date: Dec 2010
Location: Land of the Toxic Avenger
Posts: 6,790
Received 1,648 Likes
on
1,121 Posts
04-02-2014, 11:41 PM
#6
Administrator
04-03-2014, 05:11 AM
#7
Registered User

Join Date: Mar 2010
Posts: 789
Likes: 0
Received 0 Likes
on
0 Posts
I installed one and have since changed my mind so I went to the salvage yard and scrounged up another one and a bunch of the leads with the connectors that lock into fuse box.
Then you can pre wire it, the 4 relays are just enough for the headlights and blower motor upgrades Jim Lane outlined in the sticky.
These things are pretty slick really( for a rookie eletrician)!
Trending Topics
04-03-2014, 08:00 AM
#8
Registered User
He means if you had tested them before you MAY have caused it. I just used a fuse block from Napa when I got rid of all my fuse links.
04-03-2014, 08:53 AM
#9
Registered User
Just trying to help, and supply generally helpful information to the community.
I noted you said you tested in 2mm increments. That would require piercing. If you're in the habit of doing that, and not immediately dabbing a bit of liquid electrical tape on the wound, you're setting yourself up for more hidden corrosion breaks in the wiring.
Sometimes the only way to get at a circuit for testing is to pierce it, like setting up the TPS. Just go to the effort of putting a little liquid insulation on the wound and it won't come back to bite you.
04-03-2014, 08:57 AM
#10
Administrator
04-03-2014, 10:28 AM
#11
Registered User

http://www.grandmarq.net/vb/showthre...relay-fuse-box
04-03-2014, 12:20 PM
#13
Administrator
04-03-2014, 12:50 PM
#14
Registered User
Thread Starter
Join Date: Dec 2010
Location: Land of the Toxic Avenger
Posts: 6,790
Received 1,648 Likes
on
1,121 Posts
Somebody else probably did.
Just trying to help, and supply generally helpful information to the community.
I noted you said you tested in 2mm increments. That would require piercing. If you're in the habit of doing that, and not immediately dabbing a bit of liquid electrical tape on the wound, you're setting yourself up for more hidden corrosion breaks in the wiring.
Sometimes the only way to get at a circuit for testing is to pierce it, like setting up the TPS. Just go to the effort of putting a little liquid insulation on the wound and it won't come back to bite you.
One difference with me.... was my intent for the next phase..
You're right, it's not a good thing to (not )seal up the piercings, but with my situation, I was replacing everything anyway...
Very difficult to find "waterproof" Maxi's locally. I guess I'll be buying from the net.
04-03-2014, 05:33 PM
#15
Registered User

I've never found waterproof maxi holders only water resistant from marine supply places. Most have a cover to pass Coast Guard inspection and also have stainless hardware. That along with dielectric grease and they hold up pretty good.