
Fix your fuel cut-off solenoid
 09-24-2006, 12:45 PM
#1
1st Generation Admin
Thread Starter
Fix your fuel cut-off solenoid
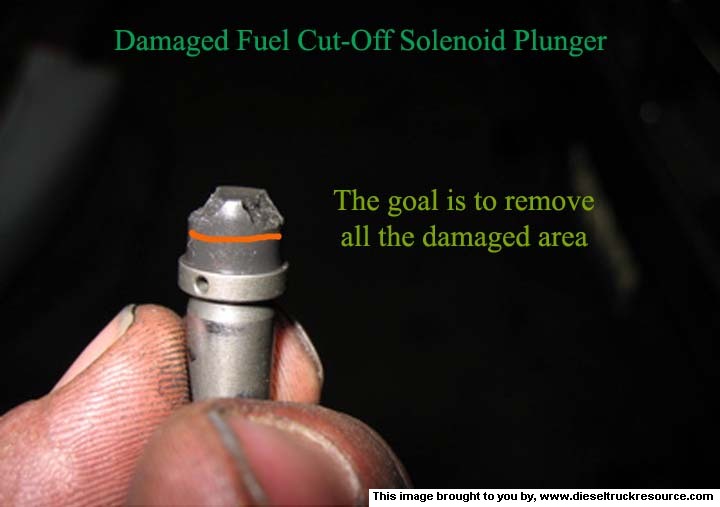
Like many here I've destroyed a few fuel cut-off solenoid plungers.
I don't want to be a member of the "Pull Cable Club".
I've considered all kinds of alternates for the rubber tip of the plunger with nothing good thus far. In goofing around with ideas, I've sorta stumbled upon what works for me.
It's irritatingly simple.
To start with, we need to try to clean up the damaged area ~
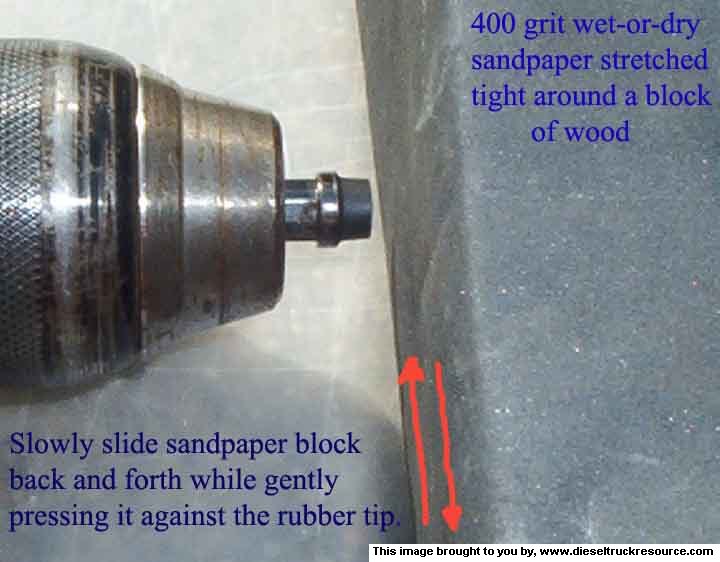
(1) Chuck your damaged plunger in a variable speed power drill.
(2) Wrap some 320 or 400 grit wet-or-dry sandpaper around a block of wood or something so as to provide a smooth, firm surface for the sandpaper.
(3) Spin the plunger at a low to medium speed.
(4) Position the drill so the plunger's pretty much at a 90* angle to the sandpaper block.
(5) While GENTLY pressing the sandpaper block against the rubber tip, slide the sandpaper block back and forth.
THE GOAL IS TO REMOVE RUBBER BY MEANS OF LEAVING SKID MARKS ON THE SANDPAPER!! If the rubber comes off like the ***** of rubber coming off a pencil eraser, you're pressing too hard. You don't want to risk tearing another plug from the rubber. Just take your time! It's easy!.
We want to remove enough rubber that we just expose the rubber tips mounting stump (that's what I call it anyway). You'll be removing what appears to be about 1/8th inch of meat. Don't try to clean the stump so to speak, just expose the outer ring as I have. It'll take a few minutes to worry away enough rubber to get there, so take your time.
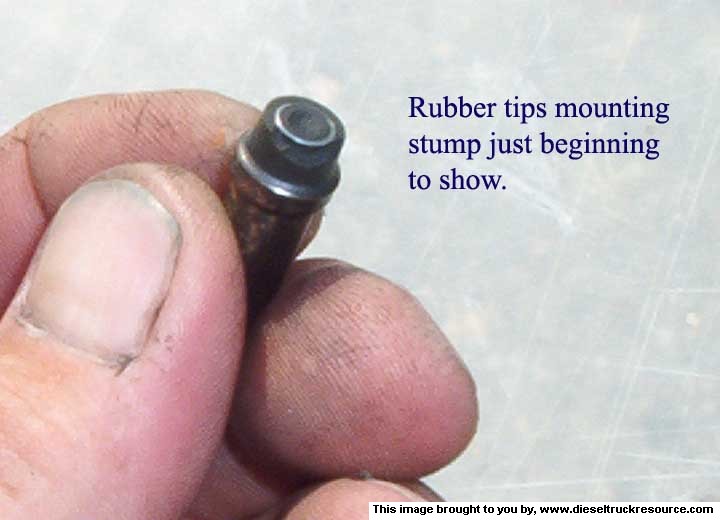
Having done that, now VERY GENTLY, slightly radius the sharp edge of what's left of the plunger. You need to be very careful at this point so not to tear the rubber. We just want to remove the relatively thin/sharp edge as if not, it will just rip out like the original *.
A few notes ~
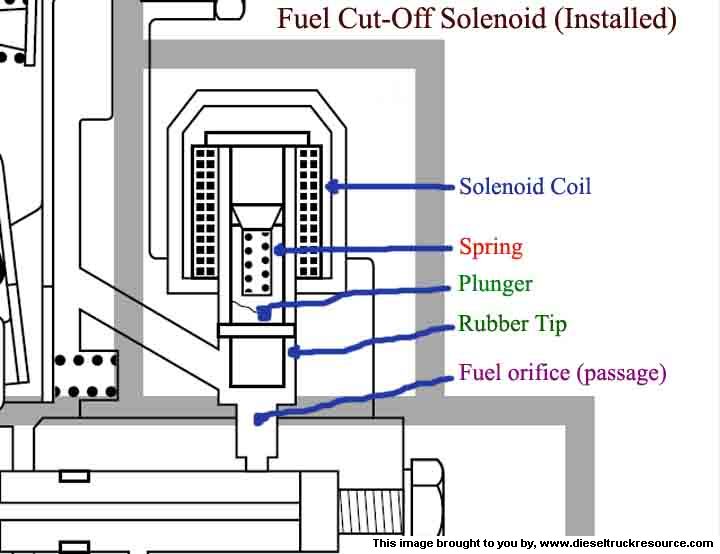
- I can't say for sure that the rubber tip has anything to do with sealing the fuel passage at this point now as it appears that the stump is just a wee bit larger than the fuel passage itself. Our sanding the rubber to the stump with the drill allows our keeping the stumps exposed surface pretty much flat and true.
- * When I first did this mod, I had a plunger with enough meat left that I was able to mill the rubber as described above, and end up with a complete ring of rubber around it. I've been running like that successfully for about six months. In removing the milled plunger yesterday so I could take pics for you good folks, I discovered that the rubber had still torn away a bit more around the edge of the stump ring. You can see it in the third image.
It apparently doesn't matter as it still shuts the engine down. Again, I think the metal stump is what's now doing the stopping of fuel flow. Perhaps it's not perfect, but it stops the engine correctly.
- In the past there were attempts to stop the tip from tearing mentioned that included stretching the plungers spring a little bit. Don't do that. With the removal of that roughly 1/8th inch of rubber, the metal sleeve of the plunger (armature) is just that much less in the solenoid coil. With that, there's less magnetic pull on the armature to overcome the spring.
For some odd reason, my mess requires me to hit the ignition switch twice. No matter what, the engine will not start on the first try. Always the second. It's my guess that based on the note above, the initial attempt grabs the plunger and gets it started moving. The second attempt pulls it on in successfully. I dunno. It may actually have nothing to do with it but this oddity started with the install of the modded plunger.
- It's an assumption on my part that all plungers are created the same. I threw away all the dead solders in the past so I was not able to try this on all the failed devices. Your's may be different. I dunno.
We can only hope this works for you as I've not heard of anyone else doing similar. Perhaps I'm just lucky. Give it a shot. The worst thing that could happen would be you ruin a . .. . . . . . ruined fuel cut-off solenoid.
I've been able to run the fool out of my mess with no failures to date. I'm comfortable to walk away from my heap knowing the cool-down timer will do its job and have the engine shut down when cool.
Good luck, and please be sure to post back here if you prove successful.
FYI ~
Damaged plunger image courtesy of swank.
I don't want to be a member of the "Pull Cable Club".
I've considered all kinds of alternates for the rubber tip of the plunger with nothing good thus far. In goofing around with ideas, I've sorta stumbled upon what works for me.
It's irritatingly simple.
To start with, we need to try to clean up the damaged area ~
(1) Chuck your damaged plunger in a variable speed power drill.
(2) Wrap some 320 or 400 grit wet-or-dry sandpaper around a block of wood or something so as to provide a smooth, firm surface for the sandpaper.
(3) Spin the plunger at a low to medium speed.
(4) Position the drill so the plunger's pretty much at a 90* angle to the sandpaper block.
(5) While GENTLY pressing the sandpaper block against the rubber tip, slide the sandpaper block back and forth.
THE GOAL IS TO REMOVE RUBBER BY MEANS OF LEAVING SKID MARKS ON THE SANDPAPER!! If the rubber comes off like the ***** of rubber coming off a pencil eraser, you're pressing too hard. You don't want to risk tearing another plug from the rubber. Just take your time! It's easy!.
We want to remove enough rubber that we just expose the rubber tips mounting stump (that's what I call it anyway). You'll be removing what appears to be about 1/8th inch of meat. Don't try to clean the stump so to speak, just expose the outer ring as I have. It'll take a few minutes to worry away enough rubber to get there, so take your time.
Having done that, now VERY GENTLY, slightly radius the sharp edge of what's left of the plunger. You need to be very careful at this point so not to tear the rubber. We just want to remove the relatively thin/sharp edge as if not, it will just rip out like the original *.
A few notes ~
- I can't say for sure that the rubber tip has anything to do with sealing the fuel passage at this point now as it appears that the stump is just a wee bit larger than the fuel passage itself. Our sanding the rubber to the stump with the drill allows our keeping the stumps exposed surface pretty much flat and true.
- * When I first did this mod, I had a plunger with enough meat left that I was able to mill the rubber as described above, and end up with a complete ring of rubber around it. I've been running like that successfully for about six months. In removing the milled plunger yesterday so I could take pics for you good folks, I discovered that the rubber had still torn away a bit more around the edge of the stump ring. You can see it in the third image.
It apparently doesn't matter as it still shuts the engine down. Again, I think the metal stump is what's now doing the stopping of fuel flow. Perhaps it's not perfect, but it stops the engine correctly.
- In the past there were attempts to stop the tip from tearing mentioned that included stretching the plungers spring a little bit. Don't do that. With the removal of that roughly 1/8th inch of rubber, the metal sleeve of the plunger (armature) is just that much less in the solenoid coil. With that, there's less magnetic pull on the armature to overcome the spring.
For some odd reason, my mess requires me to hit the ignition switch twice. No matter what, the engine will not start on the first try. Always the second. It's my guess that based on the note above, the initial attempt grabs the plunger and gets it started moving. The second attempt pulls it on in successfully. I dunno. It may actually have nothing to do with it but this oddity started with the install of the modded plunger.
- It's an assumption on my part that all plungers are created the same. I threw away all the dead solders in the past so I was not able to try this on all the failed devices. Your's may be different. I dunno.
We can only hope this works for you as I've not heard of anyone else doing similar. Perhaps I'm just lucky. Give it a shot. The worst thing that could happen would be you ruin a . .. . . . . . ruined fuel cut-off solenoid.
I've been able to run the fool out of my mess with no failures to date. I'm comfortable to walk away from my heap knowing the cool-down timer will do its job and have the engine shut down when cool.
Good luck, and please be sure to post back here if you prove successful.
FYI ~
Damaged plunger image courtesy of swank.

 09-24-2006, 05:41 PM
#4
Registered User
Join Date: Apr 2006
Location: Charlotte
Posts: 321
Likes: 0
Received 0 Likes
on
0 Posts
the full power screw is the only cause for destroying these, right?
just trying to figure out if I should proactively work on mine...as I haven't touched the pump, yet...
Greg
just trying to figure out if I should proactively work on mine...as I haven't touched the pump, yet...
Greg
09-24-2006, 05:47 PM
#5
Adminstrator-ess
I trimmed the new one I put in last August, and it's still shutting the truck down. I think a pre-emptive trim would be a good idea. I don't think you need to trim it down to the metal, though. That's probably only needed to fix a shredded plunger. All I did was make it flat across the bottom and radius the edge.
I think a pre-emptive trim would be a good idea. I don't think you need to trim it down to the metal, though. That's probably only needed to fix a shredded plunger. All I did was make it flat across the bottom and radius the edge.
09-24-2006, 07:15 PM
#7
Registered User

Where do these "shreds" go, when the plunger shreds??
Do they go to a good place, or a bad place??
Thanks.
Trending Topics
 , but I think pull cable is so cool

 09-25-2006, 05:34 PM
#11
1st Generation Admin
Thread Starter
After thoroughly ruining a two or three month old PDR HX35 Hybrid by not allowing enough idle time to cool it off, I decided that something had to be done. A cool-down timer. But it requires a means of automatic shutdown.
Gotta fix the solenoid.
Gotta fix the solenoid.
09-25-2006, 05:37 PM
#12
Adminstrator-ess
They get run through the injection plunger. If they make it through the delivery valves, there are screens at the injectors that will catch them. I wouldn't say they go to a good place.
09-25-2006, 08:31 PM
#14
Registered User
When mine went it started a leak on my IP. Some of the rubber clogged the orifice in the banjo bolt on the return...........I think, ain't real sure but it sure looked like rubber crumbs.
09-26-2006, 04:25 PM
#15
1st Generation Admin
Thread Starter
All of my cyphering and R&D in this fix has been totally independent. Having said that, since posting this thread I have found that TDR member hdm48 posted on 11-24-2005 that he had very good results doing essentially the same thing . . .
At least one other member there has posted with success as well.
Originally Posted by hdm48 of TDR
Before you spend the money on a new plunger, take an old one to someone with a lathe and have them cut the rubber on the sealing end until the aluminum JUST starts to show. Oh, and make sure the spring is able to make up for what you cut off so it will close.
I used to eat one about every time I'd stand on it, since I did this mod I've never had a problem.
I used to eat one about every time I'd stand on it, since I did this mod I've never had a problem.