
MPG is up with the airhorn
 01-05-2008, 07:59 PM
#16
Registered User
Join Date: Oct 2007
Location: terrell,texas
Posts: 1,197
Likes: 0
Received 0 Likes
on
0 Posts
Ya i agree would like to see a better picture, but from what i can tell it looks great. Im really noticing the increase from mine every time i drive, but like the charts showed its all pretty much on the bottom end. A easy just let the clutch out take off in 3rd in a piece of cake now! The extra torq. in the idle to say 1800 is very nice and makes rowing through the gears more fun. A full tank last me a while with the driving i do to so no report as yet, but i noticed today at exactly a half i was at 425 miles and im sure this is better than normal, i would have thought i was more like 375 or so- i know in a few days.
 01-06-2008, 02:35 PM
#17
Registered User

Join Date: Aug 2004
Location: SoCal
Posts: 1,219
Likes: 0
Received 0 Likes
on
0 Posts
I have a friend who has tracked his mileage on every tank since he uses it for work and writes off expenses.He has seen between 1.5-2 mpg increase in mpg with his modified 2nd gen running a preproduction AFE intake.
I don't monitor my mileage so I can't comment on my 3rd gen but it tows much nicer with the AFE intake.
Bob
I don't monitor my mileage so I can't comment on my 3rd gen but it tows much nicer with the AFE intake.
Bob
01-12-2008, 11:47 AM
#18
Registered User

Join Date: Jan 2007
Location: Left coast, Sacramento, CA
Posts: 255
Likes: 0
Received 0 Likes
on
0 Posts
Cschomer's pictures of fabricated airhorn
http://s269.photobucket.com/albums/j...00by600no2.jpg
http://s269.photobucket.com/albums/j...00by600no1.jpg
Testing-hope this works for Cschomer's pictures of his fabricated airhorn! (Not train horn )
)
http://s269.photobucket.com/albums/j...00by600no1.jpg
Testing-hope this works for Cschomer's pictures of his fabricated airhorn! (Not train horn
)


 01-12-2008, 03:17 PM
#23
Registered User
Thread Starter
Thank you, thank you and thanks to gaveupontv for posting the pics! I guess it was worth two days of work - I didn't have anything else I wanted to do. It would look better if I could weld worth a ****! Craig
01-14-2008, 07:18 AM
#24
Registered User
Join Date: Apr 2007
Location: New Braunfels, TX
Posts: 195
Likes: 0
Received 0 Likes
on
0 Posts
Do you have a parts list / instructions for building that massive intake? Anything that you can provide on the airhorn would be great too. I would love to replicate this design - send me a PM if you don't mind sharing the information. I have a friend that is always looking to give himself a challenge on fabrication!
 01-14-2008, 10:05 AM
#26
Registered User
Thread Starter
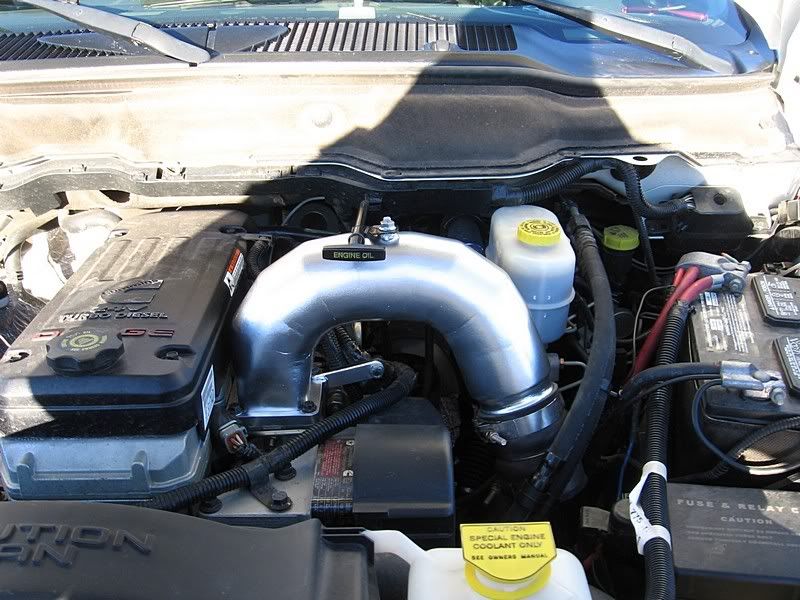
I only do this for myself. It's all handmade from materials from my junk pile. I have saws, grinders, mig welder, torch and hand tools - plus sheetmetal layout experience. It's all made the slow, tedious way! The battery is relocated to the outside of the frame, under the bed. I made new cables from 2/0 welding cable with hydraulicly climped and soldered ends and used Raychem heatshrink to seal them. The airfilter tee has 10 ga. rings (8" OD, 5" ID) for the filters to seal against and the rest of it is 18 ga. - all laid out with a rule and dividers, cut, rolled and welded. 3/8" allthread is welded in the center of the tee run and extends thru the filters (to tighten the filters to the tee) and extend past the filters and slip into slotted brackets on the fender. The horn flange is bandsawed out of 1/2" plate with the center torched out and hand filed smooth. The perimeter of the flange ID was exactly 11" - exactly the circumference of my old 3.5" downpipe. FLASH!! I laid out a pattern for the elbow segments and cut them out of my old 3.5" downpipe. The square-to-round fitting from the flange to the elbow is also a piece of 3.5" downpipe with a little heating and reforming. The nice 3" beaded inlet neck is cut from an old CAC pipe from a previous truck. I think it took me 1 day to build the filter tee and 3 days to build the horn. I'm sorry there isn't an easier way but this is how I get my kicks - it's my hobby! After I built the horn I found a tight radius 3.5" mandrel bend at work. I'll get the number off of it and post it. Two storebought 90s would have saved me a day! The filters are STP #SA6629 from Autozone. Actually, about 1" bigger dia. filters would fit and the front one could be 3" longer but these were cheap and in stock. Craig
01-14-2008, 10:45 AM
#27
Registered User

Definitely cool! I'd seen your homemade air horn recently but the filter setup was new to me on this post. That thing is AWESOME!
edit: My guess is that the filter minder isn't doing much these days!
edit: My guess is that the filter minder isn't doing much these days!
01-14-2008, 05:32 PM
#29
Registered User
Thread Starter
Just find a tinner and have him show you how to lay out round fittings. Remember geometry class and "constructing" shapes on paper - it's that easy! Two distances are always known and you triangulate to find the third one. Craig
WOW! I just did a google search for sheet metal layout and found this, https://www.fmanet.org/FMAStore/?fus...&Product_ID=73 - 22k -
Every fitting in their picture can be made with 3 basic layouts but with slight variations, depending on what type of fitting - 1 for cones and 2 for round angles.
WOW! I just did a google search for sheet metal layout and found this, https://www.fmanet.org/FMAStore/?fus...&Product_ID=73 - 22k -
Every fitting in their picture can be made with 3 basic layouts but with slight variations, depending on what type of fitting - 1 for cones and 2 for round angles.
04-28-2008, 11:09 PM
#30
Registered User
Thread Starter
I've finally put enough tanks of fuel thru it to tell for sure. I'm getting 19.7+ mixed, local driving. MPG is up .8 average for the same driving as before. Craig

Thread
Thread Starter
Forum
Replies
Last Post
DWitcher
3rd Gen High Performance and Accessories (5.9L Only)
12
11-07-2007 08:26 AM
HorseHauler
3rd Gen High Performance and Accessories (5.9L Only)
26
09-19-2006 10:25 AM