
How-To '06 Cummin Fuel Pressure Gauge
 11-15-2007 | 01:27 PM
#16

Thread Starter
Registered User
Joined: Oct 2006
Posts: 15
Likes: 0
From: Olathe, Ks
I just purchased a tapped banjo bolt from Floor-It and plan on simply replacing the existing fuel line banjo bolt with the tapped version and mounting the transducer directly on the banjo bolt, with no hose.
Is is necessary to isolate the transducer when mounting it on the CP3? If so, could you explain (i.e. known failures due to vibration, etc.).
I do want to do it right, but don't want to over-engineer it.
To use the electric transducer you will need to isolate it using a grease gun hose or a length of rubber hose to buffer it from vibration
I do want to do it right, but don't want to over-engineer it.
11-15-2007 | 02:20 PM
#18
Registered User
Joined: Jul 2005
Posts: 2,953
Likes: 0
From: Belgrade, Montana
I just purchased a tapped banjo bolt from Floor-It and plan on simply replacing the existing fuel line banjo bolt with the tapped version and mounting the transducer directly on the banjo bolt, with no hose.
Is is necessary to isolate the transducer when mounting it on the CP3? If so, could you explain (i.e. known failures due to vibration, etc.).
I do want to do it right, but don't want to over-engineer it.
Is is necessary to isolate the transducer when mounting it on the CP3? If so, could you explain (i.e. known failures due to vibration, etc.).
I do want to do it right, but don't want to over-engineer it.
11-15-2007 | 07:33 PM
#19
Thread Starter
Registered User
Joined: Oct 2006
Posts: 15
Likes: 0
From: Olathe, Ks
Pressure Gauge Installation COMPLETE - WhooHoo
Well, I thought I would close this thread with the results of my install. Once Again, thanks to all of you who helped me with the install. I have final photos to share.
The gauge works great and the truck is running at about 8-9 psi under normal driving conditions and at about 9 at idle. It's great to actually know how things are running.
You will see that I did end up getting a hose built to mount the transducer up near the firewall and to reduce the shock and vibration. Let's hope it lasts for years and years.
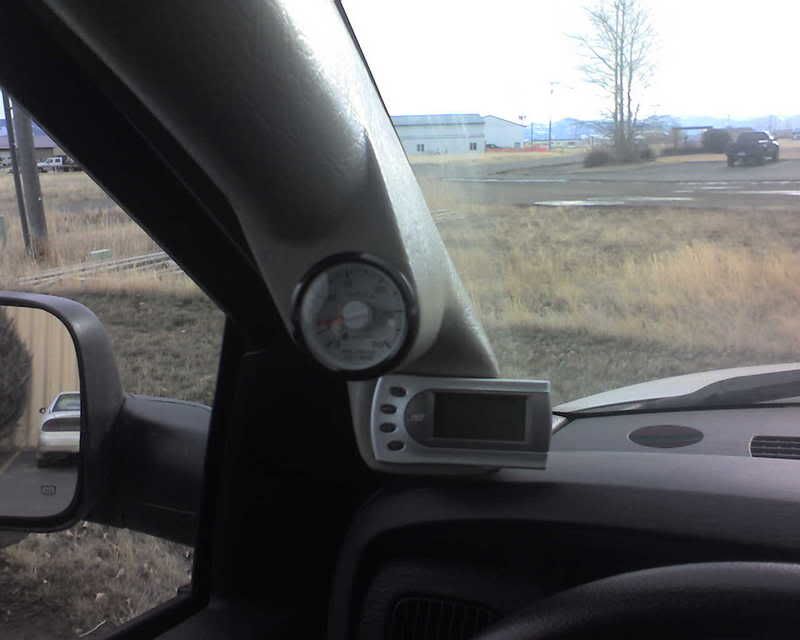
1) Gauge and New A-Pillar With Handle:
2) Tapped the CP3 with a Banjo Bolt and added a Hose:
3) Transducer mounted on end of hose near firewall:
The gauge works great and the truck is running at about 8-9 psi under normal driving conditions and at about 9 at idle. It's great to actually know how things are running.
You will see that I did end up getting a hose built to mount the transducer up near the firewall and to reduce the shock and vibration. Let's hope it lasts for years and years.
1) Gauge and New A-Pillar With Handle:
2) Tapped the CP3 with a Banjo Bolt and added a Hose:
3) Transducer mounted on end of hose near firewall:
Last edited by caldwell2000; 11-15-2007 at 09:17 PM. Reason: change links to attachments
 11-16-2007 | 06:58 PM
#21
Thread Starter
Registered User
Joined: Oct 2006
Posts: 15
Likes: 0
From: Olathe, Ks
I need one of those. I did not know they existed. Da**it. Where did you get that? How much? I wonder if I could return mine to Geno's. You really just ruined my day. Thanks 
Now I will have to unhook all the wires and replumb everything
Now that I look at it, it is missing the handle, which I really like, but could do without, because I hate the velcro that always wants to come loose on my Attitude over time.
Now I will have to unhook all the wires and replumb everything
Now that I look at it, it is missing the handle, which I really like, but could do without, because I hate the velcro that always wants to come loose on my Attitude over time.
11-16-2007 | 08:49 PM
#23
Registered User
Joined: Oct 2006
Posts: 90
Likes: 0
From: Southern Calif.
Well, I thought I would close this thread with the results of my install. Once Again, thanks to all of you who helped me with the install. I have final photos to share.
The gauge works great and the truck is running at about 8-9 psi under normal driving conditions and at about 9 at idle. It's great to actually know how things are running.
You will see that I did end up getting a hose built to mount the transducer up near the firewall and to reduce the shock and vibration. Let's hope it lasts for years and years.
1) Gauge and New A-Pillar With Handle:
2) Tapped the CP3 with a Banjo Bolt and added a Hose:
3) Transducer mounted on end of hose near firewall:
Did you have the rubber hose custom made?
I used a grease gun extension hose on mine, but it would be too short for other set-ups that tap in at the injector pump.
11-24-2007 | 11:40 PM
#24
Thread Starter
Registered User
Joined: Oct 2006
Posts: 15
Likes: 0
From: Olathe, Ks
 .
.Yes. I had it custom made. I have a local company "Thompson Industries" that specializes in connectors and hoses. So, I had them build an 18" hose with the connectors using the 150psi (the lightest material they carry). That should hold up under anything. For under $5.00, I had a custom built, high-pressure hose, professionally crimped. I am very happy with the install, other than the A-pillar. I wish I had known there was one available with the single guage insert + the Edge Attitude insert. I'll probably find one and replace the one I have.
11-25-2007 | 12:17 AM
#25

Registered User
Joined: Jan 2006
Posts: 776
Likes: 1
From: Nickelsville, Va
Thats why I mounted my gauges on the column. Plus it keeps every jockey who would see gauges on my pillar from trying to race me.
Since my Quadzilla rail pressure gauge(s) keeps crapping out I'm going with a Westach fuel pressure gauge mounted in a bullet cup that will be located in the area below the cubby hole thats below the radio.
Since my Quadzilla rail pressure gauge(s) keeps crapping out I'm going with a Westach fuel pressure gauge mounted in a bullet cup that will be located in the area below the cubby hole thats below the radio.

Thread
Thread Starter
Forum
Replies
Last Post