
Homemade Walbro Kit install + Aux Fuel Filter Write up
 Excellent Job!!!!


 06-22-2007, 07:51 AM
#17
Registered User
Join Date: Dec 2005
Location: DFW, TX
Posts: 2,627
Likes: 0
Received 0 Likes
on
0 Posts
Tim,
That is FREAKIN' AWESOME !!!
I have some questions for you, but your brain may be too fried to answer coherently.
I�m doing things a bit differently, not because I don�t like what you�ve done, but because I�ve already procured most of the materials. So, starting from the top of your post:
Dropping the Tank/Adding Pick-up Line
1. Anything you�d do different ?
2. Location of pick-up line ?
Fuel Filter Install
I�m skipping this, just go with in-line �throw away� filter.
Plumbing the Fuel System
3. You cut the stock fuel supply line (larger of the two). You removed the front section, right ?
4. And replaced it with 3/8� fuel line ?
5. And needed a new dorman connector ?
6. What did you do with the rear half of the stock supply line ?
7. You routed from the bypass/check valve to the 5/16� tee spliced into the stock return line. I�m thinking about routing my bypass line back to the filler neck and splicing into that. Any problems with that ?
8. I am not using a ball valve. I�m using two one-way check valves, one on the stock supply line, and the other on the walbro supply line. The valves will be located right before the two feed lines meet at the tee. Therefore, whichever pump is operating, fuel doesn�t backflow thru the in-operable pump. Any thoughts ?
Wiring the Fuel Pump
9. I�ve got a on-on toggle switch to install in the dash. On(1) will run power to the stock lift pump. On(2) will run power to the walbro via the relay. I figure, by doing this, along with the check valves listed above, I can switch between the stock LP & walbro by just flipping the toggle back and forth. Can you give me any thoughts or suggestions on this theory.
Electric Fuel Pressure Gauge Install
10. Hallelujah, I finally know what a �banjo bolt� is after reading your write up. I also know what a �tapped banjo� is. I�m definitely doing that. Mechanical gauge though.
Thanks for all the info, Tim. I may need your phone number when I�m neck-deep in diesel. Probably early next week.
On the plumbing questions....
3.&4. Yes, we pulled out the stock line from the last foward splice-filter canister.
5.Its 3/8" hose with a dorman connector(10mm/3/8" I believe) we picked it up at Napa, not sure if Autozone/Oriellys/etc would have it, but I dont see why they wouldnt.
6. The rear half of the stock supply was left alone, so you can switch the ball valve and run the stock LP(still hooked up like it was thru the stock pickup)
7. You can run the return either way, its just releasing excess pressure. We tapped in there because it was easier because he already has an auxillary tank tapped into the filler neck, and wasnt much room left for another tap, as well as plenty of hoses up there as it is.(with the aux tank feed, fuel tank vent, stock filler neck, etc)
Im sure hell be along shortly to answer a few of the other questions too.
Im not positive about the wiring with the Edge turbo timer, just something I thought id mention in your other thread just in case you use it.
06-22-2007, 10:11 AM
#18
Registered User
Thread Starter

Join Date: Oct 2004
Location: DFW, Texas
Posts: 706
Likes: 0
Received 0 Likes
on
0 Posts
Tim,
That is FREAKIN' AWESOME !!!
I have some questions for you, but your brain may be too fried to answer coherently.
I�m doing things a bit differently, not because I don�t like what you�ve done, but because I�ve already procured most of the materials. So, starting from the top of your post:
Dropping the Tank/Adding Pick-up Line
1. Anything you�d do different ?
2. Location of pick-up line ?
Fuel Filter Install
I�m skipping this, just go with in-line �throw away� filter.
Plumbing the Fuel System
3. You cut the stock fuel supply line (larger of the two). You removed the front section, right ?
4. And replaced it with 3/8� fuel line ?
5. And needed a new dorman connector ?
6. What did you do with the rear half of the stock supply line ?
7. You routed from the bypass/check valve to the 5/16� tee spliced into the stock return line. I�m thinking about routing my bypass line back to the filler neck and splicing into that. Any problems with that ?
8. I am not using a ball valve. I�m using two one-way check valves, one on the stock supply line, and the other on the walbro supply line. The valves will be located right before the two feed lines meet at the tee. Therefore, whichever pump is operating, fuel doesn�t backflow thru the in-operable pump. Any thoughts ?
Wiring the Fuel Pump
9. I�ve got a on-on toggle switch to install in the dash. On(1) will run power to the stock lift pump. On(2) will run power to the walbro via the relay. I figure, by doing this, along with the check valves listed above, I can switch between the stock LP & walbro by just flipping the toggle back and forth. Can you give me any thoughts or suggestions on this theory.
Electric Fuel Pressure Gauge Install
10. Hallelujah, I finally know what a �banjo bolt� is after reading your write up. I also know what a �tapped banjo� is. I�m definitely doing that. Mechanical gauge though.
Thanks for all the info, Tim. I may need your phone number when I�m neck-deep in diesel. Probably early next week.
That is FREAKIN' AWESOME !!!
I have some questions for you, but your brain may be too fried to answer coherently.
I�m doing things a bit differently, not because I don�t like what you�ve done, but because I�ve already procured most of the materials. So, starting from the top of your post:
Dropping the Tank/Adding Pick-up Line
1. Anything you�d do different ?
2. Location of pick-up line ?
Fuel Filter Install
I�m skipping this, just go with in-line �throw away� filter.
Plumbing the Fuel System
3. You cut the stock fuel supply line (larger of the two). You removed the front section, right ?
4. And replaced it with 3/8� fuel line ?
5. And needed a new dorman connector ?
6. What did you do with the rear half of the stock supply line ?
7. You routed from the bypass/check valve to the 5/16� tee spliced into the stock return line. I�m thinking about routing my bypass line back to the filler neck and splicing into that. Any problems with that ?
8. I am not using a ball valve. I�m using two one-way check valves, one on the stock supply line, and the other on the walbro supply line. The valves will be located right before the two feed lines meet at the tee. Therefore, whichever pump is operating, fuel doesn�t backflow thru the in-operable pump. Any thoughts ?
Wiring the Fuel Pump
9. I�ve got a on-on toggle switch to install in the dash. On(1) will run power to the stock lift pump. On(2) will run power to the walbro via the relay. I figure, by doing this, along with the check valves listed above, I can switch between the stock LP & walbro by just flipping the toggle back and forth. Can you give me any thoughts or suggestions on this theory.
Electric Fuel Pressure Gauge Install
10. Hallelujah, I finally know what a �banjo bolt� is after reading your write up. I also know what a �tapped banjo� is. I�m definitely doing that. Mechanical gauge though.
Thanks for all the info, Tim. I may need your phone number when I�m neck-deep in diesel. Probably early next week.
1. Go with the glacier pickup and install it the same way.
2. The location is good..its near the pump, just make sure you dont drill it to far back it interferes with the crossmember.
3. Correct..I removed from the cut forward
4. Yep...no sense in running a 3 ft hard line just to go back to rubber hose.
5. You might be able to reuse the old dorman by cutting off the plastic and rubber hose. Id just buy a new one because its not to expensive
6. The rear half of the supply line stays where its at. This still acts as the supply line for the stock lift pump.
7. Splicing the return back to the filler neck is fine...but the fittings are expensive to go from a 3/4" T and recduce it down to a 5/16". It will take a couple of reducer bushings to get from 3/4 to 5/16"
8. Thats a great way.. I would have done it that way but didnt want to wait on ordering more parts. Just make sure that the check valves open under very low pressure since all they do is prevent back flow.
9. Let me think about how to wire that. You want the walbro to trigger off the stock lift pump wire because the computer controls how long it runs when priming and keeps it running when running the truck. You could connect it to a switched hot but Im not sure that will work if you ever add in a turbo timer. You might not have one now but it may be something you add later....I always try and plan ahead so its not a pain later. The 06 edge juice/attitude has a built in turbo timer, not sure why you dont use it but I still think wiring it that way is better.
Id run the wiring like this:
 06-22-2007, 10:34 AM
#20
Registered User
Thread Starter
Join Date: Oct 2004
Location: DFW, Texas
Posts: 706
Likes: 0
Received 0 Likes
on
0 Posts
The 03 doesnt have have an intank pump....so you can simply use the stock pickup and run some 3/8" line from it to the new pump. You will only have 1 pump to run on but its MUCH easier
06-22-2007, 03:21 PM
#24
Registered User
Thread Starter
Join Date: Oct 2004
Location: DFW, Texas
Posts: 706
Likes: 0
Received 0 Likes
on
0 Posts
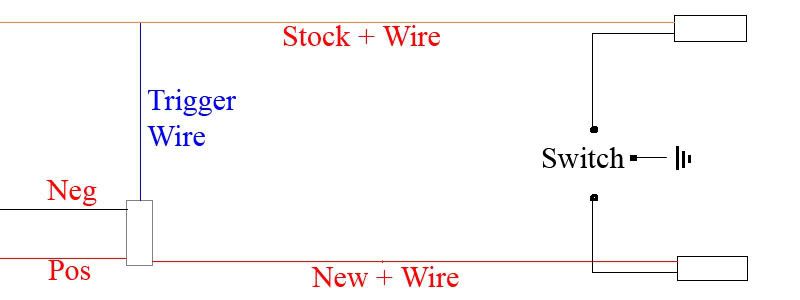
That looks ok but its alway better to switch a ground. You want the least amount of interruptions in the + wire as possible.
06-22-2007, 03:22 PM
#25
Registered User
Thread Starter
Join Date: Oct 2004
Location: DFW, Texas
Posts: 706
Likes: 0
Received 0 Likes
on
0 Posts
You still need a check valve and need to modify the return line to allow the extra pressure back into the tank. The Walbro will run 70spi and thats way to much for our trucks. You need the check valve to set the pressure and it overflows the excess pressure back to the tank
 06-22-2007, 08:07 PM
#27
Banned
Join Date: Dec 2006
Location: NC
Posts: 1,806
Likes: 0
Received 0 Likes
on
0 Posts
 Outstanding job dude!! I know the kind of time and effort that goes into a write up like this. It gonna help a lot of new installations. GDP's kit is a little more but, it has the convenience of coming it a kit which help save little time.
06-22-2007, 09:25 PM
Outstanding job dude!! I know the kind of time and effort that goes into a write up like this. It gonna help a lot of new installations. GDP's kit is a little more but, it has the convenience of coming it a kit which help save little time.
06-22-2007, 09:25 PM
#28
Registered User

Join Date: Mar 2006
Posts: 559
Likes: 0
Received 0 Likes
on
0 Posts
Return line: where did you reduce the 3/8 line from the Walbro to the 5/16 at the return? It is hard to tell but is one side of the check valve 3/8 and the other side 5/16? Or did you reduce the line at the Tee
thanks
thanks
06-22-2007, 11:59 PM
#29
Registered User
Thread Starter
Join Date: Oct 2004
Location: DFW, Texas
Posts: 706
Likes: 0
Received 0 Likes
on
0 Posts
