Guages and new dash color :D
#1
Guages and new dash color :D **Updated Pics**
hey guys i installed my glowshift guages and decided to keep it on the blue color. the only problem was that it didn't match my dash so after some looking around, i found replacement LED bulbs that match. it looks pretty sharp, the pics don't really do it justice.
#2
Looks nice! I installed the Autometer NVs (I think they are called), and they are way too bright green! Look like a ricer goin down the road. I need to see if I can change the LEDs out on them. Drives my passengers nuts too.
#5
thanks for the compliments, it actually wasn't too difficult. after talking to dodge (who told me that NO ONE made replacement bulbs but them haha, dumb dealership  ) i decided to go check out some websites. i found the bulbs at superbrightleds.com, the part number is B8.4D Twist Lock Lamp. They run about $1.50 or so a piece and it takes 11 bulbs. they charge $5 shipping no matter what size the order so it may be better if you order these lights and then some others for your truck if you have been wanting them due to the shipping being a flat rate.
So i took my instrument panel out and took the black plastic piece off of the back. i removed all of the factory bulbs from their sockets and threw them out
The new bulbs have small silver tabs on each side of the plastic housing much like the factory bulbs. you have to squeeze those tabs together some on each side so that they will make contact with the circuit board contacts. the easiest way i found to do it was to use a pair of needle nose pliers and use the outside edge of the circuit board as a filler guage to decided when the tabs have been squeezed close enough. then you have to work the new light into the hole on the circuit board. BE VERY CAREFUL since the new housing are just a hair larger than the hole. you have to carefully work it in and may want to squeeze the plastic housing together a little before placing it in the board. then you just turn them so the contacts on the bulb touch the metal contacts on the board.
you may have to play with them a little when you go to plug your dash back in because the contacts may not be touching perfectly. i just moved the bulb around a little until it made contact.
A couple of quick notes from my screwups:
1) when you are testing the lights, don't put the whole instrument cluster back together. just leave the circuit board and the front of the guages with teh needles attached. this will give you a little more working room when you are plugging the cluster in and checking the lights.
2) if one of the LED bulbs happens to fall out of the housing while your are moving it around testing them, DON'T TRY AND SEPERATE THE DASH!!! just shake it back and forth to one side or the other (not towards the top or bottom) and the bulb will just fall out and you can remove the housing. I tried to shake it to the bottom of the cluster and seperate the guage front from the circuit board and they seperated all right, along with my needles going everywhere and i had to buy another new instrument cluster. (expensive and not any fun at all) but i learned from my mistakes (just an expensive lesson lol).
well i hope this helped some, i'll try and post up some pictures tonight when i get home from work. then some of the instructions may make more sense. if you have any questions feel free to pm me.
Next step is replacing the light bulbs in the A/C controls with blue LEDs that dodge again said could not be replaced. As soon as i get that info i'll post that as well.
Good Luck
Justin
 ) i decided to go check out some websites. i found the bulbs at superbrightleds.com, the part number is B8.4D Twist Lock Lamp. They run about $1.50 or so a piece and it takes 11 bulbs. they charge $5 shipping no matter what size the order so it may be better if you order these lights and then some others for your truck if you have been wanting them due to the shipping being a flat rate.
So i took my instrument panel out and took the black plastic piece off of the back. i removed all of the factory bulbs from their sockets and threw them out

The new bulbs have small silver tabs on each side of the plastic housing much like the factory bulbs. you have to squeeze those tabs together some on each side so that they will make contact with the circuit board contacts. the easiest way i found to do it was to use a pair of needle nose pliers and use the outside edge of the circuit board as a filler guage to decided when the tabs have been squeezed close enough. then you have to work the new light into the hole on the circuit board. BE VERY CAREFUL since the new housing are just a hair larger than the hole. you have to carefully work it in and may want to squeeze the plastic housing together a little before placing it in the board. then you just turn them so the contacts on the bulb touch the metal contacts on the board.
you may have to play with them a little when you go to plug your dash back in because the contacts may not be touching perfectly. i just moved the bulb around a little until it made contact.
A couple of quick notes from my screwups:
1) when you are testing the lights, don't put the whole instrument cluster back together. just leave the circuit board and the front of the guages with teh needles attached. this will give you a little more working room when you are plugging the cluster in and checking the lights.
2) if one of the LED bulbs happens to fall out of the housing while your are moving it around testing them, DON'T TRY AND SEPERATE THE DASH!!! just shake it back and forth to one side or the other (not towards the top or bottom) and the bulb will just fall out and you can remove the housing. I tried to shake it to the bottom of the cluster and seperate the guage front from the circuit board and they seperated all right, along with my needles going everywhere and i had to buy another new instrument cluster. (expensive and not any fun at all) but i learned from my mistakes (just an expensive lesson lol).
well i hope this helped some, i'll try and post up some pictures tonight when i get home from work. then some of the instructions may make more sense. if you have any questions feel free to pm me.
Next step is replacing the light bulbs in the A/C controls with blue LEDs that dodge again said could not be replaced. As soon as i get that info i'll post that as well.
Good Luck
Justin
#6
what intensity did you go with ? the site shows two intensities for blue (1860 mcd) and (4300 mcd)
it would be cool to replace all the conventional bulbs inside the truck with LEDs including map lights, cupholder light etc.
it would be cool to replace all the conventional bulbs inside the truck with LEDs including map lights, cupholder light etc.
#7
well when you go to check out and you put in the style bulb and choose the color, it only gives you one option for each color and then a black light UV style bulb. so i'm not sure what intensity it comes with. i'm working on finding out about my A/C controler bulbs and then change out my in the cab bulb to an LED also. superbrightleds.com has just about any and every bulb you can imagine along with resistors if you need them. they are reasonable on their prices and really quick on shipping.
Trending Topics
#8
ok here are some pics....
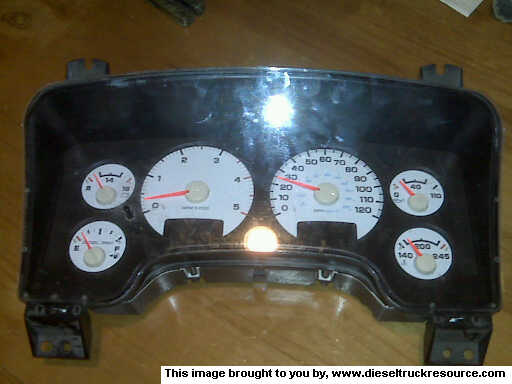
this is how the cluster will look when you pull it out of the truck

this is the back of the cluster. you will see the black plastic piece. it is held on by 18 screws that are torx head size T15.

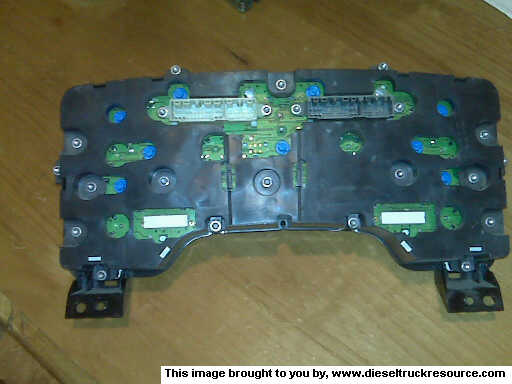
this is what the cluster will look like with the back removed, there are 11 lights that light the instrument cluster. you can see some of them on this pic (blue plastic pieces) and then in other places you can see where the holes were when i had removed some of the bulbs

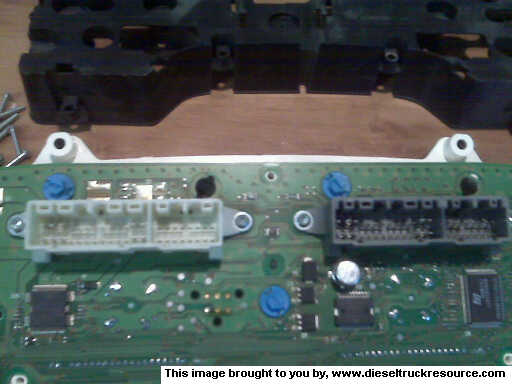
now you can remove the circuit board and guages from the clear plastic housing that you look through when you seen the cluster in the dash. this picture isn't the best but you can kinda see how thin it is and how plugging it in to test it will be easier this way since it's not near as bulky. remember becareful of the needles. you don't want them pulling off. they won't just fall off. it takes a little force (ask me how i know lol)

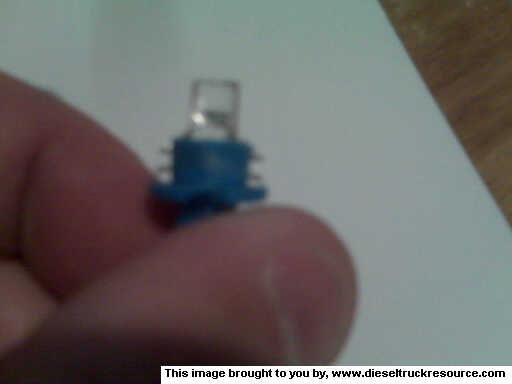
this is kind of a bad picture of the LED bulb. it kind of gives you an idea of what its going to look like. the small metal tabs on each side are the ones that you need to close down using a pair of needle nose pliers or something so they will make contact with the circuit board.

and these are just a few pictures that show where the light locations are. again the blue plastic pieces are where the bulbs are and across the top you can see a couple of places where i had already removed the bulbs


again i hope this helps some folks that want to change the color of their dash. again your going to have to be careful of the needles on the guages and you will have to do a little bit of working the new plastic housing into the holes since they are just a hair larger. nothing major and no major cutting or shaving on the plastic piece, just working it in. if you have any questions, please feel free to hollar at me either on the thread or pm me.
Justin
this is how the cluster will look when you pull it out of the truck

this is the back of the cluster. you will see the black plastic piece. it is held on by 18 screws that are torx head size T15.

this is what the cluster will look like with the back removed, there are 11 lights that light the instrument cluster. you can see some of them on this pic (blue plastic pieces) and then in other places you can see where the holes were when i had removed some of the bulbs

now you can remove the circuit board and guages from the clear plastic housing that you look through when you seen the cluster in the dash. this picture isn't the best but you can kinda see how thin it is and how plugging it in to test it will be easier this way since it's not near as bulky. remember becareful of the needles. you don't want them pulling off. they won't just fall off. it takes a little force (ask me how i know lol)

this is kind of a bad picture of the LED bulb. it kind of gives you an idea of what its going to look like. the small metal tabs on each side are the ones that you need to close down using a pair of needle nose pliers or something so they will make contact with the circuit board.

and these are just a few pictures that show where the light locations are. again the blue plastic pieces are where the bulbs are and across the top you can see a couple of places where i had already removed the bulbs


again i hope this helps some folks that want to change the color of their dash. again your going to have to be careful of the needles on the guages and you will have to do a little bit of working the new plastic housing into the holes since they are just a hair larger. nothing major and no major cutting or shaving on the plastic piece, just working it in. if you have any questions, please feel free to hollar at me either on the thread or pm me.
Justin
#9
Chapter President
Joined: Apr 2007
Posts: 9,375
Likes: 7
From: misplaced Idahoan stuck in Albuquerque, Roughneckin on RIG 270
Justin,
Why did you remove the black plastic surround from the circuit board? In the pics, it looks like the bulbs are accessible without taking the surround off. Maybe the pics donít do justice but was wondering, that would eliminate a step.
Why did you remove the black plastic surround from the circuit board? In the pics, it looks like the bulbs are accessible without taking the surround off. Maybe the pics donít do justice but was wondering, that would eliminate a step.
#10
was thinking the same thing, but you axedum first
#11
Chapter President
Joined: Apr 2007
Posts: 9,375
Likes: 7
From: misplaced Idahoan stuck in Albuquerque, Roughneckin on RIG 270
another question- can you dim them? On my ultra lite II's they don't like to be dimmed but I don't mind the red backlighting (too many years in the military with aircraft) as red is the only color that does not screw up your night vision.
#13
cbrhas, i removed the back plastic piece because it is pretty thick. if you check out the pic of just the circuit board and see the gray and black female plugs that are on the board, the black plastic piece is about another 1/2 give or take above those. so it just made it a little easier to remove the old bulbs and work the new ones in. like i said this was just worked best for me when i changed mine over and i don't mind removing a handfull of screws to give me a little more room. especially having big fingers and having to deal with those little bulbs lol  .
.
also you can dim the LEDs down quite a bit with the dimmer switch. it actually surprised me that i was able to dim them down some.
thanks for all the compliments guys. hope it helps!!
 .
. also you can dim the LEDs down quite a bit with the dimmer switch. it actually surprised me that i was able to dim them down some.
thanks for all the compliments guys. hope it helps!!
#14
I know this thread is a few months old, but can anyone point me in the right direction for an early 07. Are the bulbs the same? I know the instrument panel is slightly different even from an 06 to an early 07. The center bulb in my cluster is out and so is the water temp bulb. I'd like to change them all over to blue like my isspro EV2's. Thanks in advance, once more, I realize that this thread has been inactive for a few months.
Thread
Thread Starter
Forum
Replies
Last Post
NoSparkplugs
3rd Generation Ram - Non Drivetrain - All Years
17
05-17-2009 10:36 PM
Performance
3rd Generation Ram - Non Drivetrain - All Years
3
09-26-2007 02:44 PM
Turbo Deeezle
Performance and Accessories 2nd gen only
14
11-03-2004 02:50 AM


