Raptor RP100 install tips for 03
 08-28-2010, 04:29 AM
#1
DTR's Volcano Monitor, Toilet Smuggler, Taser tester, Meteorite enumerator, Quill counter, Match hoarder, Panic Dance Choreographer, Bet losing shrew murderer
Thread Starter
Join Date: May 2007
Location: Kenai Alaska
Posts: 965
Likes: 0
Received 0 Likes
on
0 Posts
Raptor RP100 install tips for 03
-Truck still has the original firewall LP and is working fine. However we end up many thousands of miles from home and with 80K miles I decided to replace it. I have bought the Raptor RP100 for 03-04.5 and had it shipped to Northern CA where my truck awaits me until mid Sept.
-Where I will be doing the install has limited tools and no internet.
-I am stupid. I had thought the new pump just installed where the original was and I would use the original fuel line. After looking at pictures of madhat�s (02?) and than looking at the online instructions from Glacier I realized that I really was na�ve. It also appears that there are some differences between the different years.
-Instructions say you don�t have to drop the tank but getting to the top of the tank looks imposible for big fat dumb people (also I have fender liners and a topper). Post number 5 by papaduck in one of the links below says you can splice into the old line but I would rather go to the top of the tank if it can be done without dropping it.
-What do you do with the old fuel line, just leave it?
-Thread sealer . Is Teflon tape ok or is there something better?
-Does anybody have a good picture or diagram of the quick connect on top of the tank or is it just like the new one that should be with my new pump?
-I figure if MikeyB could do it in four hours (older post), it should only take me a week.
-Pictures by madhat in one of these threads.
https://www.dieseltruckresource.com/...ing+raptor+150
https://www.dieseltruckresource.com/...ing+raptor+150
-Any extra tips, suggestions would be appreciated. Also fuel pressure guage idea�s for morons?
 08-28-2010, 12:15 PM
#2
Registered User
First off hope this helps you!
Well IMO you would be better bypassing the stock setup altogether. Mounting place is really your choice but i tend to like to go further back towards the tank. Under the driver seat along the frame is ideal. The pump should be plug and play with the stock fuel pump connection. I did leave my line but plugged it in the event I just MAY need it again one day (if the pump comes back on, mine was fine like yours but who knows). The quick connects are simple enough but yes its fun getting your hands in there to (1) unplug the stock lines and (2) get the new line in. Relieving some tension on the tank straps may give you that extra inch to get it. You may find yourself dropping the tank altogether.
I used teflon tape with no problems but i made sure to not let any overhang , as a matter of fact I put it on the last set of threads.
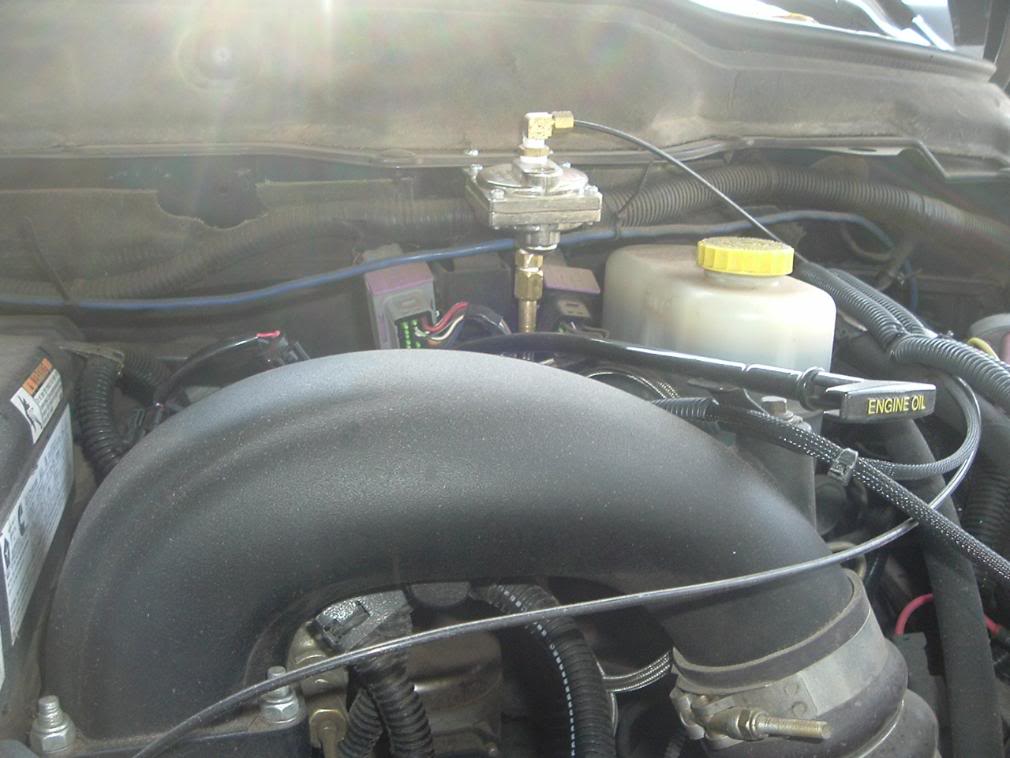
On the fuel pressure gauge, its rather simple. get you a good isolator from diesel manor with the stainless kit. I have mine mounted right above the master cylinder with the incoming line coming from the line off the cp3. I pieced together my own fittings for the line off the cp3. Then run your line to the inside and your good.
Well IMO you would be better bypassing the stock setup altogether. Mounting place is really your choice but i tend to like to go further back towards the tank. Under the driver seat along the frame is ideal. The pump should be plug and play with the stock fuel pump connection. I did leave my line but plugged it in the event I just MAY need it again one day (if the pump comes back on, mine was fine like yours but who knows). The quick connects are simple enough but yes its fun getting your hands in there to (1) unplug the stock lines and (2) get the new line in. Relieving some tension on the tank straps may give you that extra inch to get it. You may find yourself dropping the tank altogether.
I used teflon tape with no problems but i made sure to not let any overhang , as a matter of fact I put it on the last set of threads.
On the fuel pressure gauge, its rather simple. get you a good isolator from diesel manor with the stainless kit. I have mine mounted right above the master cylinder with the incoming line coming from the line off the cp3. I pieced together my own fittings for the line off the cp3. Then run your line to the inside and your good.
08-28-2010, 01:19 PM
#3
Administrator/Jarhead
The Raptor is just the fuel pump, no filtration. This means that you need some filtration, either a separate filter, or use the stock location.
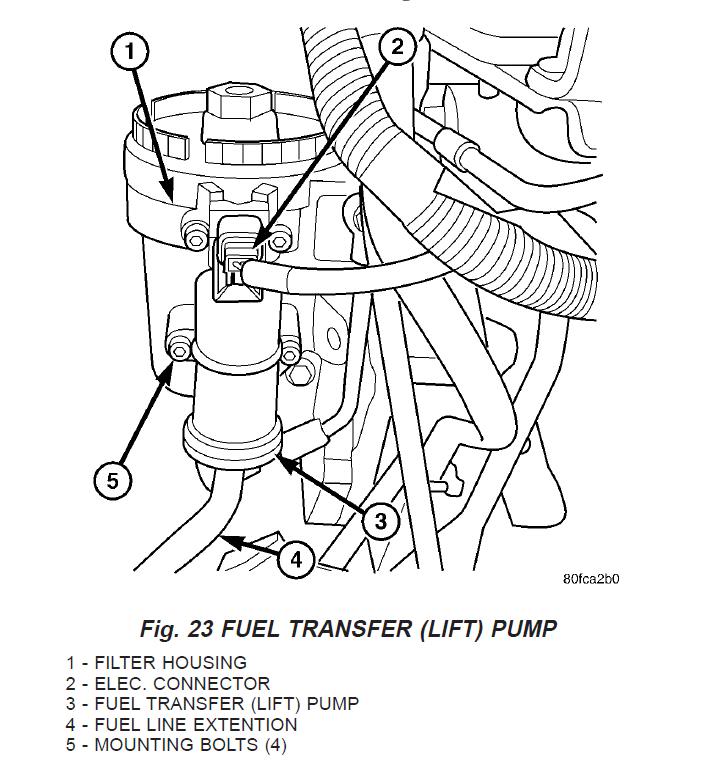
The stock fuel pump is on the back of the canister, as you know. There are two bolts on the back of the canister that hold it on. The Raptor kit has an adapter that goes in place of the pump. This has the hookup for the fuel line. It is a barb fitting, so the line just pushes on.
For the barb fittings, get a heat gun and warm the hose up, and spray a little wd-40 or some other lube on the interior of the hose or the exterior of the barb. You can use hot water too (did that one time) and some Vaseline. Just don't go crazy.
For the tank connection, just remove the stock fuel line, install the adapter, and put the new line on.

For the stock fuel lines, I just trimmed the one going to the canister back to the first stock holder, I don't remember what I did with the one at the tank.
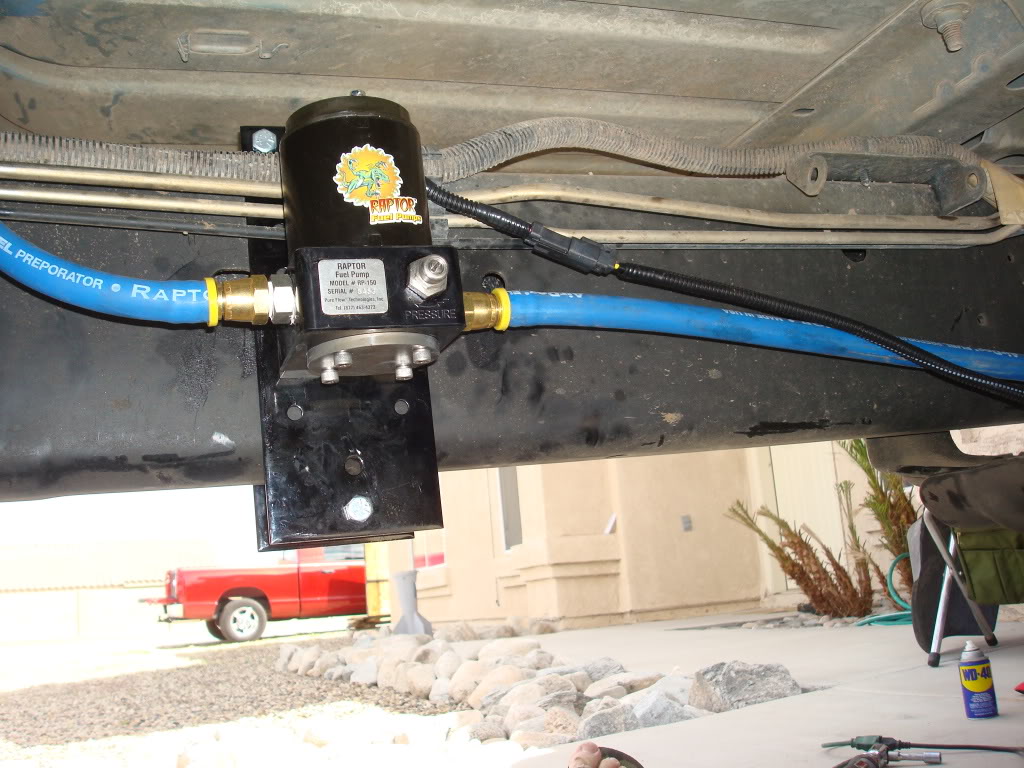
I ran the hose through the bed frame, just make sure there are no sharp edges for it to rub against. I also used zip ties to tie it to the stock lines that were already against the frame rail.

The power cord off the stock pump is used, and you will run some wires up to the battery. Make sure you have some wire crimp fittings so you can shorten the wires and get rid of the extra under the hood.
Make DANG GOOD AND SURE they sent you the wiring harness and kit for the OEM pump being in the canister location.
Taking the driver side wheel well liner out makes things easier.
Fuel Gauge: Gonna have to get a 'T' for the line. I do not recommend the filter lid type.
I used regular teflon, but it is a heavier grade.
It took me an hour and a half, taking breaks to drink beer and teach someone else how to do it.
Did I miss anything?
The stock fuel pump is on the back of the canister, as you know. There are two bolts on the back of the canister that hold it on. The Raptor kit has an adapter that goes in place of the pump. This has the hookup for the fuel line. It is a barb fitting, so the line just pushes on.
For the barb fittings, get a heat gun and warm the hose up, and spray a little wd-40 or some other lube on the interior of the hose or the exterior of the barb. You can use hot water too (did that one time) and some Vaseline. Just don't go crazy.
For the tank connection, just remove the stock fuel line, install the adapter, and put the new line on.
For the stock fuel lines, I just trimmed the one going to the canister back to the first stock holder, I don't remember what I did with the one at the tank.
I ran the hose through the bed frame, just make sure there are no sharp edges for it to rub against. I also used zip ties to tie it to the stock lines that were already against the frame rail.
The power cord off the stock pump is used, and you will run some wires up to the battery. Make sure you have some wire crimp fittings so you can shorten the wires and get rid of the extra under the hood.
Make DANG GOOD AND SURE they sent you the wiring harness and kit for the OEM pump being in the canister location.
Taking the driver side wheel well liner out makes things easier.
Fuel Gauge: Gonna have to get a 'T' for the line. I do not recommend the filter lid type.
I used regular teflon, but it is a heavier grade.
It took me an hour and a half, taking breaks to drink beer and teach someone else how to do it.
Did I miss anything?
08-28-2010, 05:39 PM
#4
DTR's Volcano Monitor, Toilet Smuggler, Taser tester, Meteorite enumerator, Quill counter, Match hoarder, Panic Dance Choreographer, Bet losing shrew murderer
Thread Starter
Join Date: May 2007
Location: Kenai Alaska
Posts: 965
Likes: 0
Received 0 Likes
on
0 Posts
Guys, thanks for the info and pictures. I am starting to feel a little better about it. A picture in the online instructions (with the bed off) sort of shows how to use pliers to release the quick connect.
Supposodly, the 03 kit has an adapter so I can use the stock fuel filter.
Going back to the DTR store and Glacier to look at guages and fittings.
Thanks again. Guess the reason I am nervous about this is having to do it so far from home so your input is really helpful.
Supposodly, the 03 kit has an adapter so I can use the stock fuel filter.
Going back to the DTR store and Glacier to look at guages and fittings.
Thanks again. Guess the reason I am nervous about this is having to do it so far from home so your input is really helpful.
08-28-2010, 05:46 PM
#5
Administrator/Jarhead
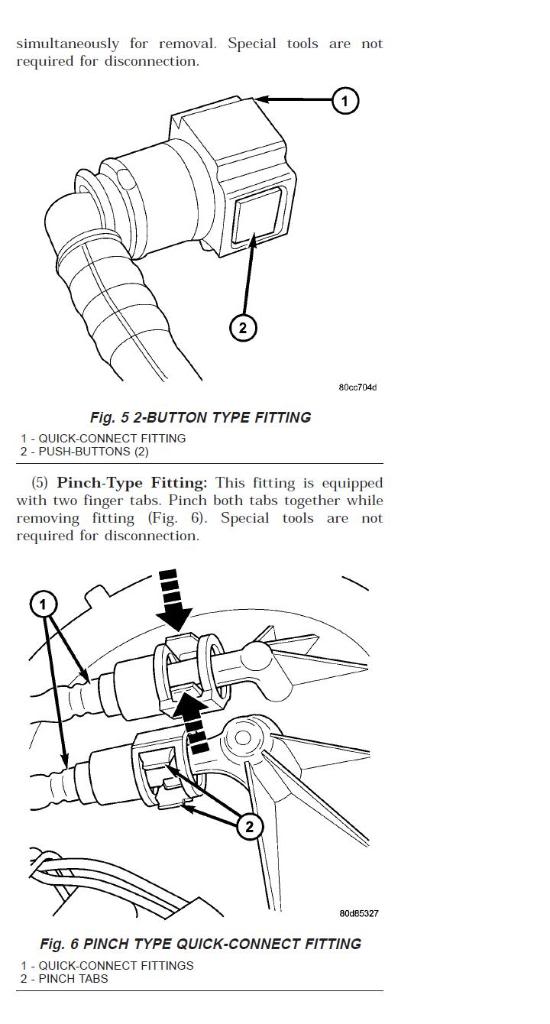
You can take the fitting off with your fingers, and push the new one on. Hang on, I think I have a picture.
Bark, I promise, it is easy cheesy. If you can turn a wrench and ratchet, look at pictures and match them up, and follow arrows, you can do it.
Bark, I promise, it is easy cheesy. If you can turn a wrench and ratchet, look at pictures and match them up, and follow arrows, you can do it.
08-28-2010, 06:12 PM
#6
Administrator/Jarhead
Ok, here we go. I don't have any pics of the top of a stock canister, I don't think I had a camera back then...
Stock canister with the pump... I lied, there are 4 bolts...
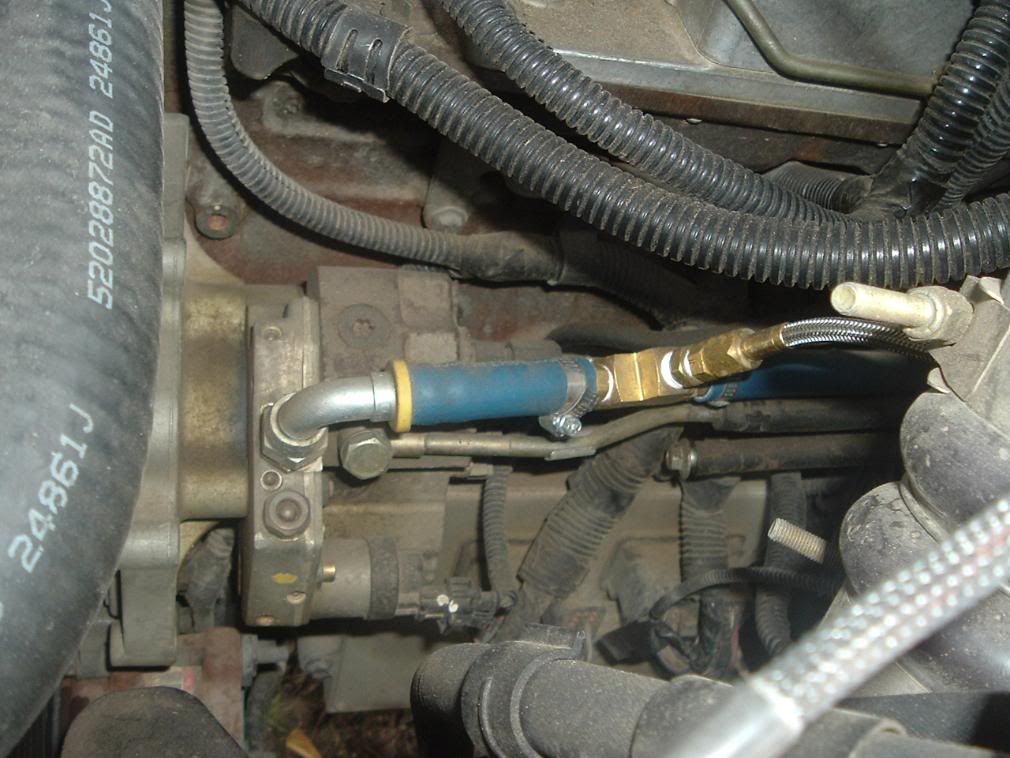
Top of the tank...
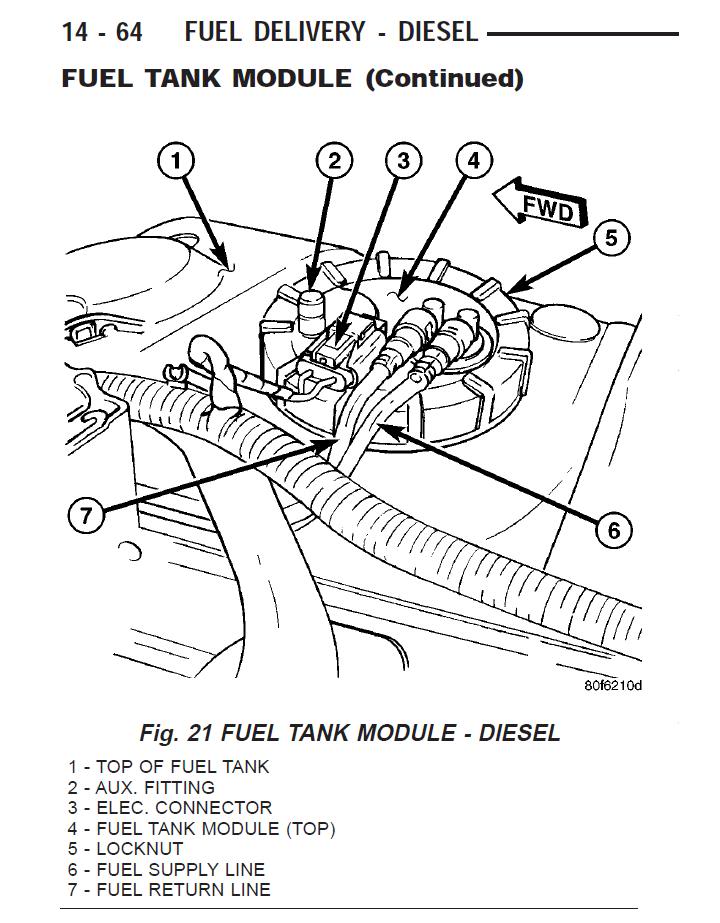
I think this is the fitting, but it might be the bottom pic. Either way, very easy. It's going to be the fitting toward the back of the truck.

Stock canister with the pump... I lied, there are 4 bolts...
Top of the tank...
I think this is the fitting, but it might be the bottom pic. Either way, very easy. It's going to be the fitting toward the back of the truck.
08-28-2010, 06:45 PM
#7
DTR's Volcano Monitor, Toilet Smuggler, Taser tester, Meteorite enumerator, Quill counter, Match hoarder, Panic Dance Choreographer, Bet losing shrew murderer
Thread Starter
Join Date: May 2007
Location: Kenai Alaska
Posts: 965
Likes: 0
Received 0 Likes
on
0 Posts
Cool! That was what I was looking for. Thought I was going to have to get pliers in there (from the pic in the instructions) but now that I know what the tabs look like I should be able to get it. Thanks again! 17 more days and I get to see my truck (if the squirrels, spiders, birds and rats haven’t taken it over again).
Trending Topics
08-28-2010, 11:34 PM
#9
DTR's Volcano Monitor, Toilet Smuggler, Taser tester, Meteorite enumerator, Quill counter, Match hoarder, Panic Dance Choreographer, Bet losing shrew murderer
Thread Starter
Join Date: May 2007
Location: Kenai Alaska
Posts: 965
Likes: 0
Received 0 Likes
on
0 Posts
08-28-2010, 11:50 PM
#10
Administrator/Jarhead
Where did you say you were going in Cali? Come on down, man. Make a weekend of it. We'll have a beer or two and fix you right up. Feed and house you, too.
Just looked at your profile... Thought you were a lot younger... my age-ish.. ...
...
Just looked at your profile... Thought you were a lot younger... my age-ish..
...
08-29-2010, 03:49 AM
#11
Registered User

Join Date: Mar 2003
Location: NW Arkansas
Posts: 783
Likes: 0
Received 0 Likes
on
0 Posts
You have been given some very good instructions. The only thing I will add is use Yellow teflon tape for petrolium and leave the tape off of the first 1 or 2 threads.
08-29-2010, 10:56 AM
#12
Administrator/Jarhead
I just can't find that stuff around here... I have some white stuff that I think is close, thicker and not as 'sticky'...
Good point.
Good point.
08-29-2010, 06:47 PM
#15
DTR's Volcano Monitor, Toilet Smuggler, Taser tester, Meteorite enumerator, Quill counter, Match hoarder, Panic Dance Choreographer, Bet losing shrew murderer
Thread Starter
Join Date: May 2007
Location: Kenai Alaska
Posts: 965
Likes: 0
Received 0 Likes
on
0 Posts
 .
.