
Adjusting Valves...Is This The Right Way? [Pics]
 06-20-2007, 12:37 AM
#1
Registered User
Thread Starter

Join Date: May 2007
Location: Dallas, TX
Posts: 936
Likes: 0
Received 0 Likes
on
0 Posts
Adjusting Valves...Is This The Right Way? [Pics]
Is this how you do it???
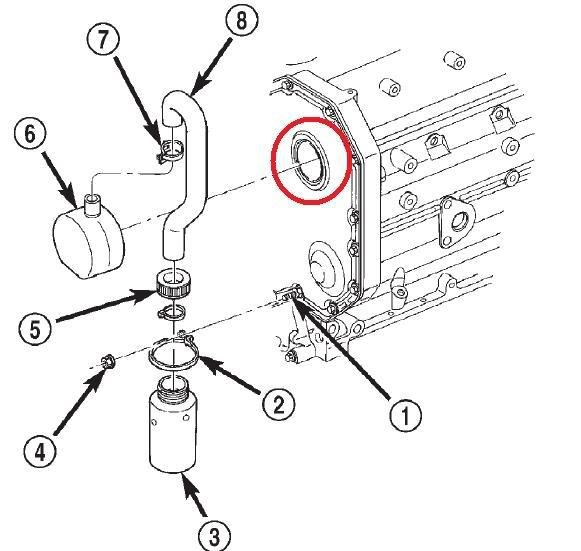
1. Remove the valve cover and gasket.
2. Twist off the crank case breather (6) with oil filter wrench (circled in red in the first pic)
3. Turn alternator counter clockwise until it shows Top Dead Center
4. Adjust intake valves 1, 2, 4 to 0.010 (long rocker is exhaust, short is intake)
5. Adjust exhaust valves 1, 3, 5 to 0.020 (long rocker is exhaust, short is intake)
6. Turn alternator counter clockwise until it shows in the 6 o clock position.
7. Adjust intake valves 3, 5, 6 to 0.010 (long rocker is exhaust, short is intake)
8. Adjust intake valves 2, 4, 6 to 0.020 (long rocker is exhaust, short is intake)
9. Tighten jam nuts to 18 ft lbs while holding the adjustment nut.
10. Recheck all gaps.
11. Put all the crap back together
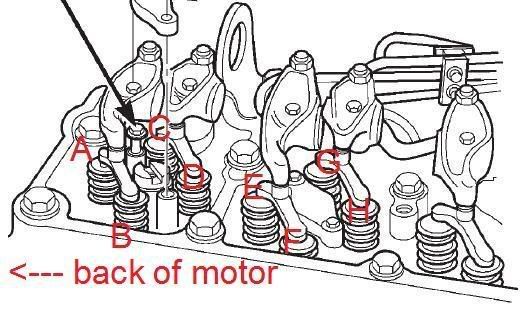
My question is... in the second pic which ones are the exhaust and which ones are the intake valves?
1. Remove the valve cover and gasket.
2. Twist off the crank case breather (6) with oil filter wrench (circled in red in the first pic)
3. Turn alternator counter clockwise until it shows Top Dead Center
4. Adjust intake valves 1, 2, 4 to 0.010 (long rocker is exhaust, short is intake)
5. Adjust exhaust valves 1, 3, 5 to 0.020 (long rocker is exhaust, short is intake)
6. Turn alternator counter clockwise until it shows in the 6 o clock position.
7. Adjust intake valves 3, 5, 6 to 0.010 (long rocker is exhaust, short is intake)
8. Adjust intake valves 2, 4, 6 to 0.020 (long rocker is exhaust, short is intake)
9. Tighten jam nuts to 18 ft lbs while holding the adjustment nut.
10. Recheck all gaps.
11. Put all the crap back together
My question is... in the second pic which ones are the exhaust and which ones are the intake valves?
 06-20-2007, 01:01 AM
#3
Registered User
Thread Starter
Join Date: May 2007
Location: Dallas, TX
Posts: 936
Likes: 0
Received 0 Likes
on
0 Posts
if the very left of that picture if the front of the motor....what would letter A and the rest of them be? intake or exhaust?
A = [Intake or Exhaust?]
B = [Intake or Exhaust?]
C = [Intake or Exhaust?]
D = [Intake or Exhaust?]
E = [Intake or Exhaust?]
F = [Intake or Exhaust?]
G = [Intake or Exhaust?]
H = [Intake or Exhaust?]
Sorry im a noob. I just want to make sure I have everything in order.
I also read something about if you didnt have the barring tool (which i dont cause its on backorder from snapon) then you have to do it backwards???
06-20-2007, 01:25 AM
#4
Registered User
Join Date: Oct 2006
Location: Okotoks AB
Posts: 3,142
Likes: 0
Received 0 Likes
on
0 Posts
no thats second pic is backwards.........Front of Motor is to the RIGHT.
The rocker arms are on the driverside of the head beside the injection lines. Bridges are on the passengerside
I just finished doing Headstuds in my engine........so I've just been staring at the motor with the valve cover off for the last 3 hours. The image is still pretty fresh
The rocker arms are on the driverside of the head beside the injection lines. Bridges are on the passengerside
I just finished doing Headstuds in my engine........so I've just been staring at the motor with the valve cover off for the last 3 hours. The image is still pretty fresh
06-20-2007, 02:26 AM
#6
Registered User
The short rockers are intake, the long ones exhaust.
You will see with the mark on 12 o clock that on the cylinders 2 and 4 the valves are open (the rocker is tilted) and you can't adjust them.

HTH
AlpineRAM
You will see with the mark on 12 o clock that on the cylinders 2 and 4 the valves are open (the rocker is tilted) and you can't adjust them.
HTH
AlpineRAM
Trending Topics
06-20-2007, 02:40 AM
#8
Registered User
You will notice that the valvest that you can adjust as per service manual will have some lash if you are on the point (eg 12 o clock on the marker in+ex 1 in 2 etc) and the others will be lifted a bit. (The rocker isn't even like on the valves you want to adjust)
Take care to insert the feeler gauge in the places I marked for you- it won't fit in anywhere else unless you take the whole stuff apart.
I didn't use the corrected pic so the arrow "front of motor" is the wrong way around.
Oopsie sorry on the picture part- one of our data warehouses had a direct lightning strike so my webspaces ain't accessible for the moment...
For removing the valve cover I prefer to separate the gasket from the cover before I do the valve cover tango to slip it out. The gasket rests on the head and doesn't get damaged. Then I lift the gasket out and put it away for cleaning I do also clean the gasket surface on the head with an outward motion. Perhaps I'm overdoing it but I try to keep the sand and crud out of my engine while working on it

HTH
AlpineRAM
06-20-2007, 08:07 AM
#9
Registered User

Join Date: Mar 2007
Location: Fort Worth, Texas
Posts: 299
Likes: 0
Received 0 Likes
on
0 Posts
Is this how you do it???
1. Remove the valve cover and gasket.
2. Twist off the crank case breather (6) with oil filter wrench (circled in red in the first pic)
3. Turn alternator counter clockwise until it shows Top Dead Center
4. Adjust intake valves 1, 2, 4 to 0.010
5. Adjust exhaust valves 1, 3, 5 to 0.020
6. Turn alternator counter clockwise until it shows in the 6 o clock position.
7. Adjust intake valves 3, 5, 6 to 0.010
8. Adjust intake valves 2, 4, 6 to 0.020
9. Put all the crap back together
06-21-2007, 04:02 PM
#11
Registered User
Join Date: Mar 2007
Location: Fort Worth, Texas
Posts: 299
Likes: 0
Received 0 Likes
on
0 Posts
Just adjusted mine this morning. One thing I noticed.. You must take valve cover bolts all the way out or you can't get the cover off. The bolts hanging down inside will catch on the rocker arms and won't let you slide it out. And to get the back bolt out, you must also remove the little rubber washer. Other than that, it went very well. I learned a couple of tricks doing it. One is that you can leave it a bit loose and then when you torque the jam jut to 18 ft. lbs, it gets just right. If not, loosen it slightly, twist the adjuster and then torque it again. I have a stepped feeler guage, so I could set it for go/no-go with the step being .002 thicker than the end. After playing with the valves a bit, I didn't need the Allen wrench any more. I was setting them with only my fingers and the torque wrench.

Thread
Thread Starter
Forum
Replies
Last Post
redramnc
12 Valve Engine and Drivetrain
7
04-18-2006 06:16 AM