
How to Adjust Your Valves
 03-26-2007, 06:48 PM
#1
Registered User
Thread Starter
How to Adjust Your Valves
Ok. I had some time on my hands and decided to adjust my valves. Then I thought I would help those newbies who dont know and try to make it easy for them. I hope I help those of you who are a little scared to start. Read carefully and have at it. Also be safe and be responsible.
Approx. time: Took me 1-1/2 hours from start to finish (including taking pics.)
Interval: Every 36,000 Miles
Shopping List:
6 valve cover gasket sets (I used Felpro VS50396 R)
Engine degreaser (I used Purple Power from Walmart)
Your favorite candy bar
The bag that comes with your purchase
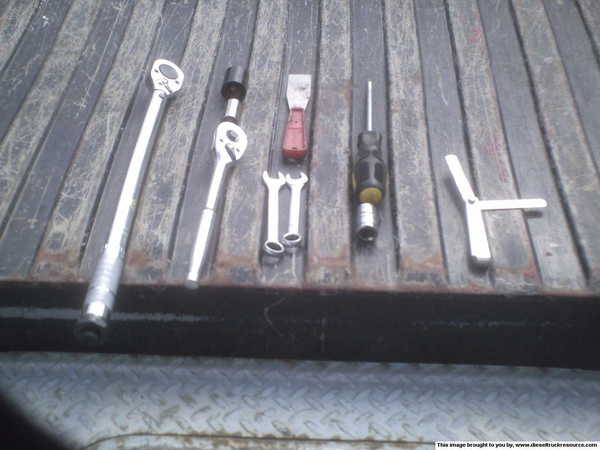
Tools Needed:
Sockets: 7/8", 9/16", 15mm
1/2" drive Ratchet
1/2" Drive Torque Wrench (I used a clickable type)
Wrenches: 13mm, 14mm
Flat Blade Screw driver
Feeler Gauges: .010" (.25mm), .020" (.50mm)
Putty Knife
Saftey First! Make sure your truck has cooled down completely. I let my truck sit 1-1/2 to 2 hours before attempting this.
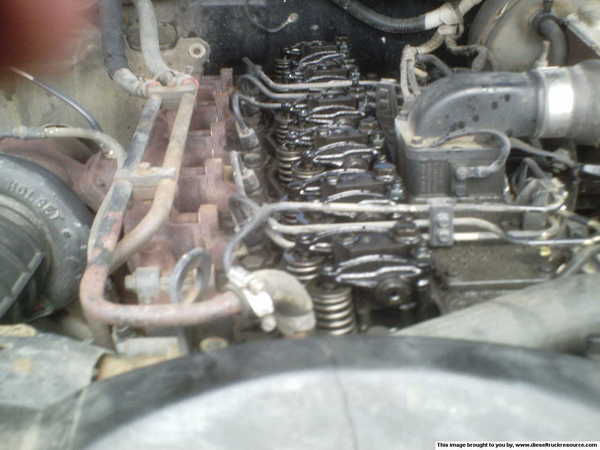
Ok First take off your (what I call it) valve cover dressing plate using a 13mm wrench. Your truck should look like this before:

And after:

Now you should have 2 rubber washers kind of smashed between the metal one on the front and back cover. Gently twist them off like you are taking off a bolt. Now go ahead and take the bolts out and take the covers off the valves. I took the bolts and covers off one by one and put the bolt inside the cover and put them in the bed. I also lined them up so they each went back on the same set of valves.
Now take your ratchet with the 7/8" socket and put it on the alternator pulley nut. Turn it COUNTER-CLOCKWISE, or to the left. Locate either the TDC for piston #1 or #6 by watching the rockers move. This is called "companion cylinder method". When you have TDC for cylinder for #6 it should look like this:

And #1 should look like this at the same time:

You can hardly see it but both valve rockers are touching the valves.
Now you take your .010" feeler gauge and check INTAKE valves #3, 5, and 6. They should slip in there with SOME resistance. Now what if it just slips in with no resistance? Now you need to adjust it.
Take your torque wrench and put on the 9/16" socket or a 14mm (couldn't find mine). Make sure it is not a impact type otherwise it will have too thick of a wall. Gently, but firmly, loosen the lock nut on the adjustment screw. Put a 14mm wrench on the nut and use the screw driver to tighten push the rocker arm up a little. KEEPING the screw driver on the screw, tighten the nut with the wrench. Should look something like this (make sure your hand is on the wrench!):

Now once that is adjusted right, Tighten it with your torque wrench to 18ft pounds:

Now precede to do the same to the exhaust valve numbers 2, 4, and 6 but with .020" of clearance.
Check all the valves you just did and make sure you didn't forget to tighten any of them.
Now using your ratchet with the 7/8" socket, turn the engine counter-clockwise until the valves on #6 cylinder are both touching and the exhaust valve is pushed a little. When I say a little, just enough till you see it move.
Ok now with the .010" feeler, check intake numbers: 1, 2, and 4. And with the .020" feeler, exhaust numbers: 1, 3, and 5. Adjust as necessary. Again check all the locknuts to make sure you didn't forget anyone.
Here is what bgilbert had to say:
Here is what dpuckett had to say:
Ok now we just probably spent a hour doing this. Now it is time to put everything back together.
Approx. time: Took me 1-1/2 hours from start to finish (including taking pics.)
Interval: Every 36,000 Miles
Shopping List:
6 valve cover gasket sets (I used Felpro VS50396 R)
Engine degreaser (I used Purple Power from Walmart)
Your favorite candy bar
The bag that comes with your purchase
Tools Needed:
Sockets: 7/8", 9/16", 15mm
1/2" drive Ratchet
1/2" Drive Torque Wrench (I used a clickable type)
Wrenches: 13mm, 14mm
Flat Blade Screw driver
Feeler Gauges: .010" (.25mm), .020" (.50mm)
Putty Knife
Saftey First! Make sure your truck has cooled down completely. I let my truck sit 1-1/2 to 2 hours before attempting this.
Ok First take off your (what I call it) valve cover dressing plate using a 13mm wrench. Your truck should look like this before:
And after:
Now you should have 2 rubber washers kind of smashed between the metal one on the front and back cover. Gently twist them off like you are taking off a bolt. Now go ahead and take the bolts out and take the covers off the valves. I took the bolts and covers off one by one and put the bolt inside the cover and put them in the bed. I also lined them up so they each went back on the same set of valves.
Now take your ratchet with the 7/8" socket and put it on the alternator pulley nut. Turn it COUNTER-CLOCKWISE, or to the left. Locate either the TDC for piston #1 or #6 by watching the rockers move. This is called "companion cylinder method". When you have TDC for cylinder for #6 it should look like this:
And #1 should look like this at the same time:
You can hardly see it but both valve rockers are touching the valves.
Now you take your .010" feeler gauge and check INTAKE valves #3, 5, and 6. They should slip in there with SOME resistance. Now what if it just slips in with no resistance? Now you need to adjust it.
Take your torque wrench and put on the 9/16" socket or a 14mm (couldn't find mine). Make sure it is not a impact type otherwise it will have too thick of a wall. Gently, but firmly, loosen the lock nut on the adjustment screw. Put a 14mm wrench on the nut and use the screw driver to tighten push the rocker arm up a little. KEEPING the screw driver on the screw, tighten the nut with the wrench. Should look something like this (make sure your hand is on the wrench!):
Now once that is adjusted right, Tighten it with your torque wrench to 18ft pounds:
Now precede to do the same to the exhaust valve numbers 2, 4, and 6 but with .020" of clearance.
Check all the valves you just did and make sure you didn't forget to tighten any of them.
Now using your ratchet with the 7/8" socket, turn the engine counter-clockwise until the valves on #6 cylinder are both touching and the exhaust valve is pushed a little. When I say a little, just enough till you see it move.
Ok now with the .010" feeler, check intake numbers: 1, 2, and 4. And with the .020" feeler, exhaust numbers: 1, 3, and 5. Adjust as necessary. Again check all the locknuts to make sure you didn't forget anyone.
Here is what bgilbert had to say:
Kind of tough to keep the adjustment screw from moving when using the torque wrench? I just get them 'tight' with the 14mm wrench while holding the adjustment screw with the screwdriver. Even then I have a hard time keeping the screw from moving on me.
I agree with Bill. Even when holding the screwdriver, the clearance has a tendency to loosen up while tightening up the jambnut. I just get it tight enough to to hold but not strip.
Also, to get the SAME clearance on all valves, I put some downward pressure on the adjusting screw as I hold it with the screwdriver, makes sure everything is pressed down where it should be.
Also, to get the SAME clearance on all valves, I put some downward pressure on the adjusting screw as I hold it with the screwdriver, makes sure everything is pressed down where it should be.
 03-26-2007, 06:50 PM
#2
Registered User
Thread Starter
Ok, we just adjusted our valves. Now we get to put it back together. Take off the old gaskets and put them in the bag you got with your purchases. I cleaned each of the valve covers with Purple Power, a cleaning solvent from Wally World. I sprayed each valve ONE AT A TIME, rinse it and the dried it with a clean shop towel. USE GLOVES AND EYE PROTECTION! It says it will burn but don�t take any chances. Here is the before pic:

And the after pic:

Now take the gaskets that you bought and put them on. Each gasket should have come with a little O-Ring. Take the old o-ring off the bolt and put the new one on. Here is what they should look like:

Now put each of the valve covers back on starting at the back and work your way forward. Use your putty knife to push any lunk out of the way. Torque them to 18ft pounds. Now clean your dressing plate. Before you put that on, put the washers back on the studs. Now put your plate on and tighten the nuts down snuggly.
Now start the truck and check for oil leaks. If nothing happens, good for you! If you are leaking oil, check to make sure you put the gasket on.
Once everything runs right, take that candy bar and eat it knowing you just prolonged the life of your truck and helped preserve the First Gens.
Sorry the pics are a little blurry. I used my sisters camera for the first time. Had to get used to it first.
Yours truly,
Jon
And the after pic:
Now take the gaskets that you bought and put them on. Each gasket should have come with a little O-Ring. Take the old o-ring off the bolt and put the new one on. Here is what they should look like:
Now put each of the valve covers back on starting at the back and work your way forward. Use your putty knife to push any lunk out of the way. Torque them to 18ft pounds. Now clean your dressing plate. Before you put that on, put the washers back on the studs. Now put your plate on and tighten the nuts down snuggly.
Now start the truck and check for oil leaks. If nothing happens, good for you! If you are leaking oil, check to make sure you put the gasket on.
Once everything runs right, take that candy bar and eat it knowing you just prolonged the life of your truck and helped preserve the First Gens.
Sorry the pics are a little blurry. I used my sisters camera for the first time. Had to get used to it first.
Yours truly,
Jon

 03-26-2007, 11:28 PM
#7
Registered User

Kind of tough to keep the adjustment screw from moving when using the torque wrench? I just get them 'tight' with the 14mm wrench while holding the adjustment screw with the screwdriver. Even then I have a hard time keeping the screw from moving on me.
Trending Topics
 03-27-2007, 12:17 AM
#9
Registered User
That, Sir, is a post you can be proud of. I add my support for it becoming a sticky. I used two feeler gauges marked (I)ntake and (E)xhaust but otherwise same. Oh and I didn't need to change gaskets but likely will next time. This is now on my "Annual Maintenance" list as it was a major improvement on my engine. I hate to think how long it had been left, over three years with me I know ...  ...thanks again!
...thanks again!
03-27-2007, 10:01 AM
#10
Banned

Join Date: Jan 2004
Location: Cape Girardeau MO
Posts: 1,205
Likes: 0
Received 0 Likes
on
0 Posts
Great write up. I second the motion to sticky it.
I agree with Bill. Even when holding the screwdriver, the clearance has a tendency to loosen up while tightening up the jambnut. I just get it tight enough to to hold but not strip.
Also, to get the SAME clearance on all valves, I put some downward pressure on the adjusting screw as I hold it with the screwdriver, makes sure everything is pressed down where it should be.
Where'd you get the black gaskets? All of mine have been grey the last 5 years or so.
Daniel
03-27-2007, 12:10 PM
#11
Registered User
Thread Starter
Gasket Number is: Felpro VS50396 R
I just tighten the jambnut securley with the wrench then tighten a little more with the torque wrench. It did not change the setting at all.
I changed my gaskets because they were leaking and needed to be replaced.
Gonna add the gasket #'s later.
Jon
I just tighten the jambnut securley with the wrench then tighten a little more with the torque wrench. It did not change the setting at all.
I changed my gaskets because they were leaking and needed to be replaced.
Gonna add the gasket #'s later.
Jon
03-27-2007, 03:00 PM
#12
Registered User
Thread Starter
Ok. I added gasket numbers, interval, and quoted Bill and Daniel. Hope this helps all of you guys!
Gotta remember to bookmark this for future reference. I have some-timers disease!
Gotta remember to bookmark this for future reference. I have some-timers disease!
03-28-2007, 04:06 PM
#13
Adminstrator-ess
Nice work, Jon!  It's going in the sticky.
A couple things I'll add: The Fel-Pro gaskets suck. Get the gray Cummins ones and you'll never need to replace them.
Don't worry about torquing the lock nuts. It's frustrating enough to keep the clearance right without a socket covering the adjusting screw, no need to add to it.
It's going in the sticky.A couple things I'll add: The Fel-Pro gaskets suck. Get the gray Cummins ones and you'll never need to replace them.
Don't worry about torquing the lock nuts. It's frustrating enough to keep the clearance right without a socket covering the adjusting screw, no need to add to it.
