When you click on links to various merchants on this site and make a purchase, this can result in this site earning a commission. Affiliate programs and affiliations include, but are not limited to, the eBay Partner Network.
1st Gen. Ram - All TopicsDiscussion for all Dodge Rams prior to 1994. This includes engine, drivetrain and non-drivetrain discussions. Anything prior to 1994 should go in here.
Got the DAP 5x.012 injectors buttoned up and test drove it. Truck runs Sooooooo much better!
Seems to idle smoother, doesn't surge or stutter at high RPMs just before shifting and not sure how to explain it but the stock injectors made the engine almost sound like a Powerstroke. It was very "springy" sounding.
Made some progress on the Ramcharger the past few days.
Dropped the engine in, installed the clutch, and bolted up the trans.
I found out the hard way that the bare flywheel is all you can have attached to the back of engine when you drop it into place. Life is also much easier if you have a clutch pilot tool
Test-fit some 2ndgen parts for the exhaust. Looks promising.
I put the clear cap on mine, which allows me to see in there when stuff gets inside without actually removing the plug. Kind of cool to leaves and whirly birds flying about on a windy day...
Had they had the black ring with clear cap, I wanted to do the same thing. They only had white ring clear cap. That's a no go.
My ring only came white as well. I used plastic spray paint and painted it black...
Shhhhhh !
Don't tell anyone
I ordered a ring for Sno-ball and accidentally selected white instead of the black I wanted.....guess it will be getting some plastic spray paint as well.
that pics not so big! that is one mighty clean looking interior you have there, looks well maintained and the gauge pod is sitting pretty! Good luck with your cleanup and bed liner task!
I used the troubleshooting procedure in the FSM but everything checked out wiring wise so I decided to try fixing the module itself. First I broke the case to pieces getting it out of the truck. Then I was checking various points on the board with my Triplett meter and I found that though I had 12v at the connector
It wasn't getting to the board itself. I inspected the connector and I found that one of the pins (6) was broken and another pin (4) was depressed. I couldn't fix the connector so I just cut the wires off one at a time and soldered them directly to the board. I enclosed the boart in a plastic bag and sealed it off with a tie-wrap. Now the intermittent wipers work fine.
Here's a link to a great write-up on fixing the intermittent wiper system. It's for an earlier Dodge Van but the system is similar. Chrysler Intermittent (Delay) Wiper Fix
A few days ago I replaced the windshield wiper bushing at the motor and figured I'd be good to go... Until the rain storm we just had in California. Half way to work the passenger side stopped moving and loud banging noise commenced inside the cowl.
Today I took it all apart and figured out a few problems that need correcting.
Wondering why the passenger side bushing which I did not replace suddenly broke was easy. Trying to turn the wiper shaft by hand once I had it on the bench proved to be very hard. I'm 39, 6,5", 240 and work construction so when I say it was hard to move the wiper shaft I mean it was super hard! After wire brushing the crud off the assembly I gently pried the small washer up at the base and dripped some oil into the shaft area and after working it back and forth for a while I actually got it to the point where I could hold it in one hand and rotate 360 degrees with my pinky of the other hand. The Drivers side wasn't as bad but it got the oil treatment also. In addition on the bottom side of the mounting flange I drilled a very small hole in the housing to get extra oil inside the unit, being pot metal it was easy to drill and feel when thru and the bit hit the much harder wiper shaft.
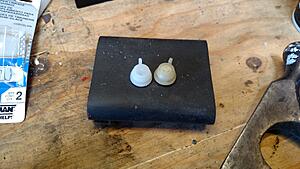
With both wiper shaft assemblies cleaned and lubricated I then made the next discovery. The bushing that come in the Dorman Help multi wiper linkage package are not the same as the ones in the Dorman Help 49440 package. They are not only different colors but the ball sockets never seemed to "pop" into the bushing like they do with the 49440 bushing. In fact you could easily remove them after using channel locks to press them together. When the ball socket is forced into a 49440 bushing it is a very solid fit.
So after freeing up the wiper shafts, fitting the proper bushing with a little white lithium grease inside and reinstalling the wipers move effortlessly and Low speed is faster than what High used to be!
Both bushing in this picture are New, both are Help brand but the white one on the left is the 49440 bushing and the one you want.
I had to go to 4 stores to find 6 of the Dorman 49440 bushings for my truck. One popped off while I was working on the intermittent module. I also put a dollop of lithium grease in each one since Dorman didn't have any lube in them. The last time I bought any of these was from a Dodge dealer and they came pre-lubed.
Today I fixed my park brake. A while back I had a malfunction where the little bolt broke that holds the brake arm. Had to scab it back together with out park brake while I found parts. Found the new bolts, springs washers, and little sleeve at quad 4x4. Put it all back together with new brake cables. Then did the annual fluid change on diff's, tcase and trans. Also installed the fast cooler trans coolers on the rag. Had to shave some off the fins to clear the bolts that hold the rag to the bell housing.
Put new door gaskets on and changed out the driveshaft carrier bearing.
Borrowed a giant 3 jaw gear puller that I found collecting dust in the fab shop I work at. Bearing came off easy-peasy. Used a 12" long piece of 1-1/2" schedule 40 pipe and a hammer to seat the new one. Worked like a charm.

 01-15-2017, 06:11 PM