W250 frame off restoration
 01-23-2020, 07:28 AM
#1
Registered User
Thread Starter
English W250 frame off restoration
I've been posting this project on the cummins forum for about a year now, I've only just recently started looking around this site and like the content so thought I'd make an account and share my project here too.
I know that a lot of people use both forums so may have already seen this but hopefully there is someone who enjoys what I'm doing and hasn't seen it yet.
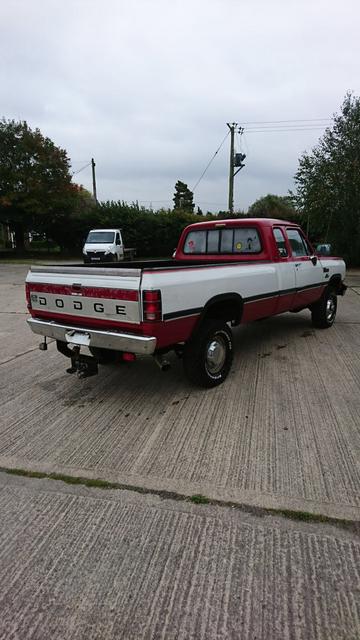
I�d wanted a 4wd first gen Cummins for quite a while but living in the UK I�d accepted I�d never own one.
We have a few American trucks over here, most are � ton gas trucks. There�s a few 2nd, 3rd and 4th gen Cummins and any older diesels are usually Fords. The only first gen dodges I�ve ever seen over here are D250, D350 diesels or W150 gas.
By complete chance I found my perfect spec W250 parked up in a timber yard only about 10 miles from my house in September 2017.
I went to talk to the guy and he told me it wasn�t for sale but was happy to show me it and talk for hours, it was a 92 Texas truck, 1 US owner and then he imported it back in 2003 I think. He ran it as his daily up until 2014 when it was getting a bit tired. He replaced it with a 2006 Chevy Duramax and planned on restoring the first gen one day but he was on with a few other projects, 40�s hot rod and 49 Chevy I think.
I left him my number if he ever changed his mind, left and forgot about it.
Just 3 weeks later he called me and said he realised he�ll never get round to restoring it and wanted it to go to a good home so he�d sell it, so we did a deal.
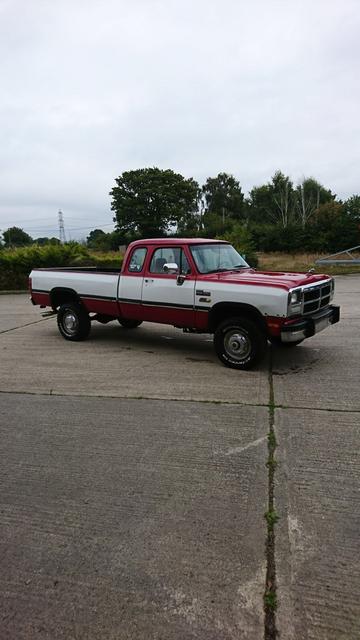
Cleaned up quite nice.

I know that a lot of people use both forums so may have already seen this but hopefully there is someone who enjoys what I'm doing and hasn't seen it yet.
I�d wanted a 4wd first gen Cummins for quite a while but living in the UK I�d accepted I�d never own one.
We have a few American trucks over here, most are � ton gas trucks. There�s a few 2nd, 3rd and 4th gen Cummins and any older diesels are usually Fords. The only first gen dodges I�ve ever seen over here are D250, D350 diesels or W150 gas.
By complete chance I found my perfect spec W250 parked up in a timber yard only about 10 miles from my house in September 2017.
I went to talk to the guy and he told me it wasn�t for sale but was happy to show me it and talk for hours, it was a 92 Texas truck, 1 US owner and then he imported it back in 2003 I think. He ran it as his daily up until 2014 when it was getting a bit tired. He replaced it with a 2006 Chevy Duramax and planned on restoring the first gen one day but he was on with a few other projects, 40�s hot rod and 49 Chevy I think.
I left him my number if he ever changed his mind, left and forgot about it.
Just 3 weeks later he called me and said he realised he�ll never get round to restoring it and wanted it to go to a good home so he�d sell it, so we did a deal.
Cleaned up quite nice.
 01-23-2020, 07:28 AM
#2
Registered User
Thread Starter
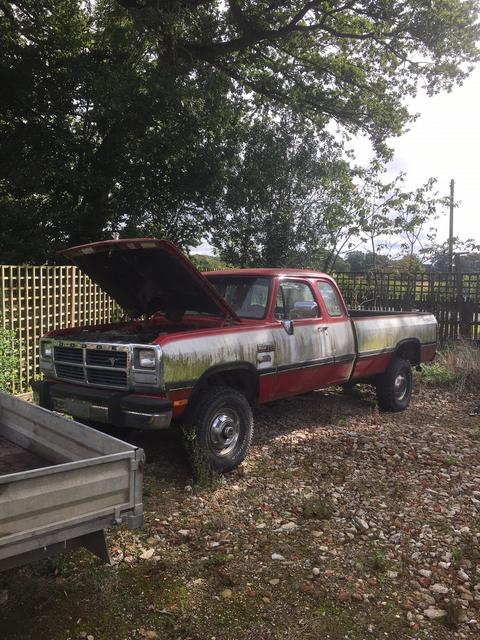
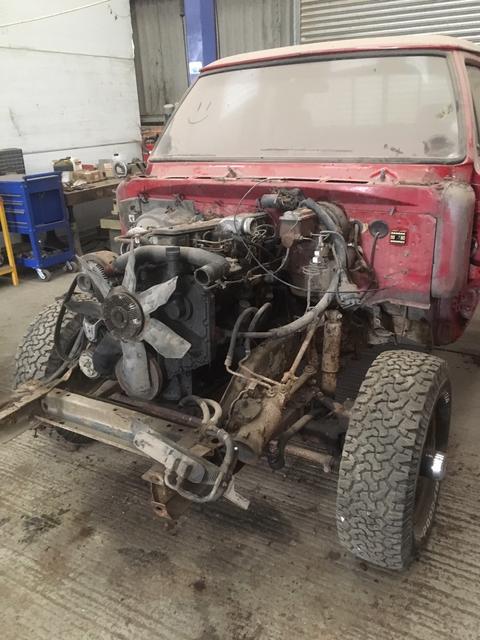
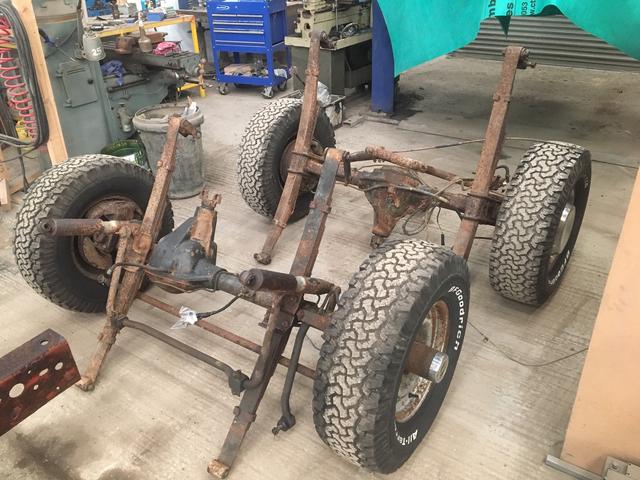
Condition wise it was ok for the year. Mileage read 260k if I recall but he said it stopped clocking up a while ago so will be considerably more.
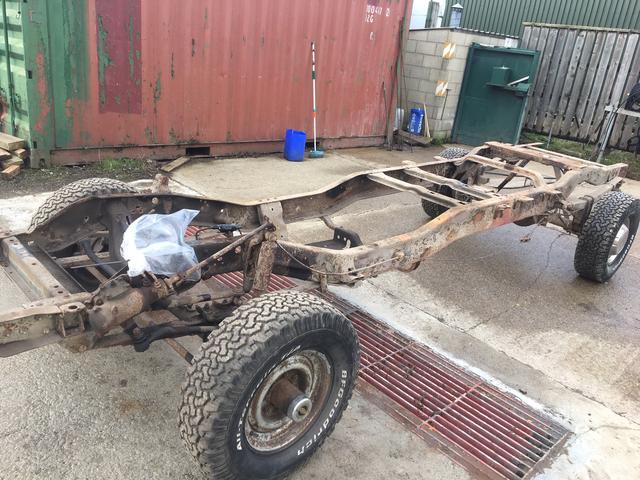
Frame was very rusty, but fairly solid and hopefully wouldn’t need any welding. It had been painted a few years before but must not have been prepped very well. The bed seemed ok but had some lacquer peel, the tailgate wasn’t good. The cab was the worst though, driver’s side inner and outer rockers were rotten and both foot wells. Roof was peeling/bubbling. Driver’s fender was rotten and passenger was dented. Both inner fenders weren’t good but I may be able to rescue them. Every bush and ball joint and half of the UJ’s on it were trash.
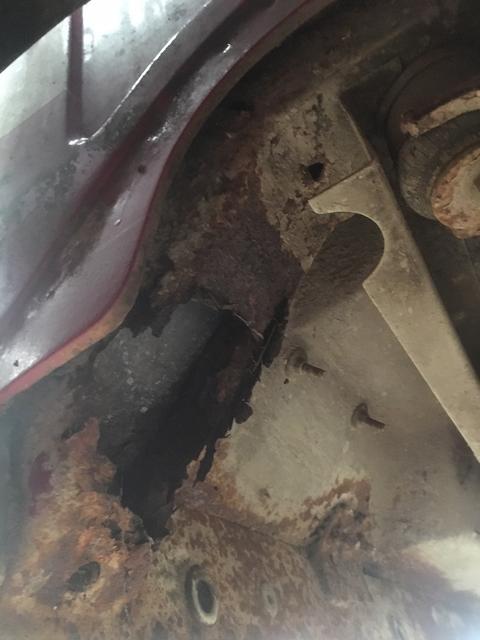
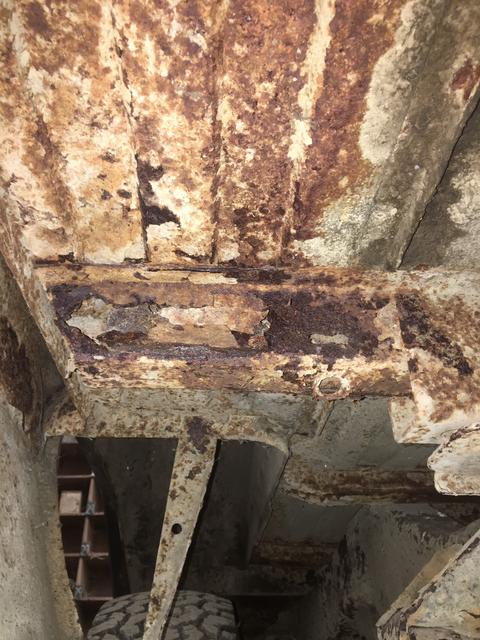
Frame was very rusty, but fairly solid and hopefully wouldn’t need any welding. It had been painted a few years before but must not have been prepped very well. The bed seemed ok but had some lacquer peel, the tailgate wasn’t good. The cab was the worst though, driver’s side inner and outer rockers were rotten and both foot wells. Roof was peeling/bubbling. Driver’s fender was rotten and passenger was dented. Both inner fenders weren’t good but I may be able to rescue them. Every bush and ball joint and half of the UJ’s on it were trash.
01-23-2020, 07:30 AM
#3
Registered User
Thread Starter
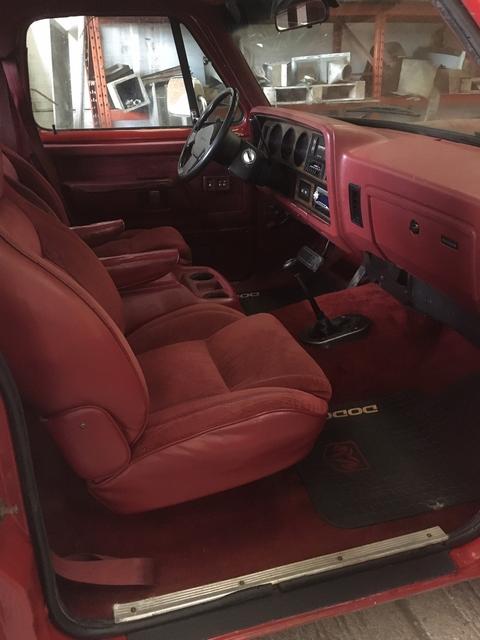
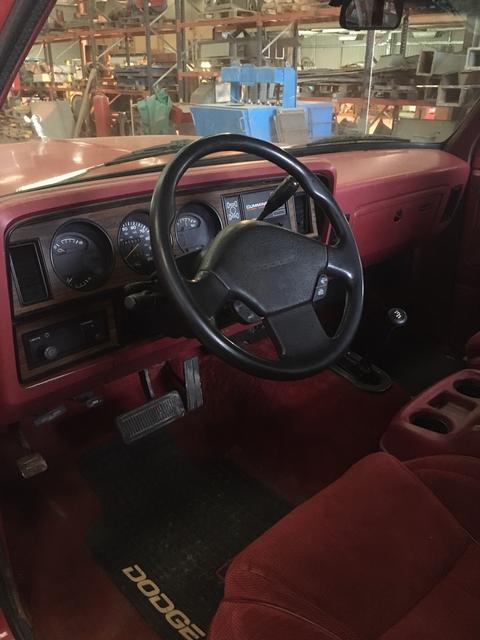
The plan with this truck was to make it tidy but not so nice that I wouldn’t want to drive it. I didn’t want to paint the full truck, only what needed it. I wanted it to be totally rust free and not have to worry about rust ever again with it, it’ll be an occasional driver when it’s done. I wanted it to look original but be lifted slightly with some decent sized mud tyres. I wanted a bit more power but had no plans to touch the transmission so I’d settle with intake, exhaust and mild pump work. He’d had the tranny rebuilt a few years ago but just with standard parts.
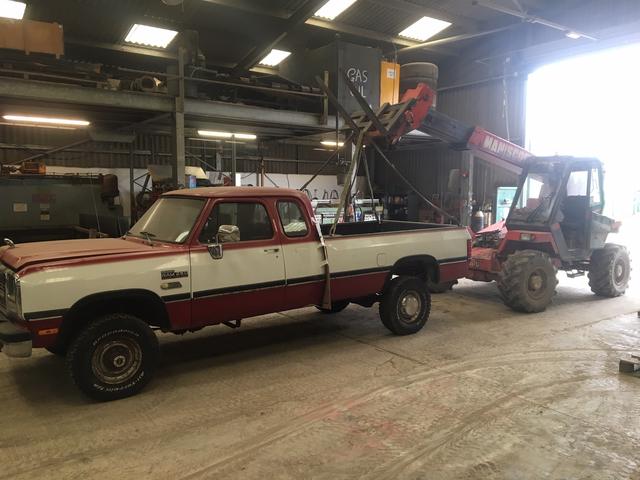
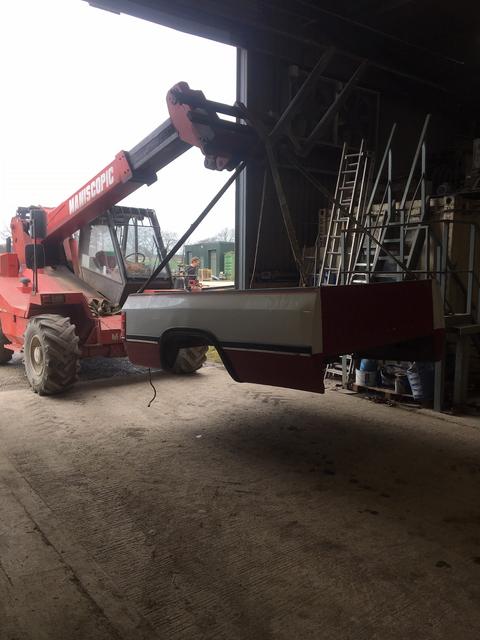
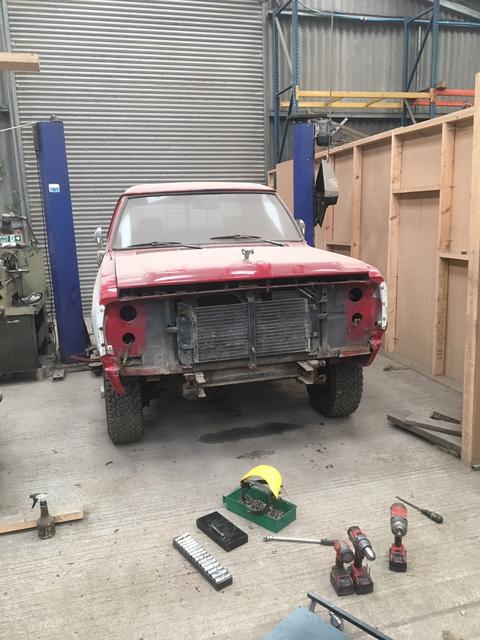
It sat for about a year before I got chance to touch it, first removing the bed and stripping the front end.

I then realised I better do some shopping.
I didn’t want waiting for parts to hold me up so without been very deep into the project and having never worked on anything like this before I had to figure out everything I was going need and order it all in one order before I needed it. I knew I wouldn’t account for everything but I tried my best. One upside was I wouldn’t have any issue with getting engine parts; 6BT’s were built over here and put into DAF 45’s in the 90’s so there’s loads of used parts about and new parts easily available off the shelf.
I ended up spending $4000 on parts online, then I bought some space in a container leaving Miami. So I shipped everything there and 6 weeks later everything arrived (apart from a few small items that were delivered late and missed the ship so will have to come in a later container)
Finding the best value items was important as I had an additional $2500 to pay in shipping and taxes once it all arrived over here.
This pile (minus 2 boxes that weren’t pictured) set me back $6500.
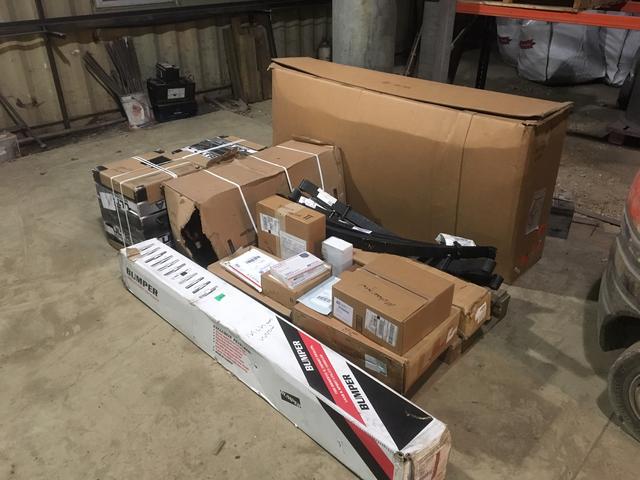
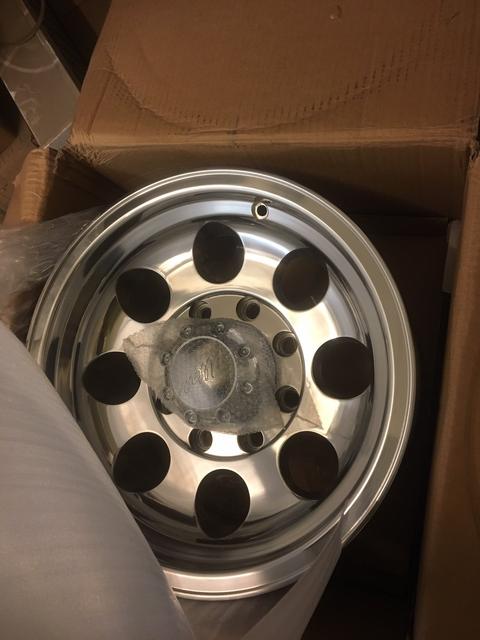
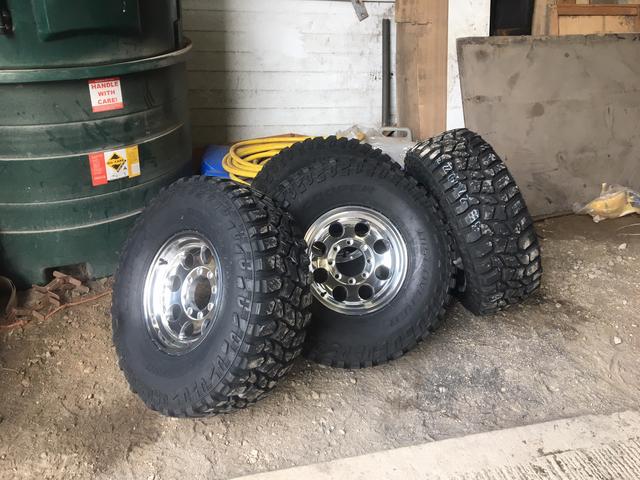
Instead of listing everything I bought I’ll just show things as I fit them, these are the wheels I ended up getting though. 16 x 8 polished Ultra’s with a -6 offset. Hopefully these will give me a fitment with the edge of tyre level with the edge of the fender, I’m wanting the tyres stuck out as much as possible without them protruding the body. This is illegal over here and I’ve been pulled over by the police once in the past for it and just got a warning but they can make you either change the wheels or fit fender flares which I don’t want to do.
It sat for about a year before I got chance to touch it, first removing the bed and stripping the front end.
I then realised I better do some shopping.
I didn’t want waiting for parts to hold me up so without been very deep into the project and having never worked on anything like this before I had to figure out everything I was going need and order it all in one order before I needed it. I knew I wouldn’t account for everything but I tried my best. One upside was I wouldn’t have any issue with getting engine parts; 6BT’s were built over here and put into DAF 45’s in the 90’s so there’s loads of used parts about and new parts easily available off the shelf.
I ended up spending $4000 on parts online, then I bought some space in a container leaving Miami. So I shipped everything there and 6 weeks later everything arrived (apart from a few small items that were delivered late and missed the ship so will have to come in a later container)
Finding the best value items was important as I had an additional $2500 to pay in shipping and taxes once it all arrived over here.
This pile (minus 2 boxes that weren’t pictured) set me back $6500.
Instead of listing everything I bought I’ll just show things as I fit them, these are the wheels I ended up getting though. 16 x 8 polished Ultra’s with a -6 offset. Hopefully these will give me a fitment with the edge of tyre level with the edge of the fender, I’m wanting the tyres stuck out as much as possible without them protruding the body. This is illegal over here and I’ve been pulled over by the police once in the past for it and just got a warning but they can make you either change the wheels or fit fender flares which I don’t want to do.
01-23-2020, 07:31 AM
#4
Registered User
Thread Starter
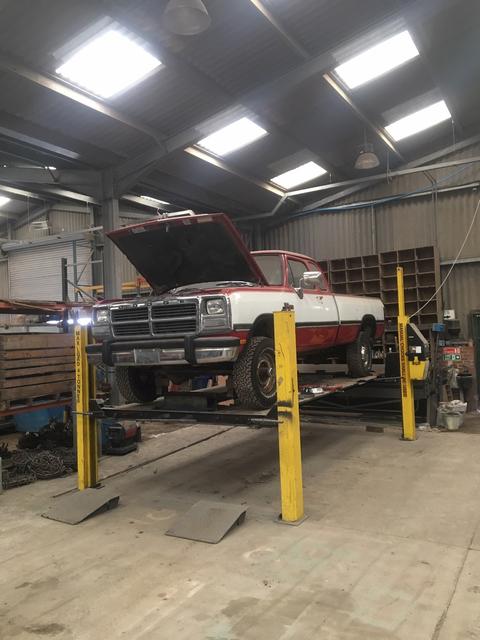
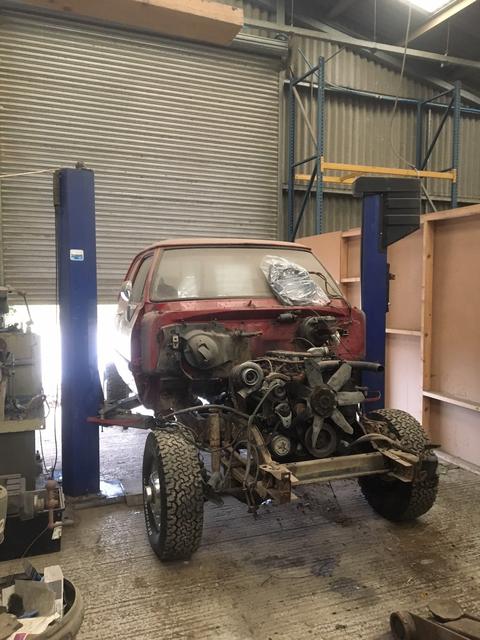
Next I lifted the cab off, at a later date I’ll be making a frame that the cab fixes to so it can be moved easily with a forklift and also mountable to a spit so the welding can be done better/easier
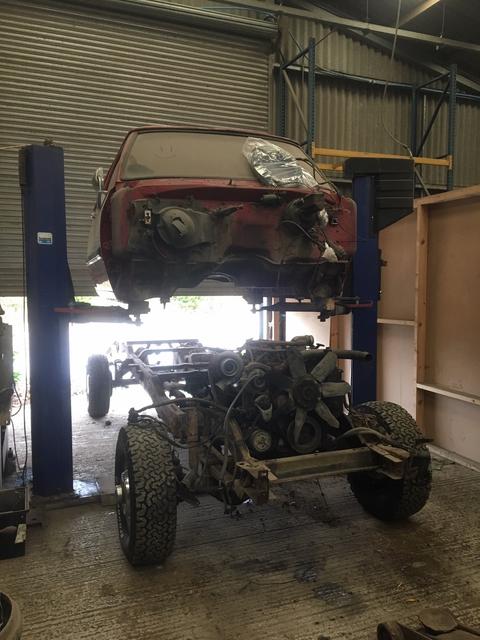
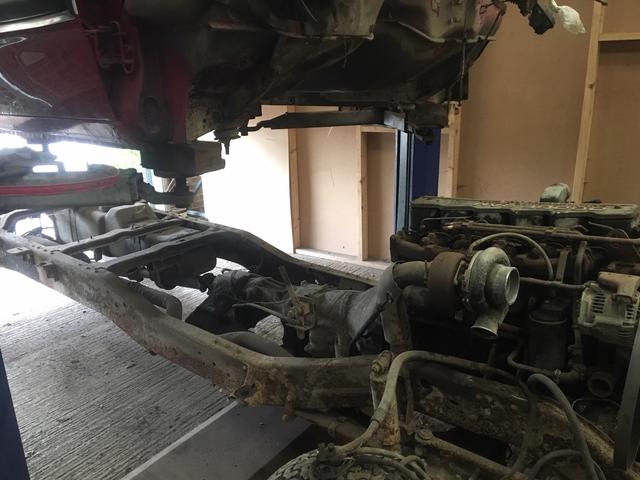
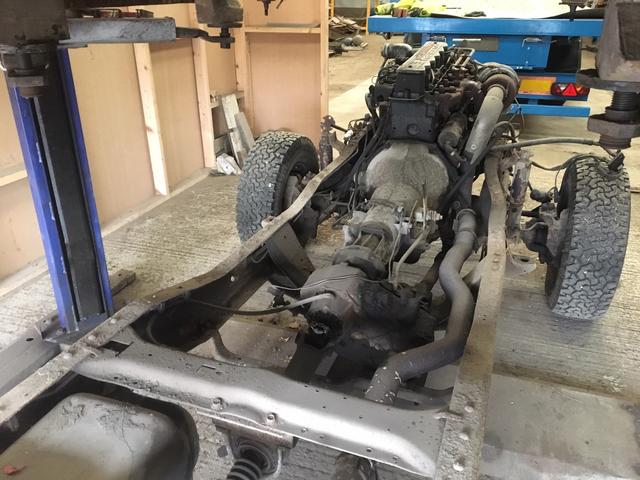
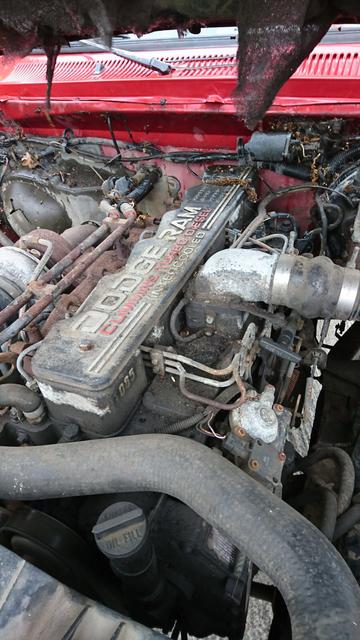
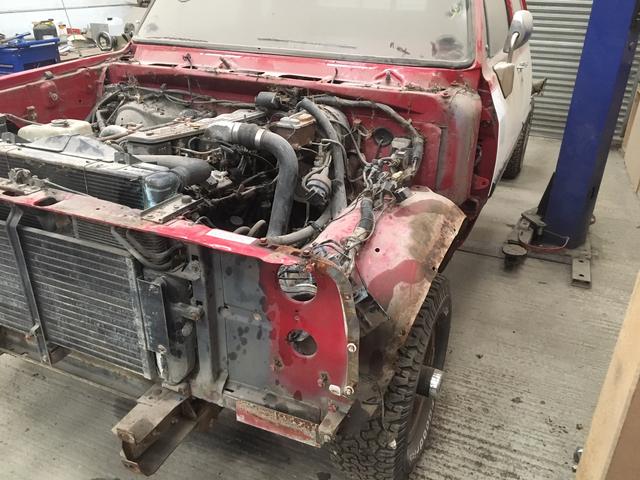
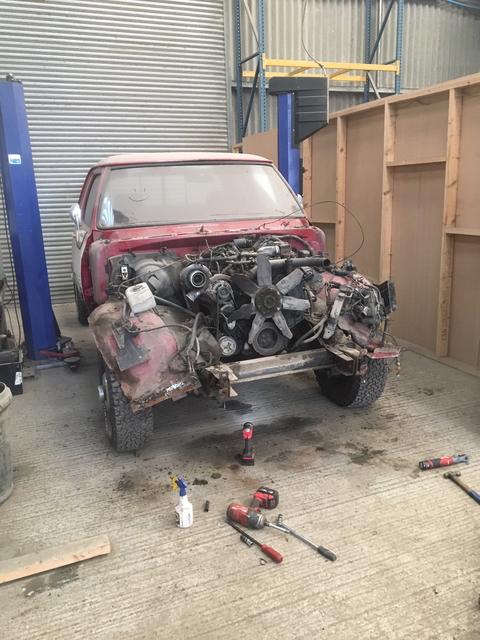
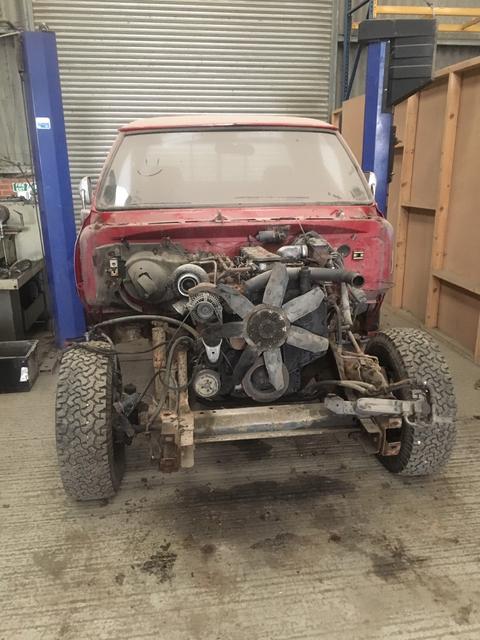
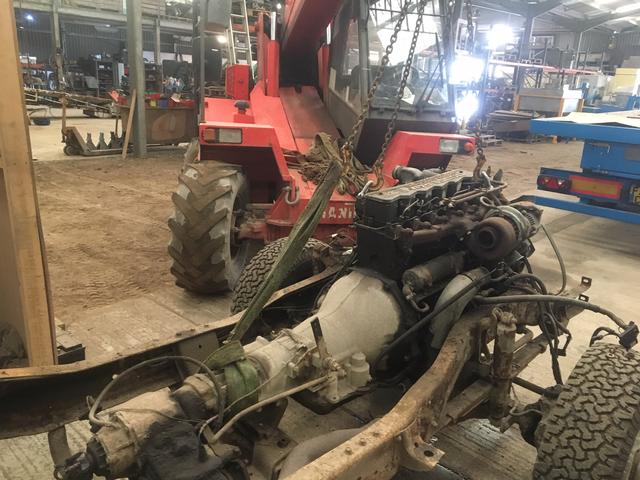
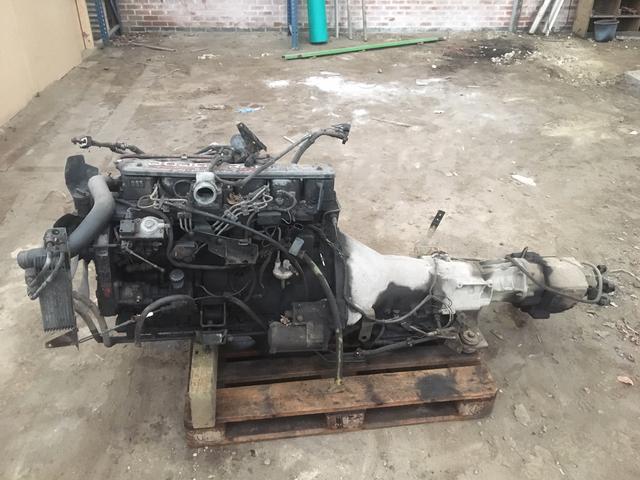
I pulled the engine, transmission and transfer box in one. I was really impressed with the condition of the turbo, I presume it’s original and taking the mileage into account it’s super tight. I’ve pulled a lot of turbo’s before and they always have some play or end float but this has nothing.
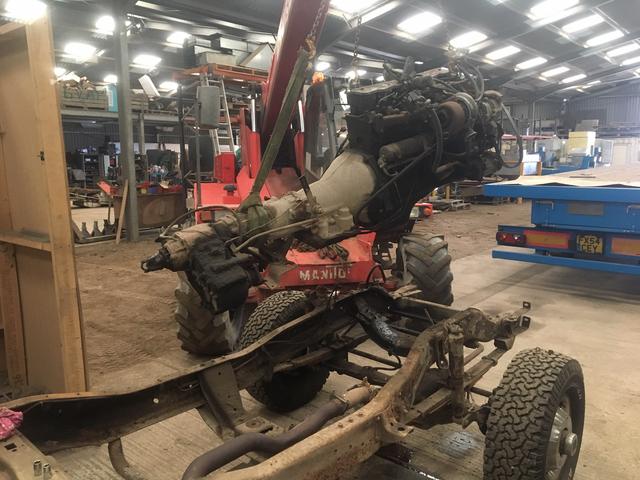
Next I dropped the tank, I was nervous as I knew if anywhere would need welding it would be inside the frame blocked by the tank. I think there must be a fault with the level float or the wiring as the gauge said an empty tank but think thing was heavy as! Felt half full! The frame was the worst behind the tank but still not too bad.

I pulled the engine, transmission and transfer box in one. I was really impressed with the condition of the turbo, I presume it’s original and taking the mileage into account it’s super tight. I’ve pulled a lot of turbo’s before and they always have some play or end float but this has nothing.
Next I dropped the tank, I was nervous as I knew if anywhere would need welding it would be inside the frame blocked by the tank. I think there must be a fault with the level float or the wiring as the gauge said an empty tank but think thing was heavy as! Felt half full! The frame was the worst behind the tank but still not too bad.
01-23-2020, 07:32 AM
#5
Registered User
Thread Starter
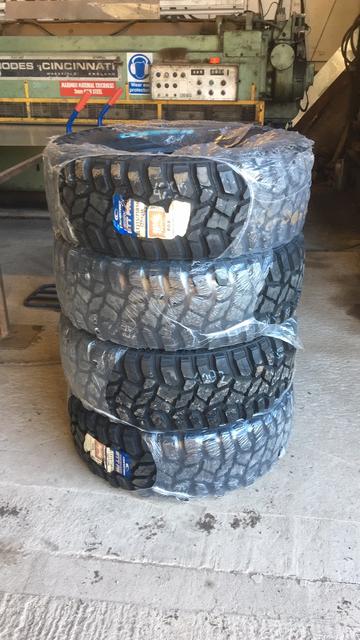
Although I should have been focusing on doing the dirty boring jobs I decided to order some tyres and get them mounted. I went for Cooper Discoverer STT Pro mud terrains – 315/75R16. These work out at 35 x 12.5. I chose these because I thought 35” was a good compromise and the Cooper’s were the cheapest of the reputable brands.

Doing shiny bits definitely motivates me to get the dirty jobs done.
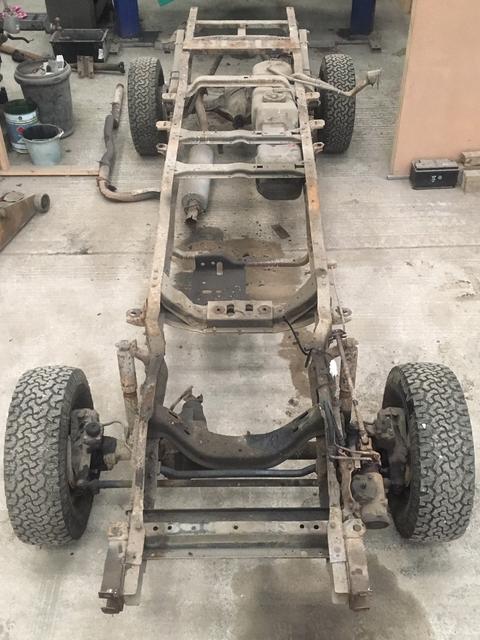
While the axles were still on I pulled the frame outside to wash it off, an hour and a half with the heat turned up on the pressure washer and a rotating nozzle cleaned everything up. I’ll give it another quick wash when it’s stripped bare.
That brings me up to date. I’ll probably next update when I’ve blasted the frame, I’ll be doing it outside so just need to wait for a day where it isn’t raining and the temperatures above freezing for getting some primer on it the same day. Might be a while as February in England it’s usually raining or snowing and if it isn’t then it’s too cold to be painting as none of our sheds are heated.
Doing shiny bits definitely motivates me to get the dirty jobs done.
While the axles were still on I pulled the frame outside to wash it off, an hour and a half with the heat turned up on the pressure washer and a rotating nozzle cleaned everything up. I’ll give it another quick wash when it’s stripped bare.
That brings me up to date. I’ll probably next update when I’ve blasted the frame, I’ll be doing it outside so just need to wait for a day where it isn’t raining and the temperatures above freezing for getting some primer on it the same day. Might be a while as February in England it’s usually raining or snowing and if it isn’t then it’s too cold to be painting as none of our sheds are heated.
The following users liked this post:
AndyB89 (07-18-2021)
01-23-2020, 07:33 AM
#6
Registered User
Thread Starter
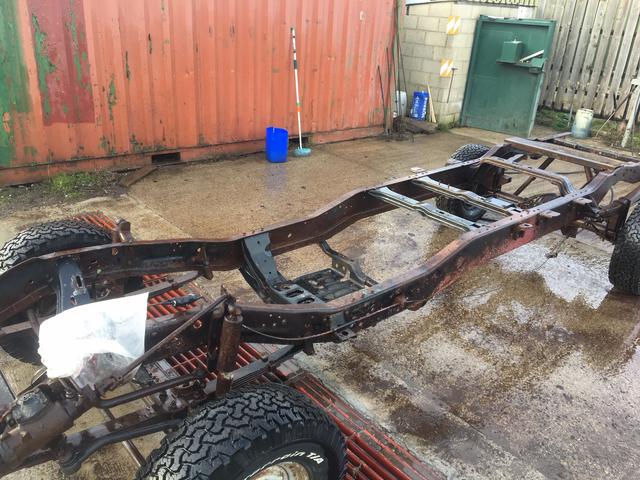
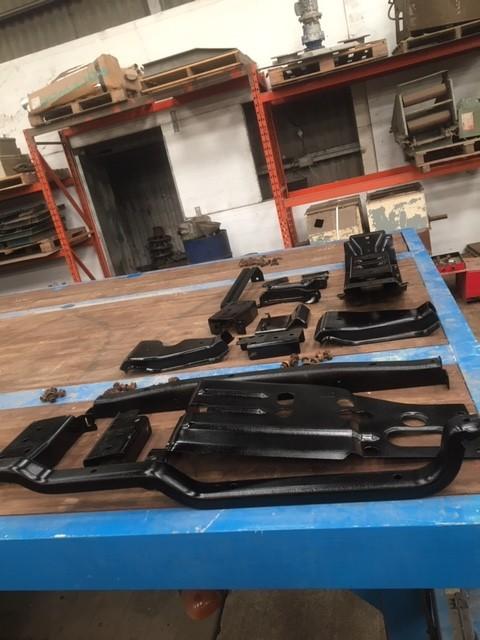
I got chance this morning to strip everything off the frame. There were a lot of pieces I didn't even realise were removable before I washed it off because there was so much dirt and rust covering up the nuts.
I went round with the wire wheel on the grinder cleaning all the threads up then oiled everything so nearly all the nuts came undone. The only 2 that snapped off were on a brake line bracket.
I did have to break the grinder and the slitting disc out for the front bolt on the front drivers side leaf spring as it was seized into the centre of the bush.
When I had it stripped bare I took it back outside, flipper it upside down and gave it all another good wash off.
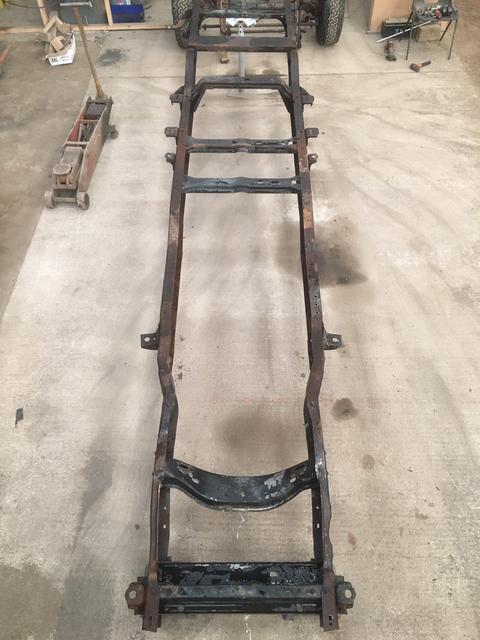
Next I'll burn the 2 front leaf spring bushes out of the frame then it'll be shot blasting time.
I went round with the wire wheel on the grinder cleaning all the threads up then oiled everything so nearly all the nuts came undone. The only 2 that snapped off were on a brake line bracket.
I did have to break the grinder and the slitting disc out for the front bolt on the front drivers side leaf spring as it was seized into the centre of the bush.
When I had it stripped bare I took it back outside, flipper it upside down and gave it all another good wash off.
Next I'll burn the 2 front leaf spring bushes out of the frame then it'll be shot blasting time.
01-23-2020, 07:35 AM
#7
Registered User
Thread Starter
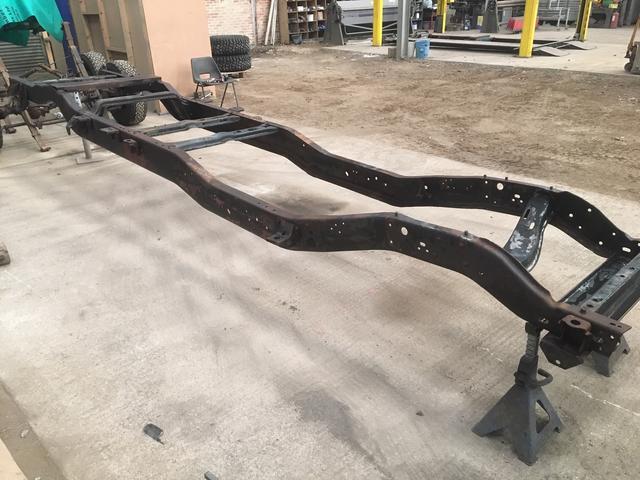
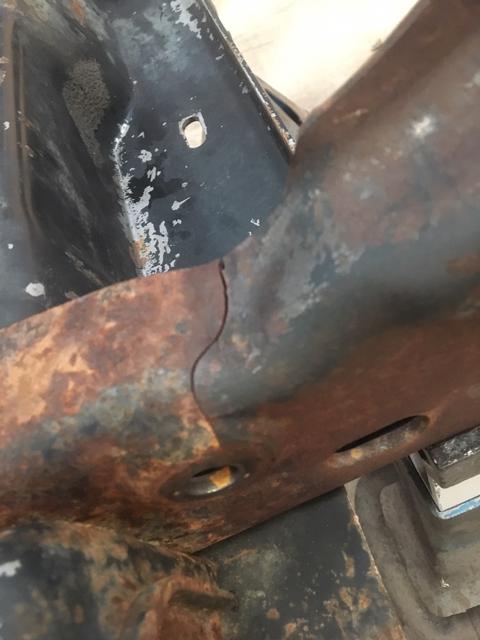
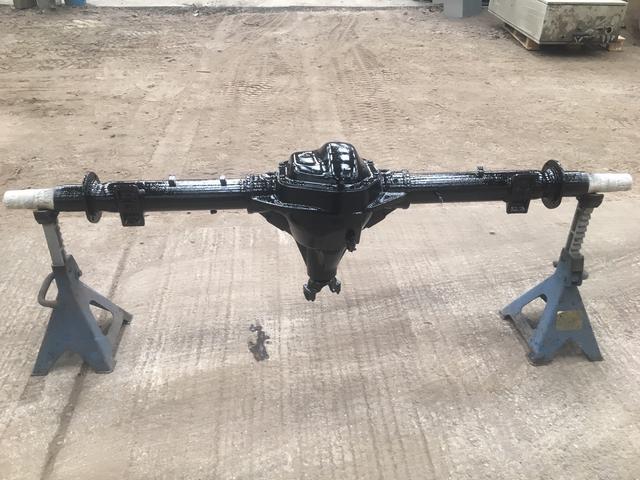
I found a good sized crack across the top of the frame next to where the steering box mounts, I'll weld this up and grind it back after blasting.
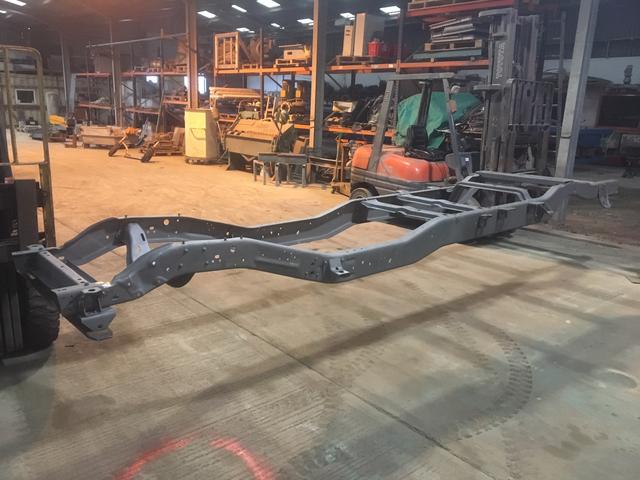
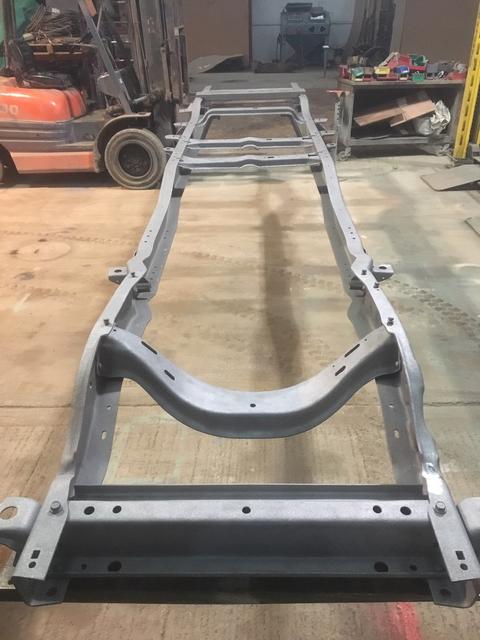
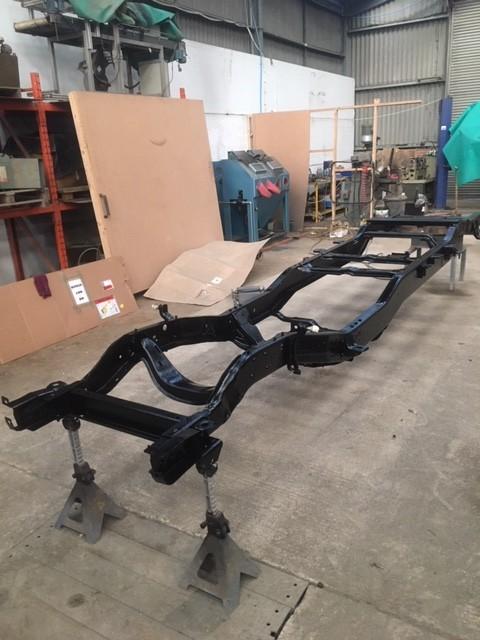
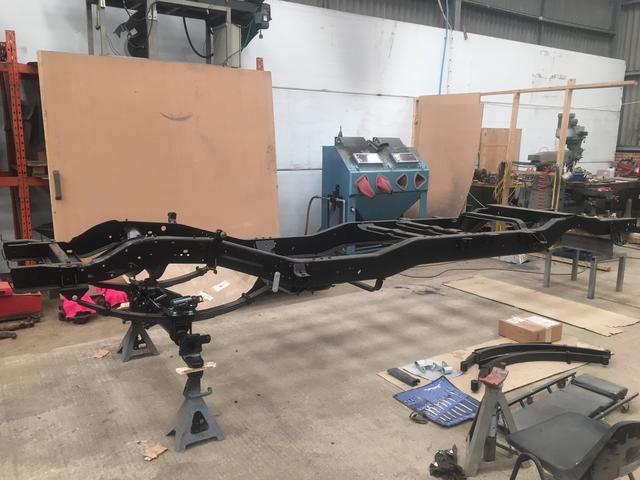
So after about 5.5 hours of blasting I was happy with how I'd got the frame to. What a s**t job shot blasting is.
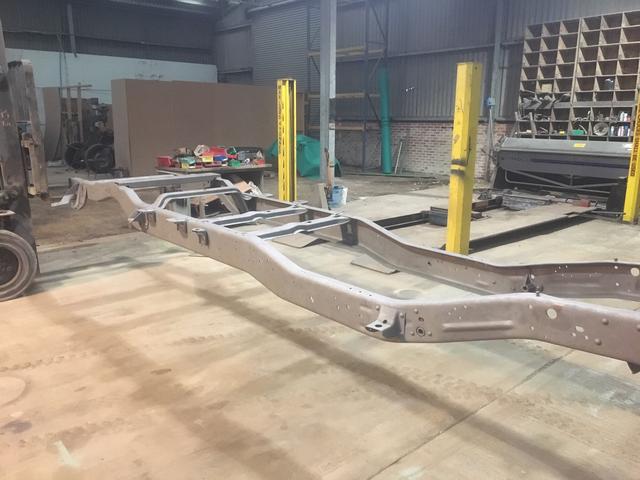
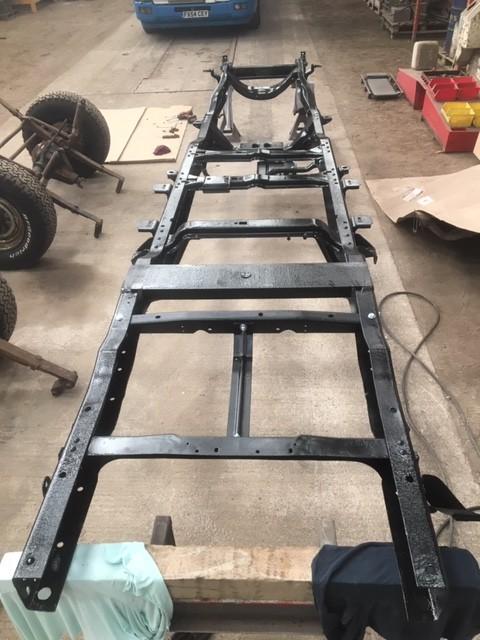
First it got 2 coats of zinc phosphate primer
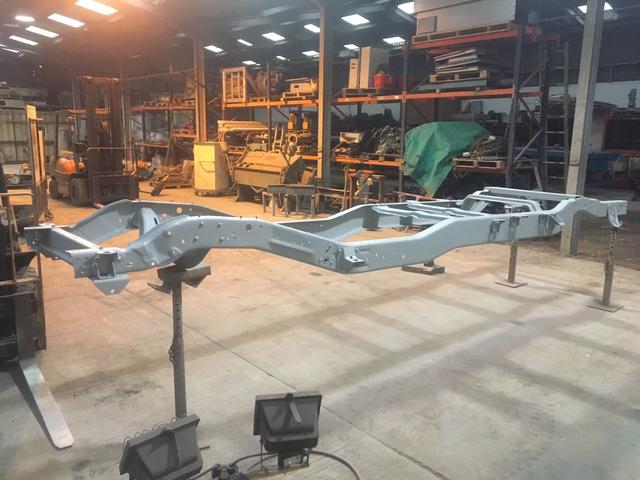
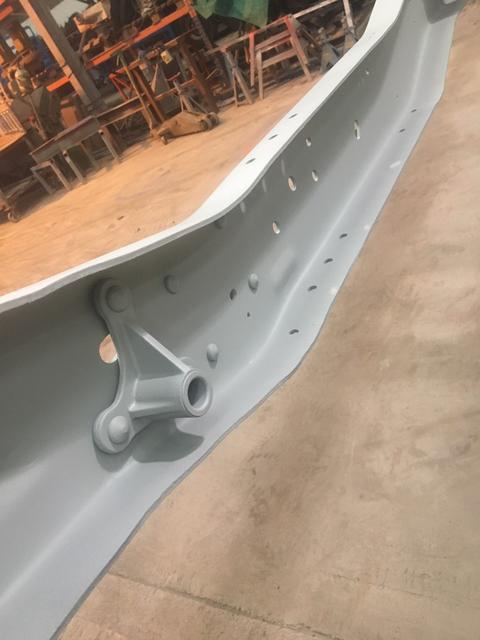
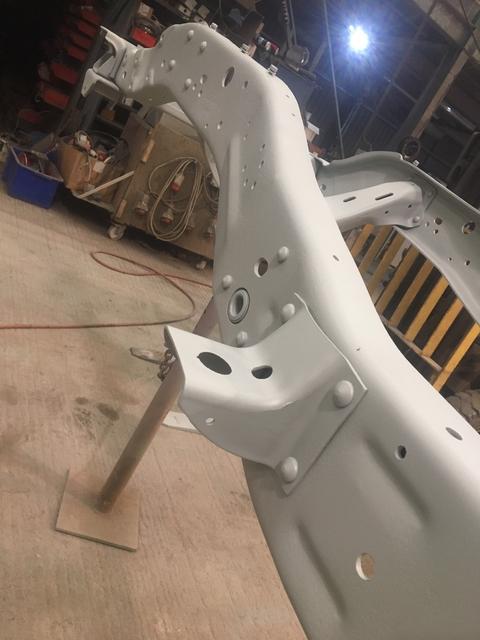
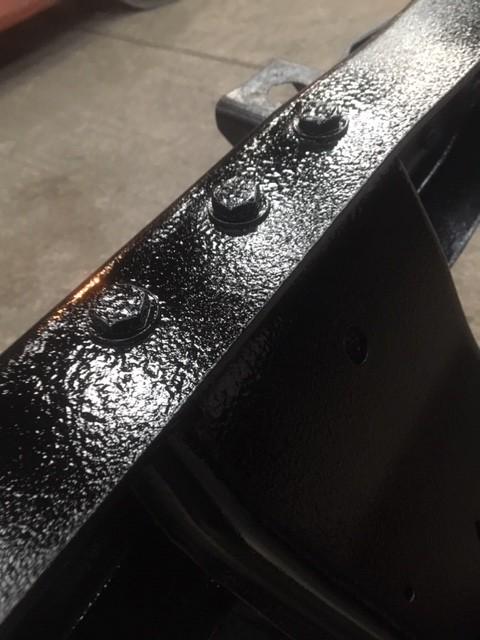
Then 1 thick coat of gloss black enamel paint
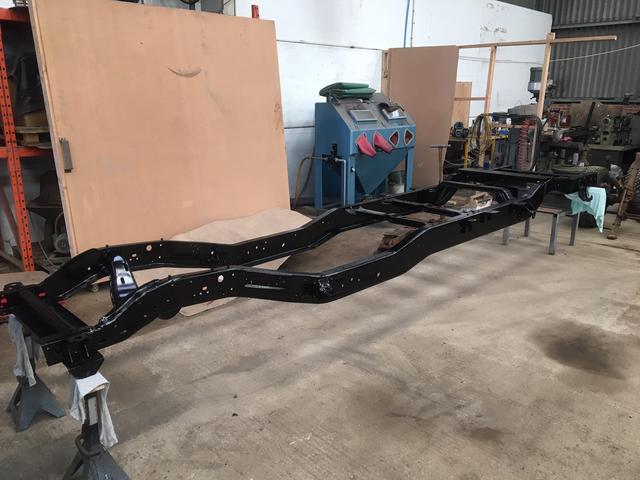

This isn't all it'll be getting, there will be more protection added to it soon.
So after about 5.5 hours of blasting I was happy with how I'd got the frame to. What a s**t job shot blasting is.
First it got 2 coats of zinc phosphate primer
Then 1 thick coat of gloss black enamel paint
This isn't all it'll be getting, there will be more protection added to it soon.
Trending Topics
01-23-2020, 07:36 AM
#8
Registered User
Thread Starter
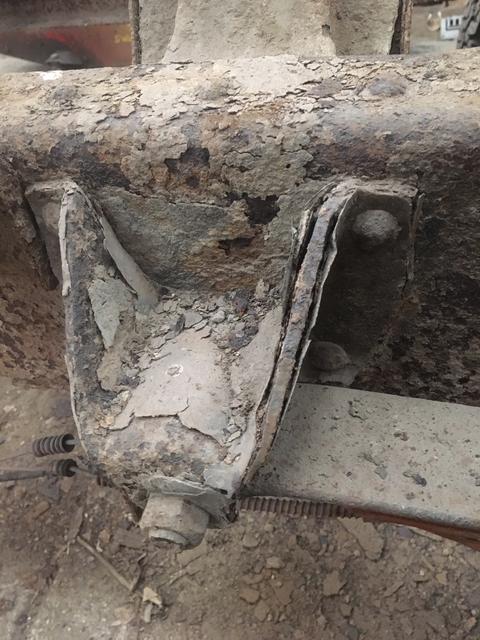
Although a horrible job you've got to love the results blasting bring, here's some before and afters of the worst areas, inside the frame where the tank sat and the rear drives side spring mount.


01-23-2020, 07:38 AM
#9
Registered User
Thread Starter
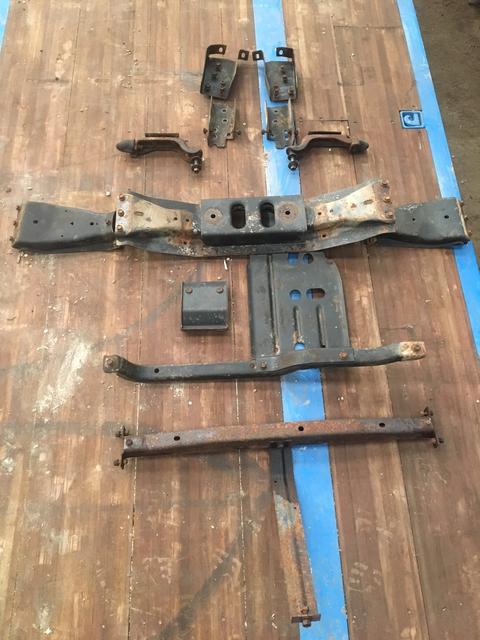
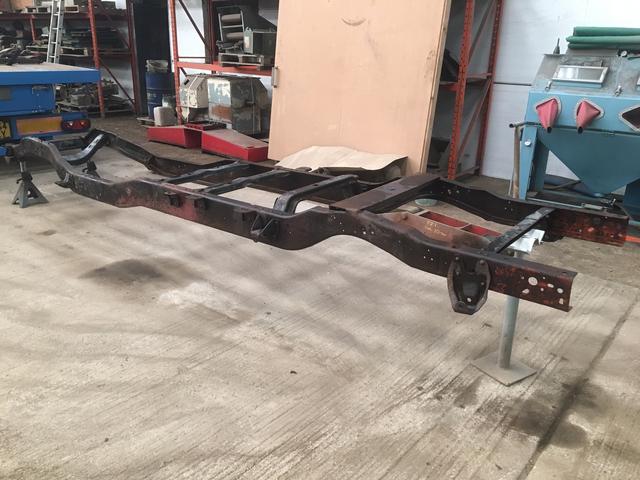
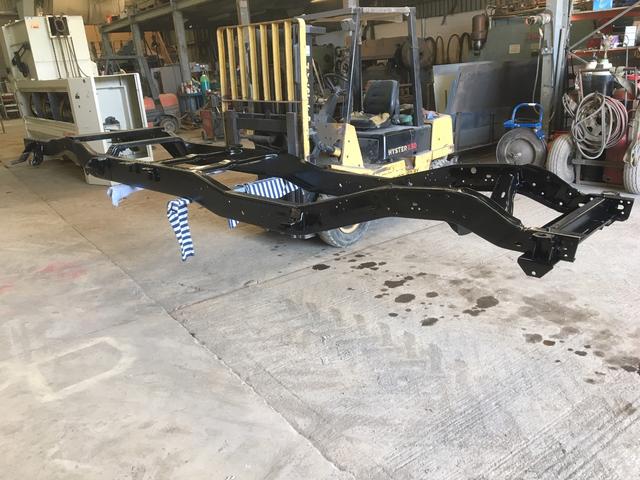
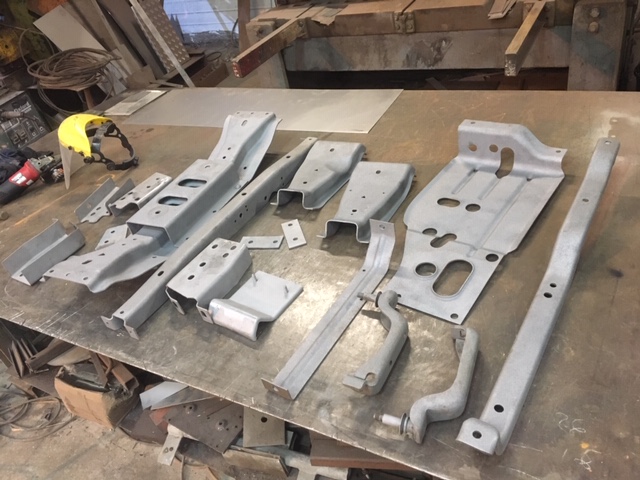
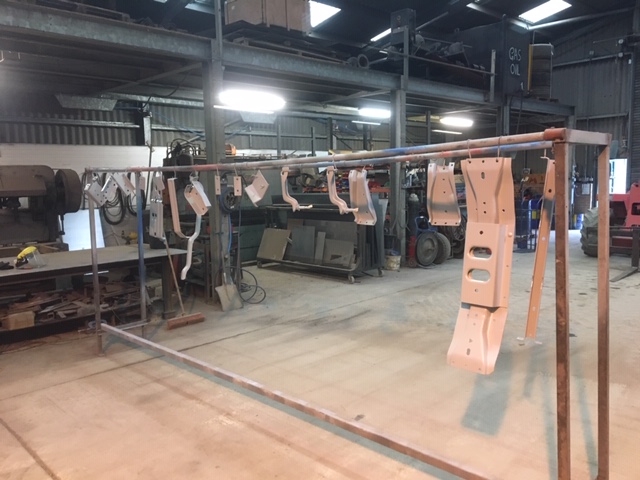
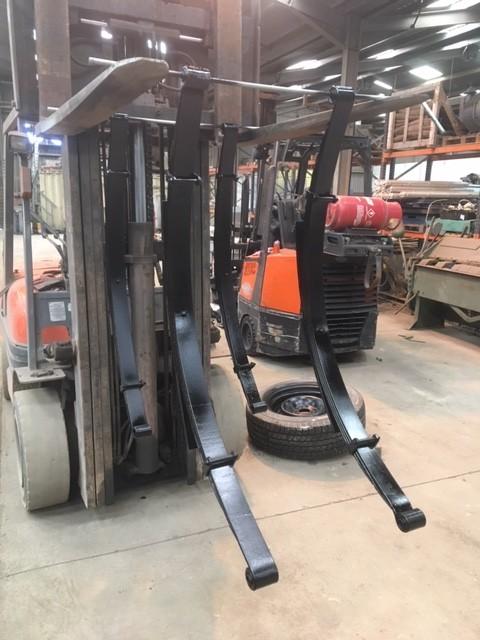
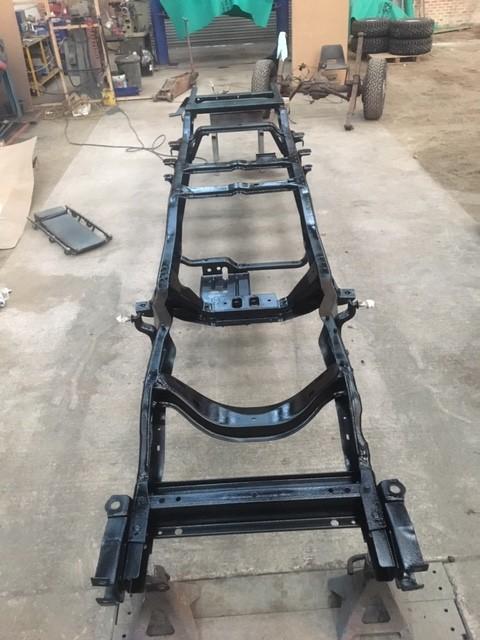
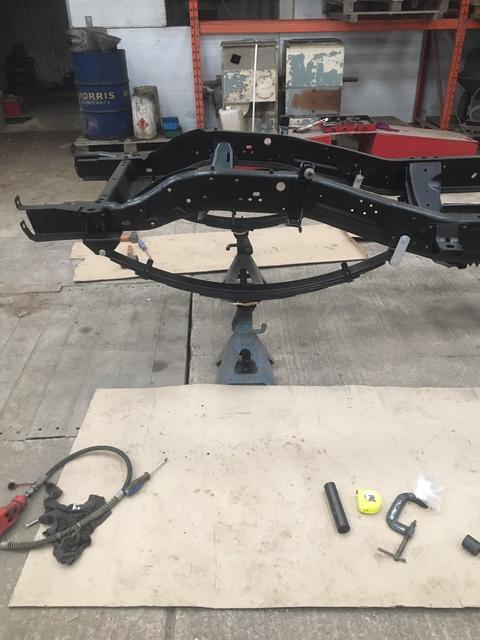
I had another blasting session and got all the pieces I removed from the frame cleaned up then primed and painted them black.
I gave my new springs a quick coat of gloss black as they'd got a bit scratched and scuffed on their long journey.
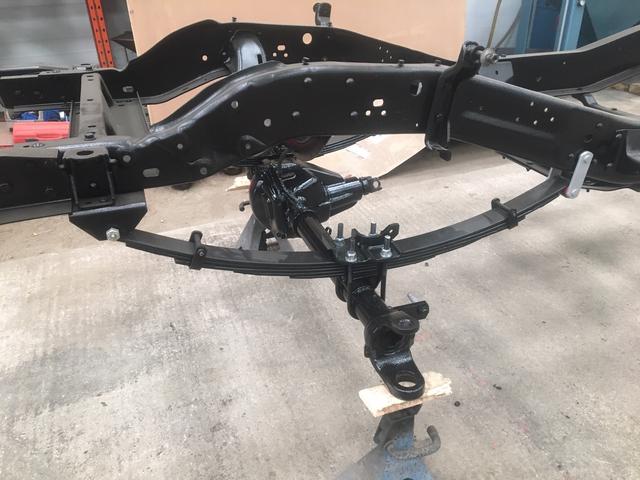
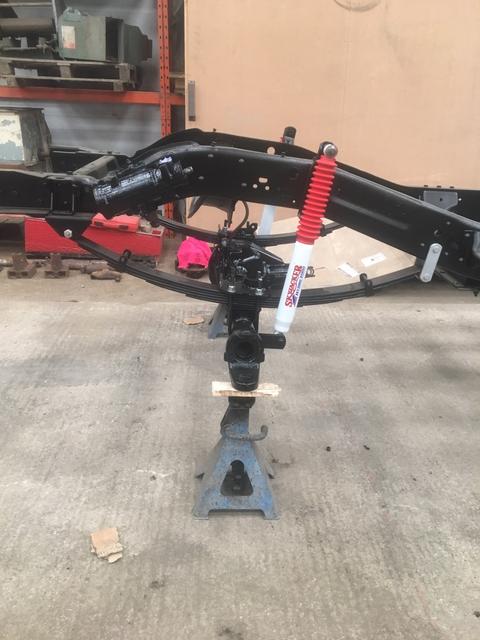
I decided to go with Skyjacker 4" lift springs
Next I got everything bolted back onto the frame, I did away with all the old school imperial bolts and used all metric.
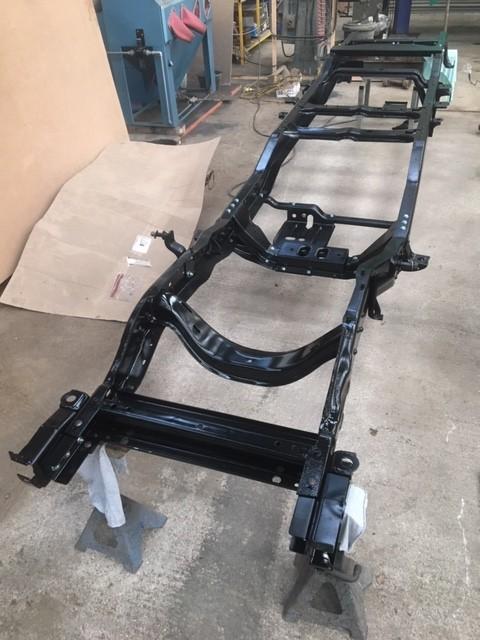
When it was all bolted together I went over everything with a Waxoil/underseal.
What I used is called Bodysafe, it's a thick tar like stuff that I just add a touch of thinners to then apply it liberally with a shutz gun
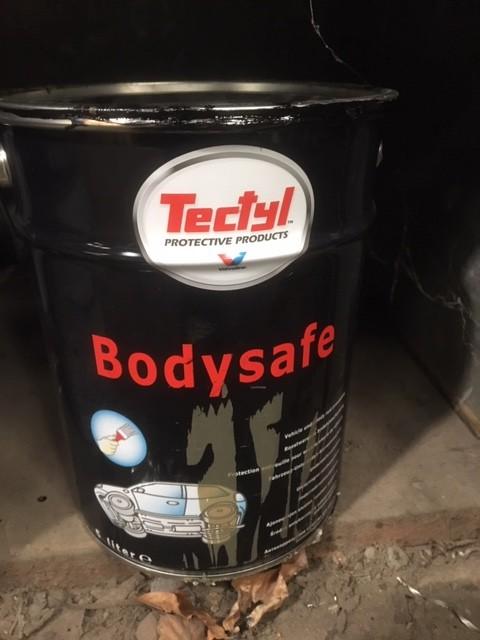
This stuff dries over night but it's tacky for up to a couple of weeks after depending on temperature. So I'm waiting until its a bit drier before I can do much more with the frame. I'd like to get the leafs on this week so they are out of the way and I can put the axle stands under them instead of onto the tacky frame.
I gave my new springs a quick coat of gloss black as they'd got a bit scratched and scuffed on their long journey.
I decided to go with Skyjacker 4" lift springs
Next I got everything bolted back onto the frame, I did away with all the old school imperial bolts and used all metric.
When it was all bolted together I went over everything with a Waxoil/underseal.
What I used is called Bodysafe, it's a thick tar like stuff that I just add a touch of thinners to then apply it liberally with a shutz gun
This stuff dries over night but it's tacky for up to a couple of weeks after depending on temperature. So I'm waiting until its a bit drier before I can do much more with the frame. I'd like to get the leafs on this week so they are out of the way and I can put the axle stands under them instead of onto the tacky frame.
01-23-2020, 07:39 AM
#10
Registered User
Thread Starter
Not had much progress that's worth posting lately.
I got the front springs fitted which are part of a skyjacker 4" lift kit.
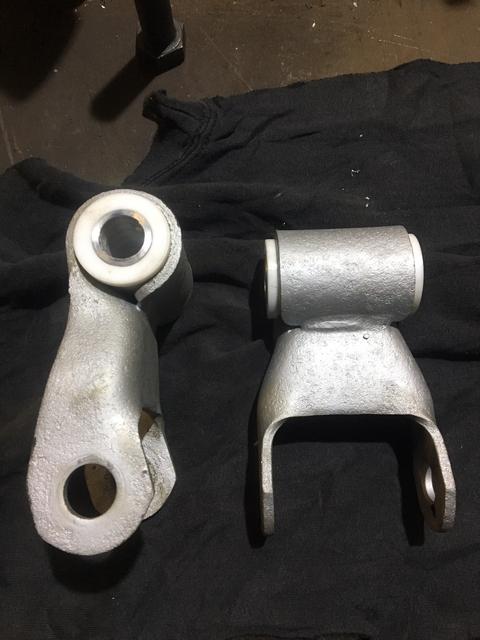
I'd forgot to order new frame bushes so had to make my own.
These are solid bushes made from acetal but I can't see me having any issues with them cracking. Although I've not made solid bushes for anything as heavy as this truck before I have made quite a lot for rally and track car suspension components in the past that take a lot of force and not had a failure I've been told about yet.
If they do crack that's a problem for future me and I'll deal with it then.
I turned them up in my good old Harrison lathe.
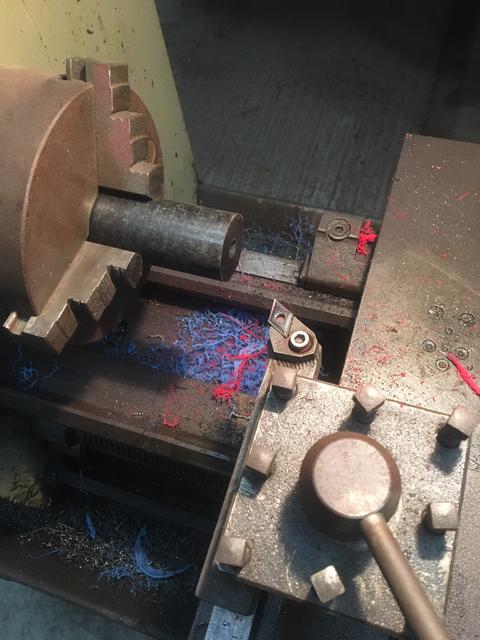
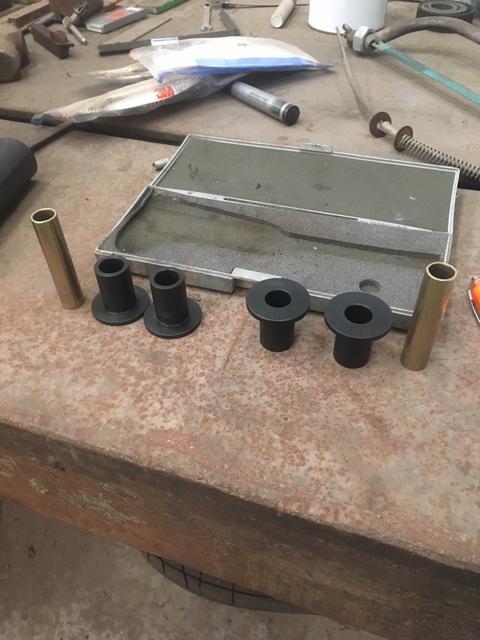
I didn't have to make the steel sleeves as I had ordered a spare skyjacker spring bush kit, the bushes didn't fit the frame but the sleeves were correct for the shackles so just made mine to fit these sleeves.
The front springs from skyjacker come with no bushes, I already new this from forum reading so had ordered a skyjacker bush kit for the rear of the spring and had ordered a greasable bolt and bush kit for the front of the spring from jungle on the ramcharger forum as skyjacker don't offer a bush to fit the front of the spring that I could find.
These greasable ones are a better option even if they did.
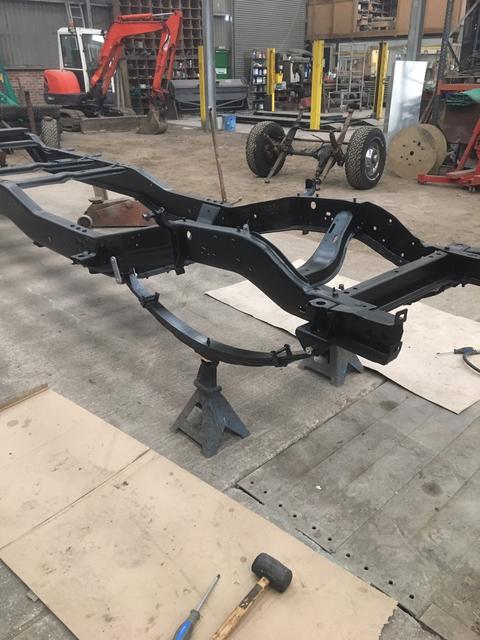
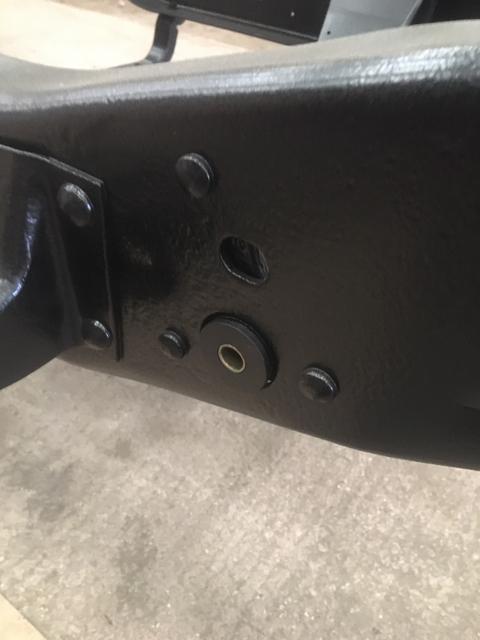
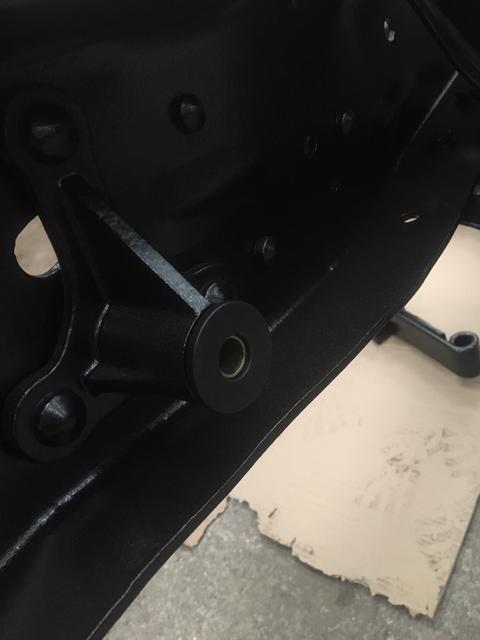
One thing I didn't account for was that the front spring mount wasn't wide enough with the new bushes fitted as 2 piece bushes are longer than 1 piece because you need a shoulder on each side. Not a big issue you just need to persuade the opening up a bit, I tried for ages to save my shiny frame by trying to portapak it open with no success.
In the end it took 2 minutes with a lump hammer to open them up slightly then when you tighten the bolt up it closes them up again.
Currently I've got a few places on the frame to go round and touch up and I'm sure I'll have a few more before I'm finished.
I got the front springs fitted which are part of a skyjacker 4" lift kit.
I'd forgot to order new frame bushes so had to make my own.
These are solid bushes made from acetal but I can't see me having any issues with them cracking. Although I've not made solid bushes for anything as heavy as this truck before I have made quite a lot for rally and track car suspension components in the past that take a lot of force and not had a failure I've been told about yet.
If they do crack that's a problem for future me and I'll deal with it then.
I turned them up in my good old Harrison lathe.
I didn't have to make the steel sleeves as I had ordered a spare skyjacker spring bush kit, the bushes didn't fit the frame but the sleeves were correct for the shackles so just made mine to fit these sleeves.
The front springs from skyjacker come with no bushes, I already new this from forum reading so had ordered a skyjacker bush kit for the rear of the spring and had ordered a greasable bolt and bush kit for the front of the spring from jungle on the ramcharger forum as skyjacker don't offer a bush to fit the front of the spring that I could find.
These greasable ones are a better option even if they did.
One thing I didn't account for was that the front spring mount wasn't wide enough with the new bushes fitted as 2 piece bushes are longer than 1 piece because you need a shoulder on each side. Not a big issue you just need to persuade the opening up a bit, I tried for ages to save my shiny frame by trying to portapak it open with no success.
In the end it took 2 minutes with a lump hammer to open them up slightly then when you tighten the bolt up it closes them up again.
Currently I've got a few places on the frame to go round and touch up and I'm sure I'll have a few more before I'm finished.
01-23-2020, 07:41 AM
#11
Registered User
Thread Starter
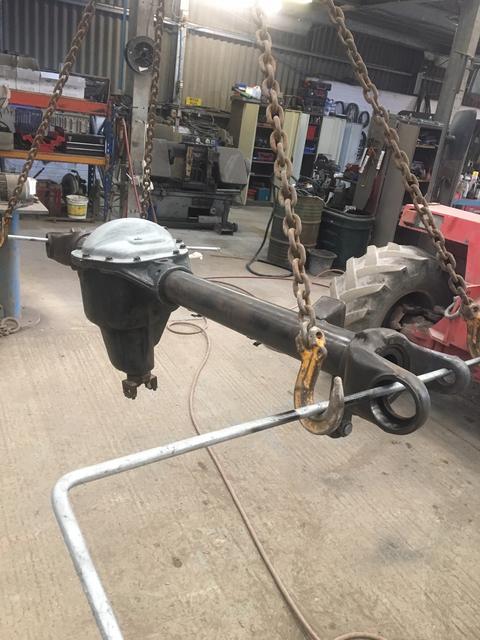
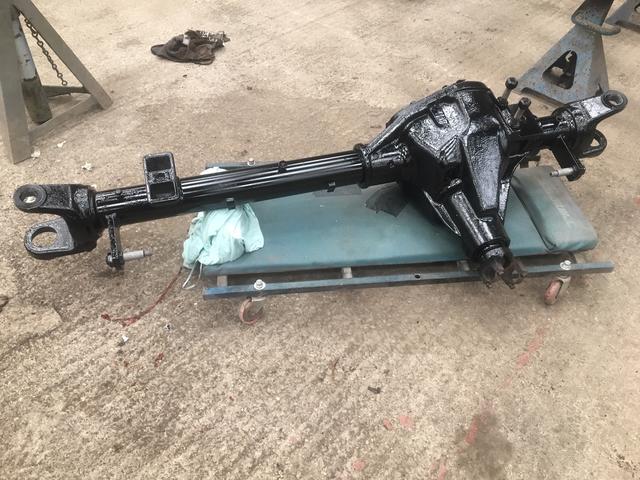
I started to strip down the front axle for paint. I new my UJ's were shot but wanted to strip everything to see the condition.
I didn't have a 7/8's allen key for the king pin so I took an M16 bolt (24mm head) and ground a bit off all 6 sides until it was just over 22mm and would fit in the kingpin, then I welded an M16 nut on to it.
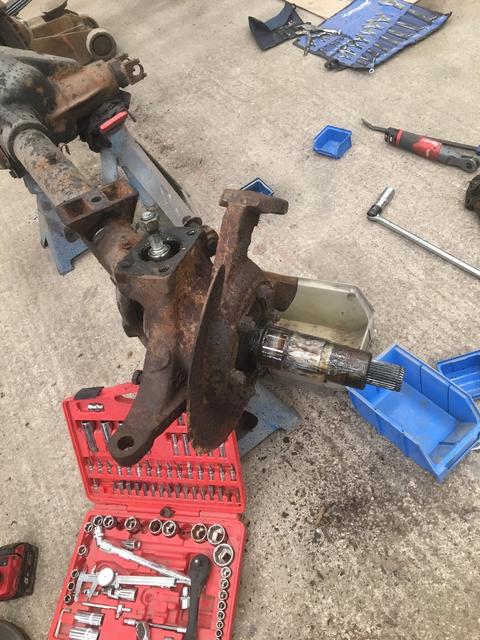
24mm socket, big breaker bar and a pipe and it wasn't moving. My Milwaukee impact gun wouldn't move it either.
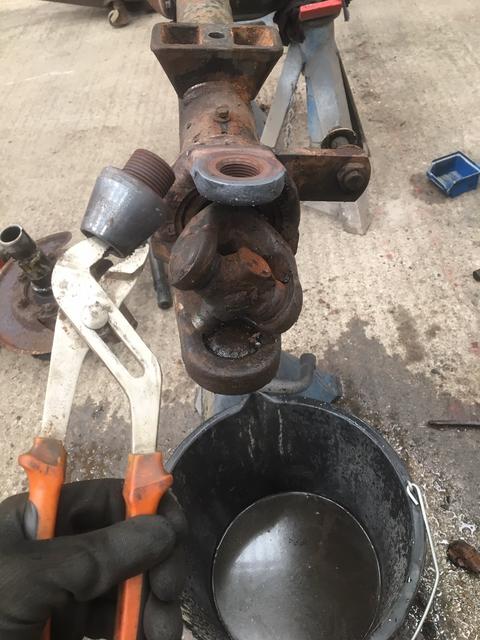
I used a grinder to cut through the UJ on the first side, this ended up not been the best way. It was very awkward and had to break the last of it with a chisel. The second side I used the gas axe and cut through it much easier and quicker and the molten steel was contained inside the joint nicely instead of blowing everywhere.
With the lower kingpin removed I could lift the hubs over the top of the upper kingpins.
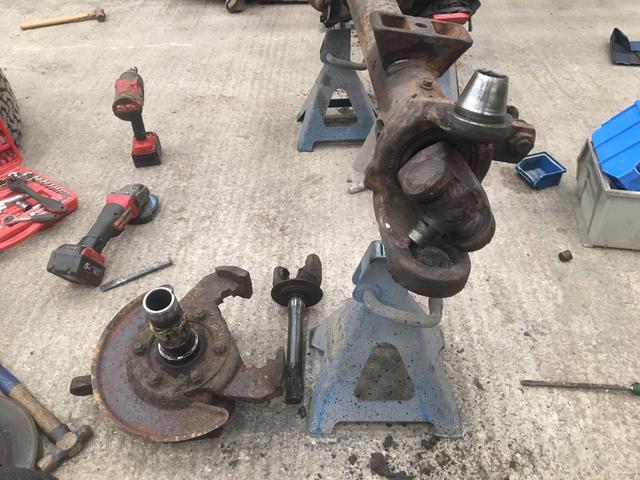
By using a lot of heat, quenching, more heat, more quenching etc. I finally managed to wind the kinpins out without having to resort to a pipe wrench and damaging them.
This wouldn't have mattered anyway as I'd decided to do a full rebuild.
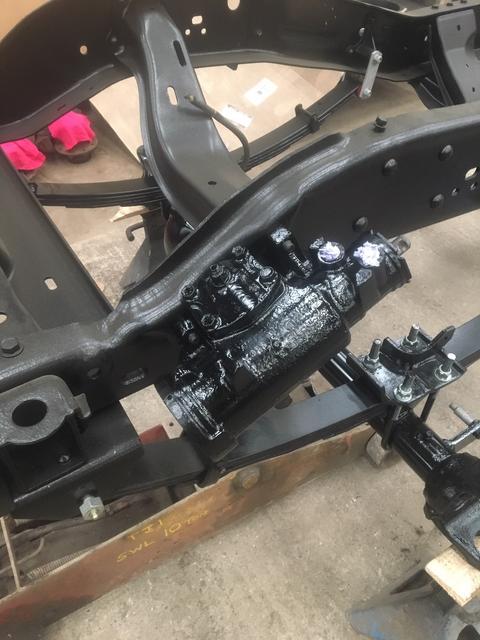
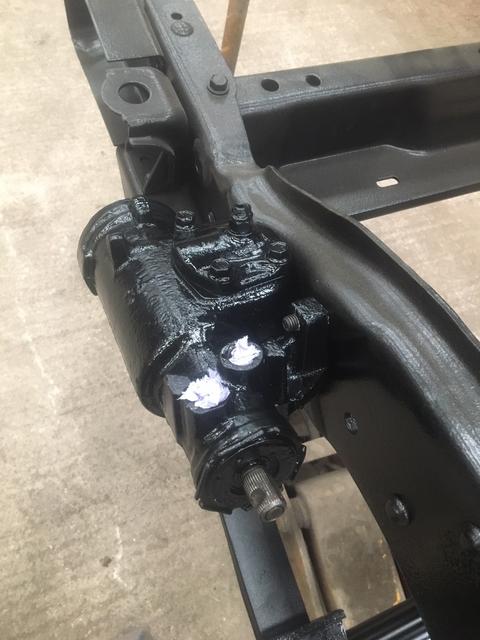
I cleaned up the axle ready for primer and some black. At the same time I cleaned up my steering box and painted that too.

I didn't have a 7/8's allen key for the king pin so I took an M16 bolt (24mm head) and ground a bit off all 6 sides until it was just over 22mm and would fit in the kingpin, then I welded an M16 nut on to it.
24mm socket, big breaker bar and a pipe and it wasn't moving. My Milwaukee impact gun wouldn't move it either.
I used a grinder to cut through the UJ on the first side, this ended up not been the best way. It was very awkward and had to break the last of it with a chisel. The second side I used the gas axe and cut through it much easier and quicker and the molten steel was contained inside the joint nicely instead of blowing everywhere.
With the lower kingpin removed I could lift the hubs over the top of the upper kingpins.
By using a lot of heat, quenching, more heat, more quenching etc. I finally managed to wind the kinpins out without having to resort to a pipe wrench and damaging them.
This wouldn't have mattered anyway as I'd decided to do a full rebuild.
I cleaned up the axle ready for primer and some black. At the same time I cleaned up my steering box and painted that too.
 01-23-2020, 07:42 AM
#13
Registered User
Thread Starter
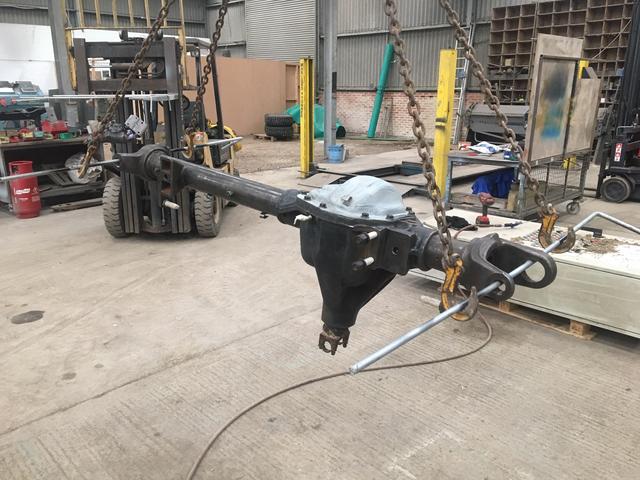
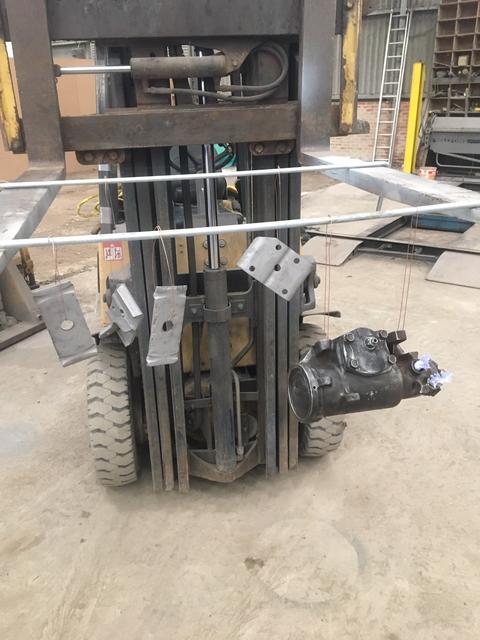
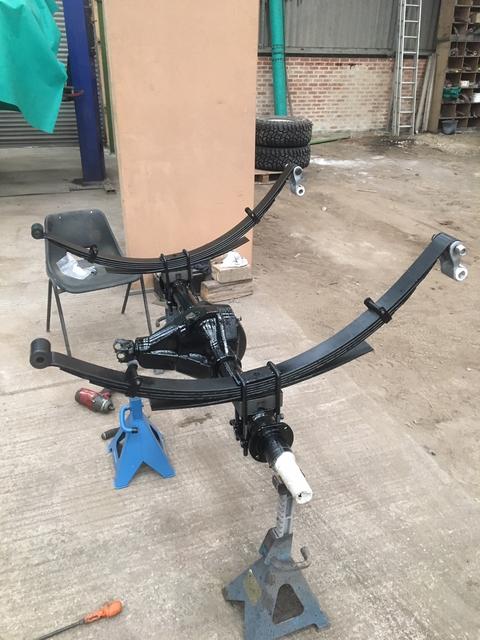
I fitted the axle on my own without scratching any paint by wheeling it under on a creeper and lowering the frame down on a jack to it.
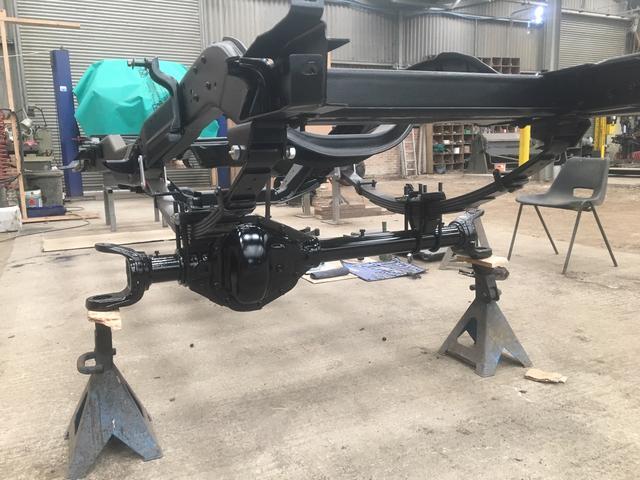
I fitted my steering box in the 2wd position directly on the frame ready for the cross over steering I'll be fitting.
I fitted my new shocks next, I had to guess the sizes of these when the truck was already stripped and luckily these seemed a very good length, about an inch off been maxed out at full droop.
The following users liked this post:
BHD (05-03-2022)
01-23-2020, 07:43 AM
#14
Registered User
Best round of first post maybe ever!
Great job saving the old candy cane colored truck.
I will be following along.
Great job saving the old candy cane colored truck.
I will be following along.
The following users liked this post:
mikemmw (01-23-2020)
01-23-2020, 07:44 AM
#15
Registered User
Thread Starter
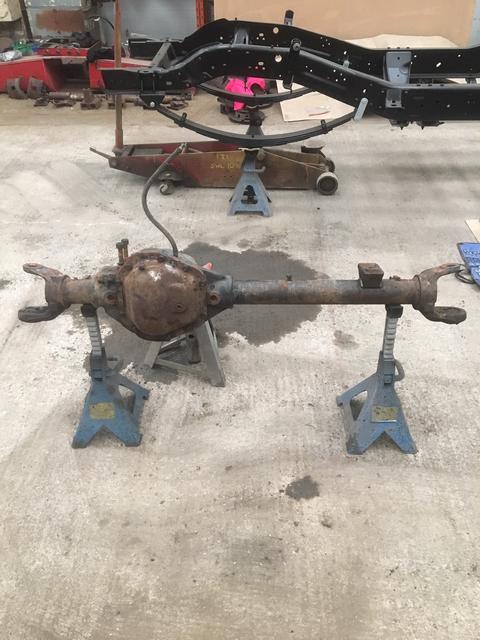
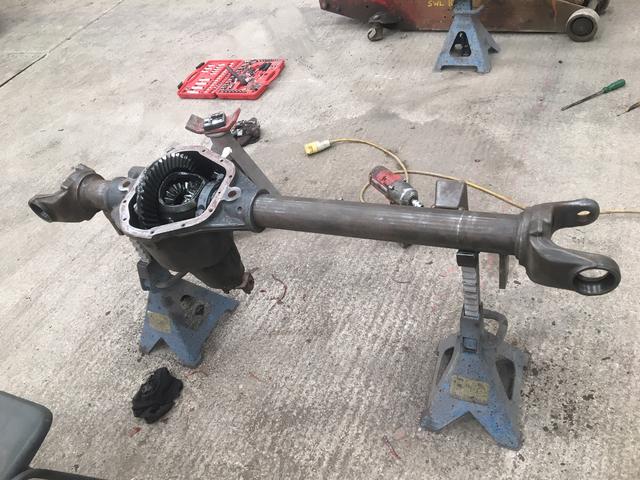
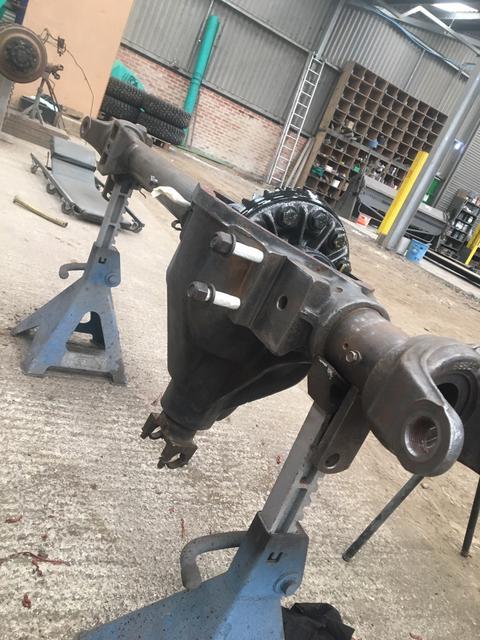
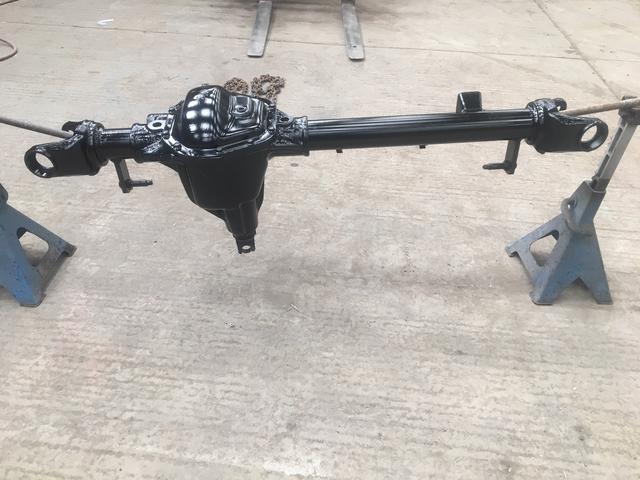
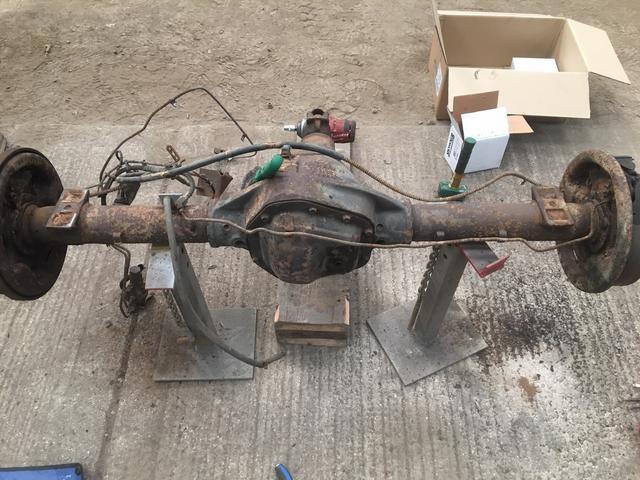
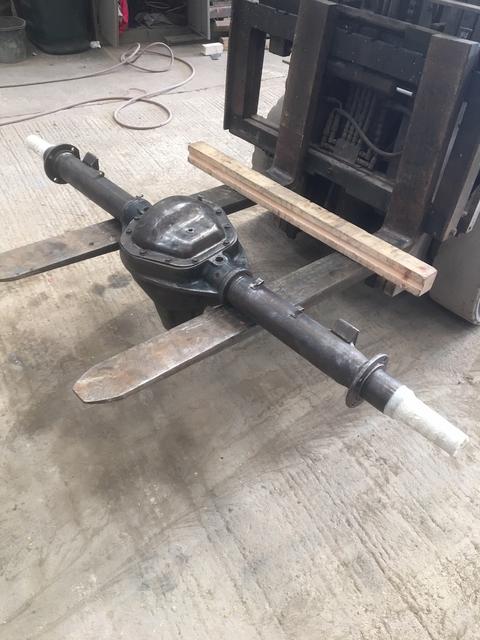
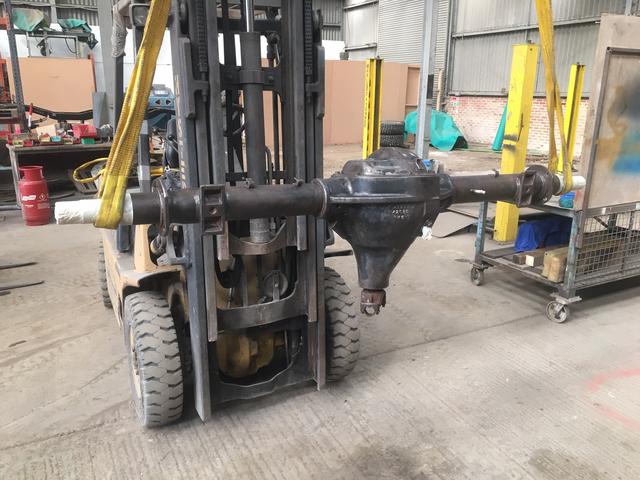
Onto the rear axle, I pulled the shafts, then the drums. I then removed the back plates with the whole shoe assembly in one piece. I cleaned this up and gave it the same treatment as the Dana 60.
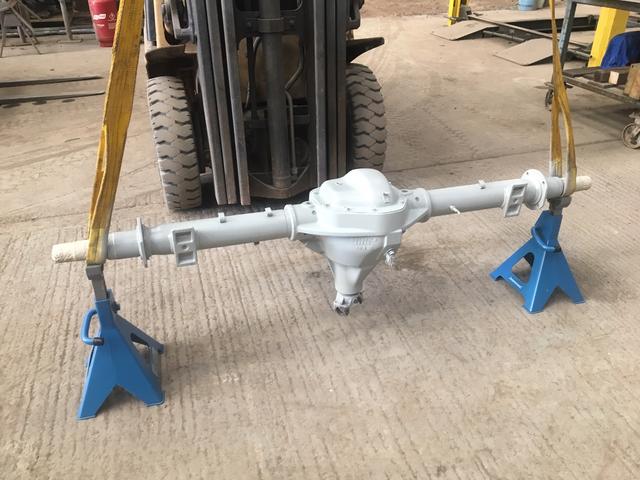
For the rear axle I decided to assemble the springs and fit it all in one piece.
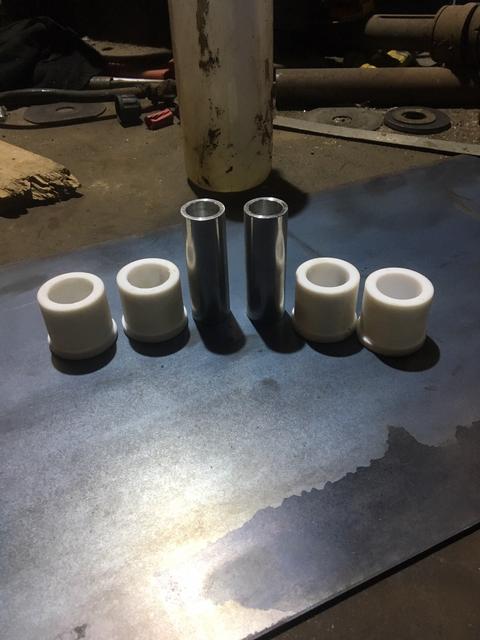
I changed the rear spring bushes out for the bigger 3/4" ones supplied.
I hadn't ordered any new shackle bushes so I made some myself, I'm not sure what I even made them out of because it was a bar of material I've had for years. I think it was ptfe, I think it will be a good choice as it has a bit of movement in it and isn't as solid as acetal. In hindsight I should had made the fronts from the same stuff. I used aluminium for the sleeves.
For the rear axle I decided to assemble the springs and fit it all in one piece.
I changed the rear spring bushes out for the bigger 3/4" ones supplied.
I hadn't ordered any new shackle bushes so I made some myself, I'm not sure what I even made them out of because it was a bar of material I've had for years. I think it was ptfe, I think it will be a good choice as it has a bit of movement in it and isn't as solid as acetal. In hindsight I should had made the fronts from the same stuff. I used aluminium for the sleeves.
The following users liked this post:
edwinsmith (01-23-2020)