
Tailgate red cove trim
 02-08-2015, 08:19 AM
#1
Registered User
Thread Starter
Join Date: Dec 2010
Location: Land of the Toxic Avenger
Posts: 6,789
Received 1,647 Likes
on
1,120 Posts
Tailgate red cove trim
My tailgate clips snapped when a yahoo at my local small machine repair shop slammed the gate with the handle pulled up.
Reviewed these threads, but can't find and answer:
RamchargerCentral.Com - Articles - 72 - 93 tailgate latch repair - Dodge Ram, Ramcharger, Cummins, Jeep, Durango, Power Wagon, Trailduster, all Mopar Truck & SUV Owners. Dodgeram
https://www.dieseltruckresource.com/...e-trim-316216/
Dodge Diesel - Diesel Truck Resource Forums - Search Results
This one says it can bypass the plastic cove molding, but it sure seems like it doesn't want to....
https://www.dieseltruckresource.com/...-apart-278961/
Anyone know how to get the cove molding (red cover under latch) out of there without damaging it ?
What's the trick ? Can't get the latch out because that trim piece is in the way... or can I ?
The clips should be available from the local parts store.
Thank you.
 02-08-2015, 01:18 PM
#2
Administrator
Hey T, I can't help with taking it a part, but I wanted to say that mine has been broken since I bought the truck. I was planning on fixing it, but I realized that all I need to do is lift up on the small tab that can be seen in the square hole on the inside passenger edge of the tailgate. The driver's side doesn't work for some reason. I like that some rotten thief can't just walk up and open the tailgate and it is not that hard to open it that way, FWIW...Mark
02-08-2015, 04:52 PM
#3
Registered User
NJT, I have never messed around with that LE trim you speak of on the latch.
I have to admit, I am like Mark and used the small inner tail gate latches to open the tail gate.
One crew cab needs the passenger side used along with the standard handle, the other one needs the drivers side latch tickled and the standard handle as well.
Heck even my '01 needs the passenger side one lifted.
It has been like that for so long, my daughter and I am just used to opening them that way.
Everyone else can't seem to open them, and since I never loan out my trucks, it doesn't seem like a problem to me.
 02-08-2015, 05:08 PM
#4
Registered User
Thread Starter
Join Date: Dec 2010
Location: Land of the Toxic Avenger
Posts: 6,789
Received 1,647 Likes
on
1,120 Posts
Well, since none of you coconuts knew what to do, or (other than Mark) offered any advice, as I'm sure this isn't a very popular fix because of my "special edition LE" rear paneled tailgate, I had to figure it out by myself... as usual...
For anyone who needs to do this you need to have a 90* pick. If you have that, you can get this done without much fuss, other than some cuts to your hands.
You unbolt the latch handle, and get it as low as it can go. You take your pick, and put it DEAD CENTER, below the bottom of the part that bolts to the truck's tailgate with the 3 large head screws. While holding the chrome handle, yank that pick towards you, and pull the bottom of the metal mounting flange outwards with the pick. The plastic cove insert is clamping on the mounting flange, and you need to overcome that pressure. You might have to do this once or twice till it frees itself from the opening and it falls out. This is what you get once you do. The pick sits below the flat portion of the mounting plate, and buy pulling the bottom out, you're rotating the assembly where it can be removed.

you're left with this slightly scuffed cove molding

once you have the handle out, remove the broken pieces of plastic clips left in the mechanism, and lube the crap out of it where ever there are moving parts.
FIRST: Put the two replacement clips into the holes in the handle mechanism arms, and slide up into the hole until you get the rods aligned with the new clips.
SECOND: ROD INSERTION: This ISN'T EASY... You will need to twist each rod, and get it into the clip, which required a pair of dykes (flat pliers used in electrician's work) or another type of pliers where you can force the rod into each hole and seat it fully. Again, not easy, but lubing the clips helps. The rods don't want to go in there, but you have to tell them, you don't care and they're gong in anyway....
Once you get both rods in, spin the clips around and trap the clip on each rod. Now you need to get the assembly back past that tight fitting cove molding. Take a screwdriver and use it as a punch, whereas you place the screwdriver at the bottom of one of the two mounting bungs, and smack it up and hard with your flat hand. The entire assembly then goes back into the hole (with a couple of slaps), reinsert the 3 mounting screws, and test to see if all worked out well.

Took about 15 minutes Start to finish. I used Dorman Help #75450 rod clip kit, and the black and yellow ones fit best.
An added note:
You can't remove the red cove plastic thingy without removing the entire "DODGE" stainless panel. It's bolted or clipped behind the stainless panel, and caught behind it. You would have to cut it free from the panel to get it out and not damage the panel in the process.
02-08-2015, 10:12 PM
#5
Registered User
Thanks for blazing the trail on that one T-man!
I disassembled a bent LE tailgate...but I removed the trim panel before the handle, or round about the same time if I remember right. So not quite the same careful procedure you used.
I disassembled a bent LE tailgate...but I removed the trim panel before the handle, or round about the same time if I remember right. So not quite the same careful procedure you used.
02-09-2015, 07:40 AM
#6
Registered User
Thread Starter
Join Date: Dec 2010
Location: Land of the Toxic Avenger
Posts: 6,789
Received 1,647 Likes
on
1,120 Posts
Just paying it back for all the times i needed help, and you guys were there for me
02-09-2015, 08:29 AM
#7
Administrator
 ...Mark
Trending Topics
 02-09-2015, 09:29 PM
#9
Well, since none of you coconuts knew what to do, or (other than Mark) offered any advice, as I'm sure this isn't a very popular fix because of my "special edition LE" rear paneled tailgate, I had to figure it out by myself... as usual...
For anyone who needs to do this you need to have a 90* pick. If you have that, you can get this done without much fuss, other than some cuts to your hands.
You unbolt the latch handle, and get it as low as it can go. You take your pick, and put it DEAD CENTER, below the bottom of the part that bolts to the truck's tailgate with the 3 large head screws. While holding the chrome handle, yank that pick towards you, and pull the bottom of the metal mounting flange outwards with the pick. The plastic cove insert is clamping on the mounting flange, and you need to overcome that pressure. You might have to do this once or twice till it frees itself from the opening and it falls out. This is what you get once you do. The pick sits below the flat portion of the mounting plate, and buy pulling the bottom out, you're rotating the assembly where it can be removed.
you're left with this slightly scuffed cove molding
once you have the handle out, remove the broken pieces of plastic clips left in the mechanism, and lube the crap out of it where ever there are moving parts.
FIRST: Put the two replacement clips into the holes in the handle mechanism arms, and slide up into the hole until you get the rods aligned with the new clips.
SECOND: ROD INSERTION: This ISN'T EASY... You will need to twist each rod, and get it into the clip, which required a pair of dykes (flat pliers used in electrician's work) or another type of pliers where you can force the rod into each hole and seat it fully. Again, not easy, but lubing the clips helps. The rods don't want to go in there, but you have to tell them, you don't care and they're gong in anyway....
Once you get both rods in, spin the clips around and trap the clip on each rod. Now you need to get the assembly back past that tight fitting cove molding. Take a screwdriver and use it as a punch, whereas you place the screwdriver at the bottom of one of the two mounting bungs, and smack it up and hard with your flat hand. The entire assembly then goes back into the hole (with a couple of slaps), reinsert the 3 mounting screws, and test to see if all worked out well.
Took about 15 minutes Start to finish. I used Dorman Help #75450 rod clip kit, and the black and yellow ones fit best.
An added note:
You can't remove the red cove plastic thingy without removing the entire "DODGE" stainless panel. It's bolted or clipped behind the stainless panel, and caught behind it. You would have to cut it free from the panel to get it out and not damage the panel in the process.
02-09-2015, 09:30 PM
#10
Good job, btw
02-09-2015, 09:47 PM
#11
Registered User
Thread Starter
Join Date: Dec 2010
Location: Land of the Toxic Avenger
Posts: 6,789
Received 1,647 Likes
on
1,120 Posts
02-10-2015, 06:44 AM
#12
Registered User

QUOTE-"I have to admit, I am like Mark and used the small inner tail gate latches to open the tail gate."
Our trucks are sooooo ahead of the curve with that inside locking tailgate --that they just started putting on new trucks---LMAO
Our trucks are sooooo ahead of the curve with that inside locking tailgate --that they just started putting on new trucks---LMAO
02-10-2015, 04:41 PM
#13
Registered User
There are two clips on each side of the tailgate -- one on each end of both steel rods. As with the plastic bushings in the windshield wipers, it is probably better to go ahead and replace all four clips while inside the tailgate. And if I remember correctly, it is easier to get these plastic things installed if the two latches (one on either end of the tailgate, on the jambs) are also loosened from the tailgate.
Anyway, these are still available from Dodge and the Mopar part numbers are:
Tailgate clips (2) Passenger side: 4658 676 (white)
Tailgate clips (2) Driver side: 4658 677 (black)
Anyway, these are still available from Dodge and the Mopar part numbers are:
Tailgate clips (2) Passenger side: 4658 676 (white)
Tailgate clips (2) Driver side: 4658 677 (black)
 11-04-2019, 06:33 PM
#15
Registered User

Well, since none of you coconuts knew what to do, or (other than Mark) offered any advice, as I'm sure this isn't a very popular fix because of my "special edition LE" rear paneled tailgate, I had to figure it out by myself... as usual...
For anyone who needs to do this you need to have a 90* pick. If you have that, you can get this done without much fuss, other than some cuts to your hands.
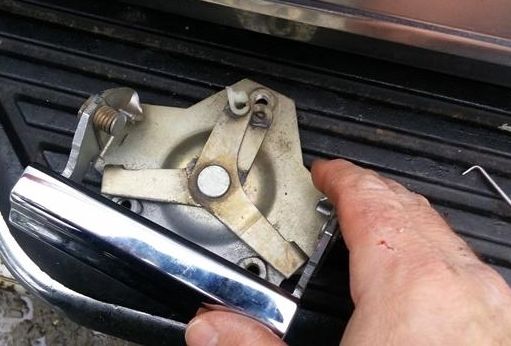
You unbolt the latch handle, and get it as low as it can go. You take your pick, and put it DEAD CENTER, below the bottom of the part that bolts to the truck's tailgate with the 3 large head screws. While holding the chrome handle, yank that pick towards you, and pull the bottom of the metal mounting flange outwards with the pick. The plastic cove insert is clamping on the mounting flange, and you need to overcome that pressure. You might have to do this once or twice till it frees itself from the opening and it falls out. This is what you get once you do. The pick sits below the flat portion of the mounting plate, and buy pulling the bottom out, you're rotating the assembly where it can be removed.
Attachment 51219
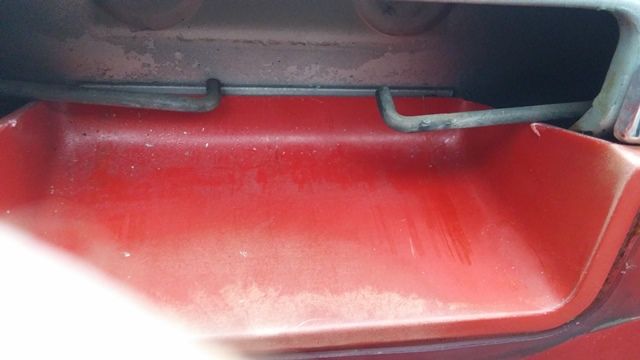
you're left with this slightly scuffed cove molding
Attachment 51220
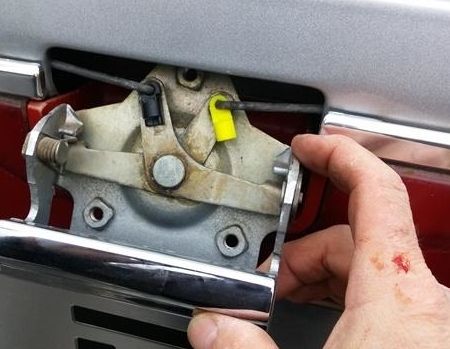
once you have the handle out, remove the broken pieces of plastic clips left in the mechanism, and lube the crap out of it where ever there are moving parts.
FIRST: Put the two replacement clips into the holes in the handle mechanism arms, and slide up into the hole until you get the rods aligned with the new clips.
SECOND: ROD INSERTION: This ISN'T EASY... You will need to twist each rod, and get it into the clip, which required a pair of dykes (flat pliers used in electrician's work) or another type of pliers where you can force the rod into each hole and seat it fully. Again, not easy, but lubing the clips helps. The rods don't want to go in there, but you have to tell them, you don't care and they're gong in anyway....
Once you get both rods in, spin the clips around and trap the clip on each rod. Now you need to get the assembly back past that tight fitting cove molding. Take a screwdriver and use it as a punch, whereas you place the screwdriver at the bottom of one of the two mounting bungs, and smack it up and hard with your flat hand. The entire assembly then goes back into the hole (with a couple of slaps), reinsert the 3 mounting screws, and test to see if all worked out well.
Attachment 51221
Took about 15 minutes Start to finish. I used Dorman Help #75450 rod clip kit, and the black and yellow ones fit best.
An added note:
You can't remove the red cove plastic thingy without removing the entire "DODGE" stainless panel. It's bolted or clipped behind the stainless panel, and caught behind it. You would have to cut it free from the panel to get it out and not damage the panel in the process.
For anyone who needs to do this you need to have a 90* pick. If you have that, you can get this done without much fuss, other than some cuts to your hands.
You unbolt the latch handle, and get it as low as it can go. You take your pick, and put it DEAD CENTER, below the bottom of the part that bolts to the truck's tailgate with the 3 large head screws. While holding the chrome handle, yank that pick towards you, and pull the bottom of the metal mounting flange outwards with the pick. The plastic cove insert is clamping on the mounting flange, and you need to overcome that pressure. You might have to do this once or twice till it frees itself from the opening and it falls out. This is what you get once you do. The pick sits below the flat portion of the mounting plate, and buy pulling the bottom out, you're rotating the assembly where it can be removed.
Attachment 51219
you're left with this slightly scuffed cove molding
Attachment 51220
once you have the handle out, remove the broken pieces of plastic clips left in the mechanism, and lube the crap out of it where ever there are moving parts.
FIRST: Put the two replacement clips into the holes in the handle mechanism arms, and slide up into the hole until you get the rods aligned with the new clips.
SECOND: ROD INSERTION: This ISN'T EASY... You will need to twist each rod, and get it into the clip, which required a pair of dykes (flat pliers used in electrician's work) or another type of pliers where you can force the rod into each hole and seat it fully. Again, not easy, but lubing the clips helps. The rods don't want to go in there, but you have to tell them, you don't care and they're gong in anyway....
Once you get both rods in, spin the clips around and trap the clip on each rod. Now you need to get the assembly back past that tight fitting cove molding. Take a screwdriver and use it as a punch, whereas you place the screwdriver at the bottom of one of the two mounting bungs, and smack it up and hard with your flat hand. The entire assembly then goes back into the hole (with a couple of slaps), reinsert the 3 mounting screws, and test to see if all worked out well.
Attachment 51221
Took about 15 minutes Start to finish. I used Dorman Help #75450 rod clip kit, and the black and yellow ones fit best.
An added note:
You can't remove the red cove plastic thingy without removing the entire "DODGE" stainless panel. It's bolted or clipped behind the stainless panel, and caught behind it. You would have to cut it free from the panel to get it out and not damage the panel in the process.
I had a similar situation on my tailgate but all I needed was lube. Glad you got it sorted.
Edwin
The following users liked this post:
NJTman (11-09-2019)