
ready for taillight project
 04-15-2011, 10:11 PM
#1
Registered User
Thread Starter

ready for taillight project
My relays will be in at napa tomorrow. They only had one harness at the warehouse, so I am only going to do the taillights for now. I got a roll of 12 gauge wire, 2, 6-space fuse blocks, and 4 colors of 14 gauge wire. I am going to mount one block under the hood, and run the 12 wire through it with a 30 amp fuse. That will also give me space to fuse headlight feeds and for fusible link replacement.
The 12 gauge wire will run to the RR corner of the bed (as I have no left tail light currently), and feed the other fuse block, mounted up under the rail. I am thinking of running 10 or 15 amp fuses there. Fused power will go out to relays, which will be triggered by my tail and reverse lights, on the 14 gauge wire. If it is enough draw, also my signal/brake lights, that will take a little testing. I believe the trailer lights may get run on their own circuits/relays, too.
I also got grommets, so I can cushion the wire coming into the bed, and plastic clips, to hold the wires in place.
I have to go through and seal up some wires, when the trailer plug was added, they used butt connectors, and there is no tape, no shrink wrap, nothing, on them.
 04-17-2011, 05:36 AM
#2
Registered User
Thread Starter
Well, I almost got it done. I crawled underneath and found my problem.
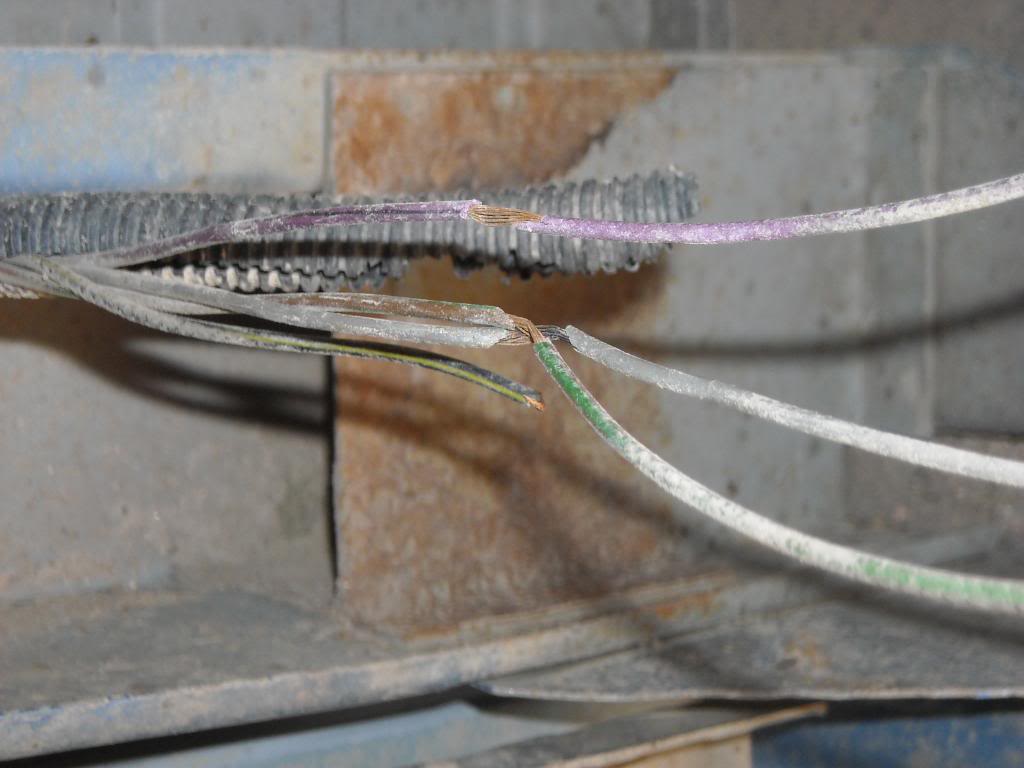
Other side
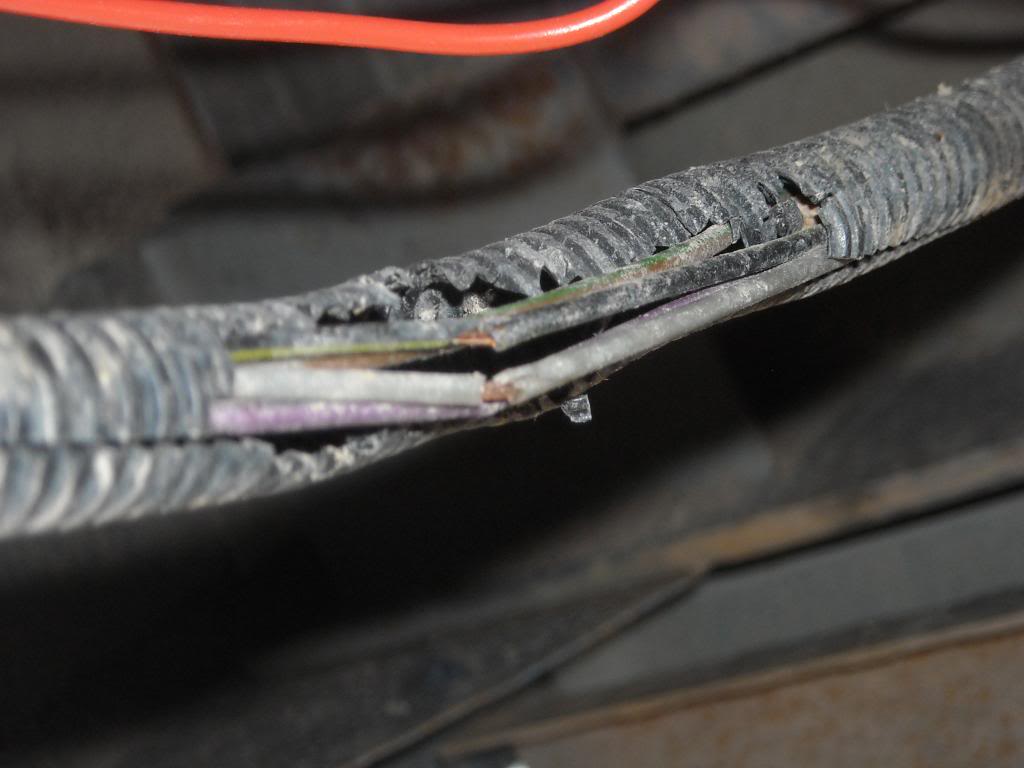
The wires appearantly rubbed on something and the insulation gave up. The wire for the left tail light was broken. To seal the wires I was no longer using out of the harness, I folded the end over and put a piece of heat shrink on it.
So I went ahead and ran wires from the right side to the left of the truck, and loosely zip-tied them up. Ran a 12 gauge wire from the battery to the RR bed corner, through this fuse block. Put it on the fender behind the batteries, and put my fusible link bypasses on fuses while I was at it.
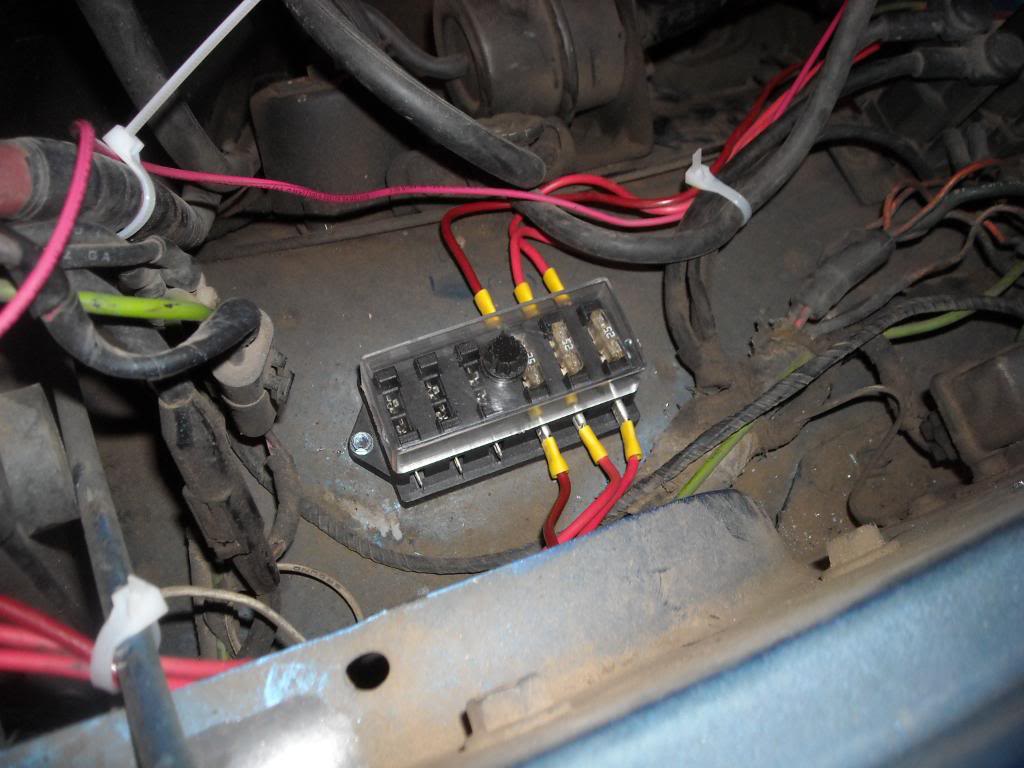
I got two of these blocks, one for the front, one for the back. The only downside, is having to run a power wire to each fuse.
I ran a red wire for the tail lights, the black wire with green tracer. I also ran an orange wire for the back-up lights, which are the purple ones in the harness. I tied both sides together, and ran them up through a grommet in a hole I drilled in the bedside.
I also ran two pink wires, one with several zip ties on it, for the left signal, so when I get some more relays I can put it on one, too.
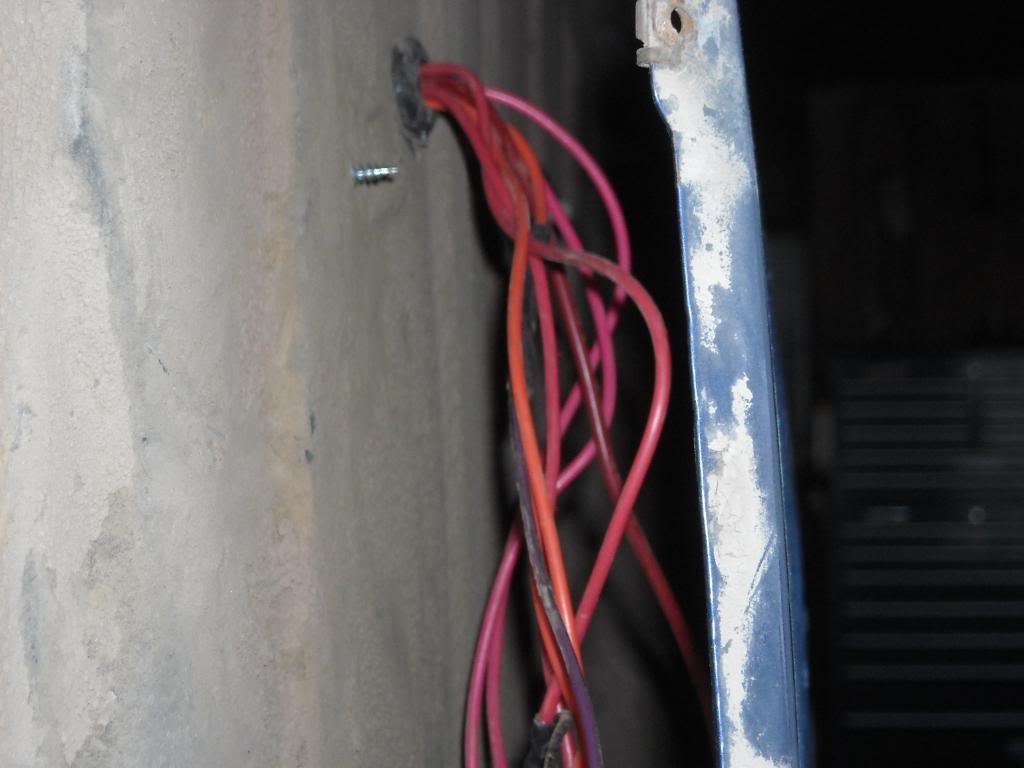
Once I had the left-side wires tied in, I pulled the slack out and tied them up good. I have to put another one or two of the plastic clips on the back side of the bedside yet, too. The grommet was 1/2 inch ID and fit pretty well in the 5/8 hole I drilled.
I had to make a pigtail, so that I could supply power to each of the fuses in the block. I branched from one to two 12 gauge wires, then branched out to three 14 gauge wires on each 12. I will have to tear this all apart sometime and get my heat shrink tubing on them, as I was running out.

I mounted the fuse block and relays up under the bed rail. But the one, was shorted out inside, all it did was burn my finger when I held the ground wire on a bolt head. I wired the tail lights into the good relay, and put a jumper in the wires for the back-up lights. Once I get a replacement relay, I'll unhook it and wire it into the relay.

I'm thinking of bolting a couple pieces of 2x4 around this, and hanging a couple pieces of round baler belt from under the back of the bed rail to protect it all.
I was also surprised, that without the bulbs in the back, the flasher blinked at the proper rate. So I will put the brake/signals on relays, too.
Other side
The wires appearantly rubbed on something and the insulation gave up. The wire for the left tail light was broken. To seal the wires I was no longer using out of the harness, I folded the end over and put a piece of heat shrink on it.
So I went ahead and ran wires from the right side to the left of the truck, and loosely zip-tied them up. Ran a 12 gauge wire from the battery to the RR bed corner, through this fuse block. Put it on the fender behind the batteries, and put my fusible link bypasses on fuses while I was at it.
I got two of these blocks, one for the front, one for the back. The only downside, is having to run a power wire to each fuse.
I ran a red wire for the tail lights, the black wire with green tracer. I also ran an orange wire for the back-up lights, which are the purple ones in the harness. I tied both sides together, and ran them up through a grommet in a hole I drilled in the bedside.
I also ran two pink wires, one with several zip ties on it, for the left signal, so when I get some more relays I can put it on one, too.
Once I had the left-side wires tied in, I pulled the slack out and tied them up good. I have to put another one or two of the plastic clips on the back side of the bedside yet, too. The grommet was 1/2 inch ID and fit pretty well in the 5/8 hole I drilled.
I had to make a pigtail, so that I could supply power to each of the fuses in the block. I branched from one to two 12 gauge wires, then branched out to three 14 gauge wires on each 12. I will have to tear this all apart sometime and get my heat shrink tubing on them, as I was running out.
I mounted the fuse block and relays up under the bed rail. But the one, was shorted out inside, all it did was burn my finger when I held the ground wire on a bolt head. I wired the tail lights into the good relay, and put a jumper in the wires for the back-up lights. Once I get a replacement relay, I'll unhook it and wire it into the relay.
I'm thinking of bolting a couple pieces of 2x4 around this, and hanging a couple pieces of round baler belt from under the back of the bed rail to protect it all.
I was also surprised, that without the bulbs in the back, the flasher blinked at the proper rate. So I will put the brake/signals on relays, too.
04-17-2011, 01:56 PM
#3
Registered User

Join Date: Oct 2006
Location: Indianapolis, Indianna
Posts: 701
Likes: 0
Received 0 Likes
on
0 Posts
That wire damage looks to be from someone in the past doing an improper trailer light wiring job. I bet they just twisted the new wires around them & taped them. When they removed the setup they were to lazy to tape them up.
Scotch Locks will also do similar damage to wiring.
Scotch Locks will also do similar damage to wiring.
04-17-2011, 10:23 PM
#4
Registered User
Thread Starter
I don't know, that could be what caused it. I know the current set-up has almost a dozen connectors that aren't even taped. The insulation was pretty brittle as far back as 3/4 inch on the one break. I just slid it off and put a longer piece of tubing on it. It didn't look like it had been peeled off though, the end of the insulation was pretty square, like it had been cut or had just snapped. This is about where it turned up to the taillights. I pulled the sockets down underneath to work on them before I took pictures.
I need about another 5 relays, if I am going to put the trailer lights all on them, too. I might just wire the plug off the truck relays, though. Not sure yet.
Napa will have my replacement relay Tuesday. Then I will have the back-up lights on one, too. The relay plug has aluminum wire, which I am not really thrilled about, but it will still be a lot easier to change relays out.
I'm certain that a 12 gauge wire can provide enough amperage to run the truck and trailer lights. If not, I can run a second wire. Any thoughts? The original wiring is 16 gauge.
I found some 12 gauge solder-able connectors in my box, so when I tear the pigtail apart for shrink-wrap, I'll solder the connections.
I've got some of those connectors that you put the wire through, then push the metal tab down through the insulation. I think those are scotch-locks. I didn't like the idea of the small surface area in the connection, so I have never used them. They came with a trailer wiring kit I used to wire a plug into my Chevy and my dad's old truck so we didn't have to open the hood every time we needed to pump fuel.
04-19-2011, 07:05 AM
#5
Administrator

I use this method on lots of truck and trailers in the past, I will use Liquid Tight conduit secured along the frame rails and at both ends I will terminate the conduit into PVC 6X6 boxes under the hood and usually under the frame.
You can get 4X4, 6X6 and 12X12 boxes, the boxes have no cutouts so you can use a hole saw and cut them out where you need them, inside the box you can mount barrier strips for all of your connections and your relays at the rear of the truck you could use SJO cables and exit the box through waterproof compression fittings leading to all to your lights, you can also have the connections for the trailer circuits.
If installed properly all of the connections are now completely sealed from the elements
Using 3/4" conduit you can easily pull 10 to 12 circuits using 12-gauge stranded wire including a 6-gauge battery feed to the rear of the truck.
After the conduit and boxes are installed it is easy to pull all of the wires using a short electricians fish tape, I would also highly recommend using pulling compound (yellow snot) to lubricate then, this way it is easier to get more wires in if you need them
Also figure out how many circuits you need and then always pull several extra for futures, if you will be using relays you can use 16-14-gauge wire for the trigger circuits.
You can use different colors of wire if you wish or you can do like I will sometimes do and use several colors of wire and tag the wire using an adhesive wrap around marker and a sharpie.
If you have ever worked on military wiring, all of the wire is the same color, the only way you identify the circuit is by a metal tag wrapped around the end of the wire that has a circuit # on it.
The boxes have gasketed covers and have 4 screws to secure them, to mount the components inside the boxes I mount a piece of dense 3/8" plywood to the bottom of the box using several long countersunk head 10X24 machine screws from the outside in and seal them using silicone.
now you can mount the relays and barrier strips by passing them over studs made from more countersunk head screws and nuts mounted to the plywood base.
If I were doing your truck I would use 12X12 and mount all of the relays for the taillights.
Here is what the boxes look like.
http://www.lowes.com/pd_10029-1716-L...7C1%26page%3D4
This is what the conduit looks like, you can get this up to 2" diameter and any length needed in bulk rolls.
http://www.lowes.com/pd_240409-295-5...7C1%26page%3D1
You can get this at Home Depot, Lowe's, or any electrical supply house. and is fairly inexpensive.
I also use this method inside the vehicle to pass wiring from the front to behind the seat, 1/2" can be hidden next to the door sill under the carpet I do not use any ends and I can simply pull the wires through them.
If I am confusing you let me know and I will try and explain it better.
Jim
04-20-2011, 10:37 PM
#6
Registered User
Thread Starter
I see what you mean. I think the 12x12, where I have stuff now, would be a good option. I think I'd put thumbscrews on it, too. The conduit wouldn't be a bad idea, coming back from the front.
I think I might want to run another supply wire. That way I can get rid of some of the splices in back, and be sure to have enough juice for all the lights. I don't think I need all that many wires running to the back, with the stock wiring still all there, though having the constant power in my trailer plug might be nice in the end. I can't see running more than three wires back, for any reason.
I think I am going to switch the trigger wires to the relays to 16 gauge, too. And probably use the wire I pull back out, for my headlight relays.
I checked, the nearest Lowes is 4 hours, east OR west. There is a Menards in North Platte, I am sure they would have it. I haven't been north of Wellfleet since I got here in October, that's about halfway to NP, so I have no idea when I will get back up there.
04-21-2011, 04:16 AM
#7
Administrator
Here are some circuit breakers instead of fuses.
http://wiredritesystems.com/store/page11.html
Bussbars, Barrier strips.
http://www.downwindmarine.com/home.p...cat=514&page=1
ATO fuse blocks with a common buss.
http://www.steinair.com/fuseblocks.htm
ATO fuse blocks and panels.
http://www.wirthco.com/fuse-blocks-p..._161-l-en.html
This is just give you an idea of what devices are out there.
I use a lot of these devices in my work and projects.
Quote,
I think I'd put thumbscrews on it, too.
If you wanted to spend some time you could make a custom cover uaing 1/4" lexan
Jim
Trending Topics
04-21-2011, 10:24 PM
#8
Registered User
Thread Starter
That's a good idea, self-resetting breakers instead of fuses.
If I was to use this block, it looks to me like it has 10, number 8-size screws, I'd put a ring terminal or an open 2-prong terminal on my wire, then put it under the screw head?
http://www.downwindmarine.com/Termin...n-p-14040.html
Or, if I went with one of these with 10 or 12 positions, I would run a cable directly to it, and not worry about the buss bar?
http://www.wirthco.com/ato/atc-fuse-...-776-l-en.html
Wirthco has the fuse blocks that I got from Napa.
You've got me thinking, about the lexan box cover, but cash is the issue at the moment. I'll have to do some thinking here.
Would you fuse the 6 gauge wire at the battery?

Thread
Thread Starter
Forum
Replies
Last Post
DNRCustoms
1st Gen. Ram - All Topics
11
08-08-2008 12:51 AM
ROCKNRAM
Performance and Accessories 2nd gen only
8
12-03-2007 02:19 PM
Kenworth
3rd Gen High Performance and Accessories (5.9L Only)
1
07-05-2005 11:36 PM
TXPOWER
3rd Generation Ram - Non Drivetrain - All Years
2
03-10-2005 04:06 PM