
Message center relocate for guages
 07-23-2008, 12:52 PM
#1
Registered User
Thread Starter
I built this ramcharger to be like a first gen, and now that it is on the road, I wanted to get some guages in it.
Since the radio is dead and this truck is a convertable, I did not want to put a stereo in itonly to get stolen. Later I will wire up an amp with a headphone jack to play music off an mp3.
The next thought was to put the guages in the radio hole. Then I thought that the info I get from my guages is more important than the info from the message center and the message center takes up a lot of prime dash real estate. So rather than delete it, I deleted the radio.
Here is what I did.

I don't get my guages until Thursday so they are not in yet.
I stared by cutting two rectangles out of an old kick panel. A person could use any flat thin scrap stock.

I taped off rectangles that were about 3/8" bigger than the holes in the dash bezel all the way around.

Using a cut-off wheel in an air grinder I cut them out using the edge of the tape as a guide.

Here are the rough panels

Since the radio is dead and this truck is a convertable, I did not want to put a stereo in itonly to get stolen. Later I will wire up an amp with a headphone jack to play music off an mp3.
The next thought was to put the guages in the radio hole. Then I thought that the info I get from my guages is more important than the info from the message center and the message center takes up a lot of prime dash real estate. So rather than delete it, I deleted the radio.
Here is what I did.
I don't get my guages until Thursday so they are not in yet.
I stared by cutting two rectangles out of an old kick panel. A person could use any flat thin scrap stock.
I taped off rectangles that were about 3/8" bigger than the holes in the dash bezel all the way around.
Using a cut-off wheel in an air grinder I cut them out using the edge of the tape as a guide.
Here are the rough panels
 07-23-2008, 01:07 PM
#3
Registered User
Thread Starter
Next, I focussed on the new message center bezel.
I held the panel behind the old message center locatin and traced the holes onto tape.

Then I cut the two rectangular holes with a scroll saw.

I wiped it down with vinyl-prep prior to painting. I have used this before on plastics. It softens the plastic a little so the paint can bond better. After rinsing and drying I painted it with matte black out of a rattle can.

Then I used 3m double stick foam tape (the stuff you use for body emblems)

And lined the back side of the new bezel.

After peeling the red backing, I centered and stuck the message center/4wd to the back.

I held the panel behind the old message center locatin and traced the holes onto tape.
Then I cut the two rectangular holes with a scroll saw.
I wiped it down with vinyl-prep prior to painting. I have used this before on plastics. It softens the plastic a little so the paint can bond better. After rinsing and drying I painted it with matte black out of a rattle can.
Then I used 3m double stick foam tape (the stuff you use for body emblems)
And lined the back side of the new bezel.
After peeling the red backing, I centered and stuck the message center/4wd to the back.
07-23-2008, 01:17 PM
#4
Registered User
Thread Starter
Then, I lined the back of the radio hole with the double-stick.

Being careful to get it centered and level, I stuck the assembly to the back of the dash bezel.

Moving on to the new guage bezel, I had to remove the screw bosses and tabs on the back of the dash bezel. I just used the cut-off tool here.

Then I stuck the other new bezel to it with double-stick.

This is what the front looks like. You can see that I alco took out the bar between the 4x4 indicator and the message center.

With it all said and done, I will be able to get my boost, pyro, and tranny-temp guages in there along with a O.D. switch and Potentiometer.
All-in-all, I'm happy with it.
Being careful to get it centered and level, I stuck the assembly to the back of the dash bezel.
Moving on to the new guage bezel, I had to remove the screw bosses and tabs on the back of the dash bezel. I just used the cut-off tool here.
Then I stuck the other new bezel to it with double-stick.
This is what the front looks like. You can see that I alco took out the bar between the 4x4 indicator and the message center.
With it all said and done, I will be able to get my boost, pyro, and tranny-temp guages in there along with a O.D. switch and Potentiometer.
All-in-all, I'm happy with it.
07-23-2008, 01:27 PM
#5
Registered User
Thread Starter
07-23-2008, 04:05 PM
#7
Registered User

Join Date: Jan 2008
Location: Quinton, New Jersey (middle of nowhere)
Posts: 7,547
Likes: 0
Received 2 Likes
on
2 Posts
You could say screw the ashtray, and mount the stereo on like a cb radio mount where the ash tray is under the dash. the wire pigtails should be long enough.
Trending Topics
 07-24-2008, 11:56 AM
#9
Registered User

That is exactly the kind of "out of the box" thinking that keeps this site interesting.
Even though someone may not copy an idea to the letter, seeing what someone else has done is often a source of ideas to accomplish any number of tasks, such as your using an old scrap kick-panel for the necessary plastic to accomplish the job.
Good job.
Even though someone may not copy an idea to the letter, seeing what someone else has done is often a source of ideas to accomplish any number of tasks, such as your using an old scrap kick-panel for the necessary plastic to accomplish the job.
Good job.
07-24-2008, 12:13 PM
#10
Registered User
Thread Starter
such as your using an old scrap kick-panel for the necessary plastic to accomplish the job.
 07-24-2008, 01:58 PM
#12
Registered User
Join Date: Nov 2005
Location: COVINGTON,LA
Posts: 174
Likes: 0
Received 0 Likes
on
0 Posts
thats were mine are. i've got boost, pyro, and fuel pressure in a 3 hole pod on dash above and then oil press, oil temp, water temp in the hole for the message center. my tach is mounted on the rh side dash lamp bolt. kinda nice having all together in one spot. i'm gonna get some pics up soon...
daryl
daryl
07-29-2008, 12:17 AM
#14
Registered User
Thread Starter
Finally got the guages in.

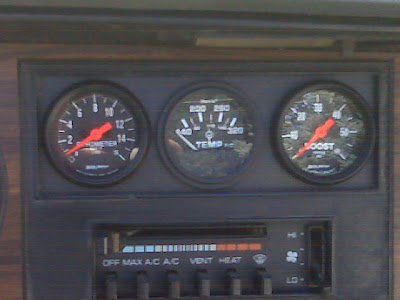
I installed the pyro sender post turbo, the boost in the port in the side of the head, and the trans probe is yet to be installed in place of the overdrive sensor in the cooler line. I had a 3/8" to 1/4" bushing in my brass collection, but had to bush it down to 1/8". I got the part, just need to put it in.
I installed the pyro sender post turbo, the boost in the port in the side of the head, and the trans probe is yet to be installed in place of the overdrive sensor in the cooler line. I had a 3/8" to 1/4" bushing in my brass collection, but had to bush it down to 1/8". I got the part, just need to put it in.