
Glove Box LED Upgrade.
 02-26-2014, 02:52 AM
#1
Administrator
Thread Starter

Glove Box LED upgrade.
I was getting really annoyed with the pretty much useless excuse for a light that was installed in my glove box,
Come on how much can you see inside the glove box with a tiny lamp shining through a tiny hole in the side of the box side when all of your junk is at the top of the box.
It finally got so the light would come on when I hit a bump and then stay on because of the plastic door and nonreplicable hinge being worn out,.
I would temporarily fix it with a piece of adhesive weatherstrip glued to the door for the stem of the pushbutton switch to contact, however this would work for about a week then it was on again.
So like I always do, I set out to make it better.
The first thing I wanted was to be able to connect to the factory harness so nothing was cut and make it a simple Plug-N-Play.
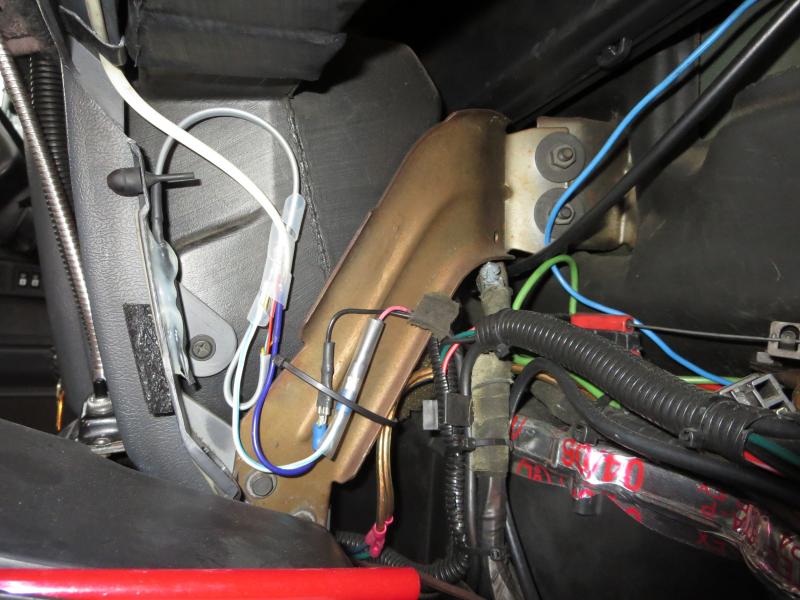
Here you can see how I made the new harness and using the appropriate male spade connectors to connect into where the old light was unplugged.
To connect to the Magnetic Reed switch and to the LED strip I used telephone line cord, because it is easy to work with, it lays flat and because I still have about 5,000 feet of it however you can use anything down to about 24 AWG since the LED's draw very little current.
The reed switch is on the left side of the picture and is the cylinder siliconed to the back edge of the dash.
About the Magnetic Reed Switch, if you do not know what it is, It is a small hermetically sealed glass cylinder with a common terminal and at least 1 movable magnetic reed encapsulated inside to make up the switch, the one you will be using has 2 stationary internal terminals and is in a standard SPDT (Single Pole Double Throw) configuration.
The reeds within the switch are attracted or repelled by the presence of a permanent magnet or any magnetic field and shifts the reed from one state to the other.
I have used them alarms so I already had some.
You can also use a SPST reed switch with a biasing magnet.
The name Magnetic Reed Switch and Reed Switch are interchangeable.
This is what it looks like.
They are usually about 1 1/2" long but can be as small as 1/2"
This is from the Digikey Catalog but even Radio Shack should have them.

The terminals you will be using on your Reed Switch will be the
C = common
N/C = normally closed
The N/O will be left open.
The wiring is simple, (+) power from the factory harness connects to the Common terminal which is the single terminal on one end of the switch.
A wire from the N/C terminal (the one of the 2 terminals that will be physically touching the common reed) will connect to the (+) terminal of the LED strip.
The (-) terminal from the LED strip will connect back to the Black wire on the factory harness or the Ground.
This is the complete circuit.
In operation when the door is open, the magnet is away from the switch and the Common & Normally/Closed reeds are shorted and the LED array is lit, when the door is closed the switch is in the proximity of the magnet and the circuit opens and the LED array is extinguished.
Really elementary beginners electricity here, I probably knew this while I was still in Kindergarten. Really.
After all of the connections have been made and tested, I sealed the entire switch in a section of Shrink Tubing and then siliconed to the back edge of the dash as shown.

After the switch circuit is wired and mounted I then connected it into the factory harness using 2) 1/4" male spade terminals cut down to fit the factory female spade connector.
And now for the LED strip, I bought this from Superbright LEDs, yes it was a bit expensive but when something is cool, the price doesn't really matter to me.

You do not have to use this one though, I know places like Auto Zone, Pep Boys and O Reilly�s also sell LED strips cheaper but they are nowhere as bright.
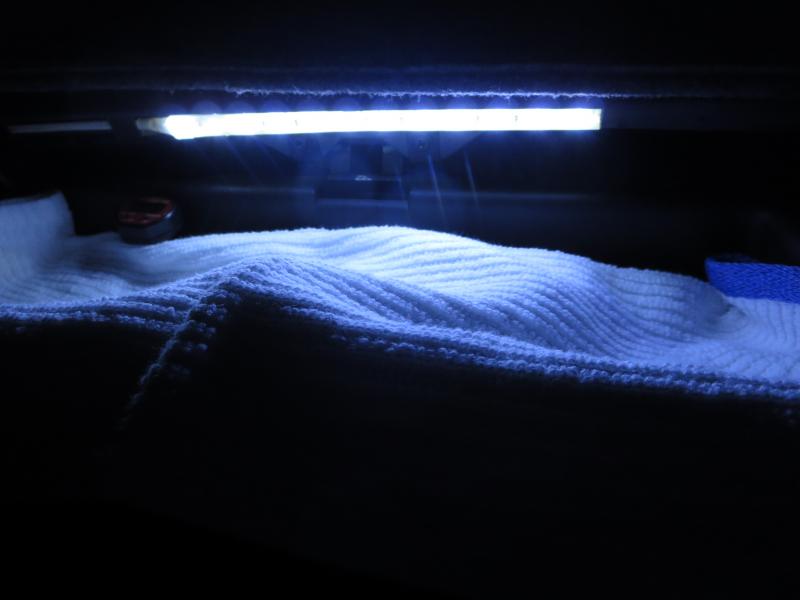
I then wired up and mounted the LED strip, I used about 8 1/2" of the LED strip and affixed it to the underside plastic edge of the dash using a section of cut down 3M Acrylic Tape with the red backing the width of the strip making sure the surfaces are clean first.
I made small plastic clips to secure the flat wire along the edge of the dash and keep it out of the way.
Notice this is facing diagonally toward the seat.

Finally after the power is applied to the circuit the LED's should illuminate and we know everything up to now is correct.
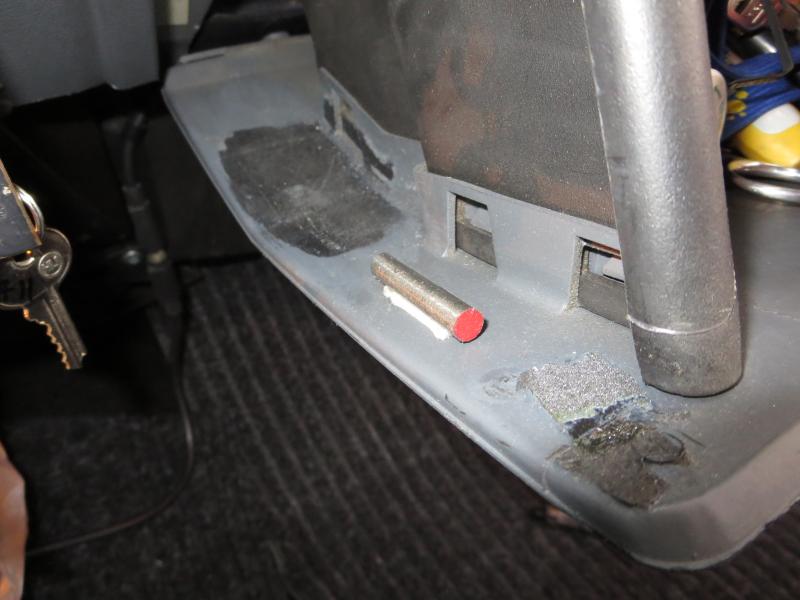
Now, take the small magnet and bring it close to the reed switch and then flip it end to end N/S S/N and see which way works best when it is centered with the reed switch, they are polarity sensitive and one orientation will work better than the other.
Now is the time to secure the small bar magnet to the edge of the glove box door, so when the door is closed it is in line with the reed switch, again I used a piece of 3M Acrylic tape so it will be easy to reposition it if necessary to get it right.
Once you have determined the correct position then run a bead of silicone to secure it.
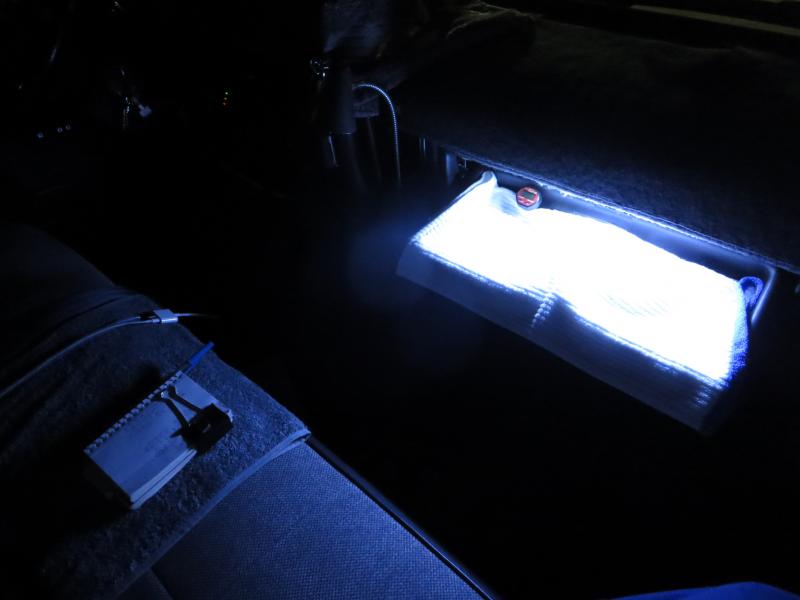
Now for the real test to see just how cool your new Hi Tek Glove Box light is.
Now you can see everything that is inside the box,
I had to put a towel over mine so you could not see how much junk I carry in mine, but you get the idea.
If you were wondering why I mounted the LED strip on the face above the door,
See how the light in addition to illuminating the entire contents of the glove box also spills out into the passenger side downwards at dash level, this is prefect for the passenger or copilot to read maps, logs or anything that requires light that does not interfere with the drivers vision.
BTW there is no glare upward when the towel is removed.
If you want to get fancy, you can get color changing RGB LED Strips and a controller that can be changed from every color under the rainbow.
Why you ask??
Red or Blue/Green will be bright yet will preserve your night vision.
I hope this gives you an idea of just how easy it is to update your Glove Box light into something that is finally functional and is also cool.
Parts List:
8 1/2" LED Strip light. (Note this comes 39" long)
https://www.superbrightleds.com/more...strip/103/499/
Or equivalent LED strip.
1) Magnetic Reed Switch SPDT configuration (will have 3 leads, ONE lead on one end and TWO leads on the other end) Try DigiKey, Radio Shack, e-Bay
* see note below.
1) Flat or Cylindrical strong magnet.
You will also need:
Misc wire for connections, I used flat 2-pair telco cord or any other stranded 22-24 AWG wire.
Heat Shrink tubing.
2) Male spade terminals, (use diagonal cutters and cut down the width of the blade to fit the factory terminals)
Cable-Ties or spiral-wrap to dress the leads.
Tube of clear silicone.
Low wattage soldering iron, solder, basic soldering skills.
About 12" of 3M Acrylic (double sided) tape this tape has a Red liner.
(*) A note about finding Magnetic Reed Switches, if you work in HVAC or know anybody who does, check inside of the newer thermostat bases, older ones used mercury tilt switches but most of the newer ones all use Magnetic Reed Switches and a tilting mechanism with a magnet.
Some of the Honeywell thermostats I have removed 3-4 SPST and SPDT reed switched from the circuit boards including magnets.
(Desolder them using a low wattage soldering iron and desoldering wick with a pair of needle nose pliers on the lead as a heatsink)
Just saying there are places you can scrounge quality switches for free.
Also Alarm contacts work well, again you need SPDT, they will be marked C/NO/NC and the magnet will be included.
I am working on an idea for color changing LED's to illuminate the inside of the cab in either Red or Blue/Green for night vision without blinding you.
Thanks for letting me entertain you with one of my many ideas.
Please let me know if you have any questions or comments.
Thanks Jim
I was getting really annoyed with the pretty much useless excuse for a light that was installed in my glove box,
Come on how much can you see inside the glove box with a tiny lamp shining through a tiny hole in the side of the box side when all of your junk is at the top of the box.
It finally got so the light would come on when I hit a bump and then stay on because of the plastic door and nonreplicable hinge being worn out,.
I would temporarily fix it with a piece of adhesive weatherstrip glued to the door for the stem of the pushbutton switch to contact, however this would work for about a week then it was on again.
So like I always do, I set out to make it better.
The first thing I wanted was to be able to connect to the factory harness so nothing was cut and make it a simple Plug-N-Play.
Here you can see how I made the new harness and using the appropriate male spade connectors to connect into where the old light was unplugged.
To connect to the Magnetic Reed switch and to the LED strip I used telephone line cord, because it is easy to work with, it lays flat and because I still have about 5,000 feet of it however you can use anything down to about 24 AWG since the LED's draw very little current.
The reed switch is on the left side of the picture and is the cylinder siliconed to the back edge of the dash.

About the Magnetic Reed Switch, if you do not know what it is, It is a small hermetically sealed glass cylinder with a common terminal and at least 1 movable magnetic reed encapsulated inside to make up the switch, the one you will be using has 2 stationary internal terminals and is in a standard SPDT (Single Pole Double Throw) configuration.
The reeds within the switch are attracted or repelled by the presence of a permanent magnet or any magnetic field and shifts the reed from one state to the other.
I have used them alarms so I already had some.
You can also use a SPST reed switch with a biasing magnet.
The name Magnetic Reed Switch and Reed Switch are interchangeable.
This is what it looks like.
They are usually about 1 1/2" long but can be as small as 1/2"
This is from the Digikey Catalog but even Radio Shack should have them.
The terminals you will be using on your Reed Switch will be the
C = common
N/C = normally closed
The N/O will be left open.
The wiring is simple, (+) power from the factory harness connects to the Common terminal which is the single terminal on one end of the switch.
A wire from the N/C terminal (the one of the 2 terminals that will be physically touching the common reed) will connect to the (+) terminal of the LED strip.
The (-) terminal from the LED strip will connect back to the Black wire on the factory harness or the Ground.
This is the complete circuit.
In operation when the door is open, the magnet is away from the switch and the Common & Normally/Closed reeds are shorted and the LED array is lit, when the door is closed the switch is in the proximity of the magnet and the circuit opens and the LED array is extinguished.
Really elementary beginners electricity here, I probably knew this while I was still in Kindergarten. Really.
After all of the connections have been made and tested, I sealed the entire switch in a section of Shrink Tubing and then siliconed to the back edge of the dash as shown.

After the switch circuit is wired and mounted I then connected it into the factory harness using 2) 1/4" male spade terminals cut down to fit the factory female spade connector.
And now for the LED strip, I bought this from Superbright LEDs, yes it was a bit expensive but when something is cool, the price doesn't really matter to me.
You do not have to use this one though, I know places like Auto Zone, Pep Boys and O Reilly�s also sell LED strips cheaper but they are nowhere as bright.
I then wired up and mounted the LED strip, I used about 8 1/2" of the LED strip and affixed it to the underside plastic edge of the dash using a section of cut down 3M Acrylic Tape with the red backing the width of the strip making sure the surfaces are clean first.
I made small plastic clips to secure the flat wire along the edge of the dash and keep it out of the way.
Notice this is facing diagonally toward the seat.

Finally after the power is applied to the circuit the LED's should illuminate and we know everything up to now is correct.
Now, take the small magnet and bring it close to the reed switch and then flip it end to end N/S S/N and see which way works best when it is centered with the reed switch, they are polarity sensitive and one orientation will work better than the other.
Now is the time to secure the small bar magnet to the edge of the glove box door, so when the door is closed it is in line with the reed switch, again I used a piece of 3M Acrylic tape so it will be easy to reposition it if necessary to get it right.
Once you have determined the correct position then run a bead of silicone to secure it.

Now for the real test to see just how cool your new Hi Tek Glove Box light is.
Now you can see everything that is inside the box,
I had to put a towel over mine so you could not see how much junk I carry in mine, but you get the idea.

If you were wondering why I mounted the LED strip on the face above the door,
See how the light in addition to illuminating the entire contents of the glove box also spills out into the passenger side downwards at dash level, this is prefect for the passenger or copilot to read maps, logs or anything that requires light that does not interfere with the drivers vision.
BTW there is no glare upward when the towel is removed.

If you want to get fancy, you can get color changing RGB LED Strips and a controller that can be changed from every color under the rainbow.
Why you ask??
Red or Blue/Green will be bright yet will preserve your night vision.
I hope this gives you an idea of just how easy it is to update your Glove Box light into something that is finally functional and is also cool.
Parts List:
8 1/2" LED Strip light. (Note this comes 39" long)
https://www.superbrightleds.com/more...strip/103/499/
Or equivalent LED strip.
1) Magnetic Reed Switch SPDT configuration (will have 3 leads, ONE lead on one end and TWO leads on the other end) Try DigiKey, Radio Shack, e-Bay
* see note below.
1) Flat or Cylindrical strong magnet.
You will also need:
Misc wire for connections, I used flat 2-pair telco cord or any other stranded 22-24 AWG wire.
Heat Shrink tubing.
2) Male spade terminals, (use diagonal cutters and cut down the width of the blade to fit the factory terminals)
Cable-Ties or spiral-wrap to dress the leads.
Tube of clear silicone.
Low wattage soldering iron, solder, basic soldering skills.
About 12" of 3M Acrylic (double sided) tape this tape has a Red liner.
(*) A note about finding Magnetic Reed Switches, if you work in HVAC or know anybody who does, check inside of the newer thermostat bases, older ones used mercury tilt switches but most of the newer ones all use Magnetic Reed Switches and a tilting mechanism with a magnet.
Some of the Honeywell thermostats I have removed 3-4 SPST and SPDT reed switched from the circuit boards including magnets.
(Desolder them using a low wattage soldering iron and desoldering wick with a pair of needle nose pliers on the lead as a heatsink)
Just saying there are places you can scrounge quality switches for free.
Also Alarm contacts work well, again you need SPDT, they will be marked C/NO/NC and the magnet will be included.
I am working on an idea for color changing LED's to illuminate the inside of the cab in either Red or Blue/Green for night vision without blinding you.
Thanks for letting me entertain you with one of my many ideas.
Please let me know if you have any questions or comments.
Thanks Jim
 09-11-2014, 12:48 AM
#3
Registered User

Thanks for this good idea; I am putting it on my list of things to do.
Just a couple days ago, I was messing around behind the glove-box in one of our trucks and saw the glove-box light for the first time; I didn't know such an animal existed.
I first wondered what the bare bulb was for; then, I saw the silly little sort-of-see-thru white plastic button in the glove-box that coincides with the bare bulb.
I wiggled the switch and low-and-behold the bulb lit.
I looked in the glove-box and had to strike a match to see that the light was actually working.
About the second time I closed the box it quit working again.
A couple questions:
The LED strip was quite a bit longer than the portion you used; I am assuming they are made to be cut to length; how does one go about this ??
Can the cut-off piece also be used on a different project or is it sacrificed ??
Applying an old trucker's trick, years ago, I installed RED marker-lights on the kick-panels and under the dash of my F-350; having the interior lit up in RED seems to eliminate much of the glare from oncoming traffic, especially when it is raining.

Thread
Thread Starter
Forum
Replies
Last Post
tractor-man
3rd Generation Ram - Non Drivetrain - All Years
5
02-04-2004 06:41 PM