
Crewcab update...
 07-05-2015, 10:43 PM
#946
So are you going to re construct the intercooer(power stroke) to go behind the condenser coils? If so, could you take pics of the retrofit?
 07-06-2015, 12:44 PM
#947
Registered User
Thread Starter
So the condenser will get mounted under the box on the passenger side....similar to the "Super duty cooling package" the auto trucks could get.
07-06-2015, 03:07 PM
#948
Not familiar with that package.. So ford went with a condenser coil remotely mounted, and not in the path of the air like the norm? Did they mount a remote fan on that coil?
07-06-2015, 03:30 PM
#949
Registered User
Not "Superduty" like a Ford
07-06-2015, 06:53 PM
#950
Registered User
Thread Starter
Guess my wording was a bit off. Oliver is correct...I was making reference to the HD automatic tranny cooling package that could be added to the auto 1st Gen's that bumped there GVW from 12,000 to 14,000lbs.
Jim Lane has a set-up on his dually....
https://www.dieseltruckresource.com/...ng-hot-309408/
I will just be doing a AC condenser with dual 12" fans....maybe?
Jim Lane has a set-up on his dually....
https://www.dieseltruckresource.com/...ng-hot-309408/
I will just be doing a AC condenser with dual 12" fans....maybe?
07-06-2015, 07:15 PM
#951
Registered User
Thread Starter
My left turn signal bulb in the dash popped on, and stayed on, while I was out getting groceries. It does this if a running light is out. Checked the truck and my lower front fender side amber light was out.
Got home and popped in a new bulb...nothing. Hmmm try another bulb...nothing. Go get test light...have power to plug so should come on. Checking out the tangs in the plug and they looked a little compressed. So grab a pick and bend them out, insert 3rd bulb and still nothing.
OK now I'm getting cheesed. So go grab a couple alligator clip jump wires. Test all three bulbs...only one was working. OK put working bulb in again, still nothing. Decided to test connectors while bulb is in socket. Had test light on the ground, and had power on one side. Then switched test light to positive, no ground coming into bulb.
OK so I probe the wire on the outside of the connector....still no ground. Now I figure it must be a bad splice or broken wire. So I start pulling the wrap off the wiring. Noticed that the front turn signal/marker bulb also used the same wires, so figured they must join somewhere and that would be where my problem was. I Got it all off all the way back to the inner fender and the big bundle of wrapped wires there...Still no splice.
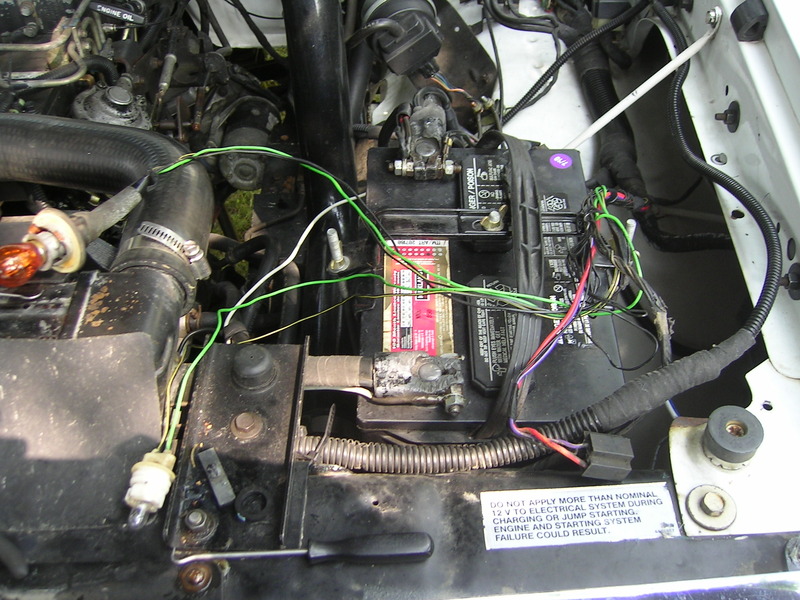
I then went and got my FSM and started looking at the wiring diagrams. Appeared that there was no splice in the engine compartment. I went back out and was looking at things and then noticed that the front amber bulb was burnt out as well. I thought what would be the odds that if the front signal bulb was out, that the side bulb would not work either...well after a new front bulb the side one started working....
So there ya go folks I learned something new today, it only took me an hour or so to figure it out. Lesson learned is....if you have front side marker light out, and a new bulb doesn't fix the problem...check to make sure your front marker/signal light bulb is in good shape and working properly.
08-11-2015, 07:54 AM
#952
Registered User

Hey Brian,
I just had an idea while reading your reply about the Fluid Damper fan clearance problem. So far I haven't had to replace a fan mount bearing , but it occurred to me that there isn't any retainer for the bearing in the mounting bracket, it is just pressed in up to a seat in the bore. There are some great pictures in this thread. https://www.dieseltruckresource.com/...earing-247209/ I know everyone is going to be screaming about belt alignment, but in my experience, you could easily press that bearing out (forward) an 1/8 of an inch without any bad effects on the serpentine belt, and it would give you the extra clearance you need. If you could find a pulley with a deeper cup, you could press the bearing out even further, but I don't think that is too likely. It is also remotely possible that swapping hubs from a non-ic truck into the ic mounting bracket might help.
Just some ideas, doesn't mean any of them are good.
08-11-2015, 08:21 AM
#953
Registered User

Hey Brian,
I just had an idea while reading your reply about the Fluid Damper fan clearance problem. So far I haven't had to replace a fan mount bearing , but it occurred to me that there isn't any retainer for the bearing in the mounting bracket, it is just pressed in up to a seat in the bore. There are some great pictures in this thread. https://www.dieseltruckresource.com/...earing-247209/ I know everyone is going to be screaming about belt alignment, but in my experience, you could easily press that bearing out (forward) an 1/8 of an inch without any bad effects on the serpentine belt, and it would give you the extra clearance you need. If you could find a pulley with a deeper cup, you could press the bearing out even further, but I don't think that is too likely. It is also remotely possible that swapping hubs from a non-ic truck into the ic mounting bracket might help.
Just some ideas, doesn't mean any of them are good.
I just had an idea while reading your reply about the Fluid Damper fan clearance problem. So far I haven't had to replace a fan mount bearing , but it occurred to me that there isn't any retainer for the bearing in the mounting bracket, it is just pressed in up to a seat in the bore. There are some great pictures in this thread. https://www.dieseltruckresource.com/...earing-247209/ I know everyone is going to be screaming about belt alignment, but in my experience, you could easily press that bearing out (forward) an 1/8 of an inch without any bad effects on the serpentine belt, and it would give you the extra clearance you need. If you could find a pulley with a deeper cup, you could press the bearing out even further, but I don't think that is too likely. It is also remotely possible that swapping hubs from a non-ic truck into the ic mounting bracket might help.
Just some ideas, doesn't mean any of them are good.
 08-11-2015, 11:18 AM
#954
Registered User
Thread Starter
Thanks for the suggestions Alec, something to ponder.
As for swapping the Non-IC hub assembly. Yes you could do that and most likely the fan would clear the fluidampr no problem, BUT the fan would no longer align with the fan shroud.
As for swapping the Non-IC hub assembly. Yes you could do that and most likely the fan would clear the fluidampr no problem, BUT the fan would no longer align with the fan shroud.
08-11-2015, 04:54 PM
#955
Registered User
As for swapping the Non-IC hub assembly. Yes you could do that and most likely the fan would clear the fluidampr no problem, BUT the fan would no longer align with the fan shroud.
08-11-2015, 08:56 PM
#956
Registered User
Thread Starter
I don't think that would matter. The bearing is the same from 89-2011 I believe, and the center shaft that the pulley bolts to would be the same I'm guessing. Yes the Non-IC runs a different pulley...but that is because of the casting that houses the bearing and center shaft.
Great Idea, but think I would end up in the same position I started in.
But this got me thinking though...maybe I should pull my Non-IC unit apart and then have my machinist build me a new center shaft, but with the threaded area longer, to move the fan outwards....Hmmmm.
Great Idea, but think I would end up in the same position I started in.
But this got me thinking though...maybe I should pull my Non-IC unit apart and then have my machinist build me a new center shaft, but with the threaded area longer, to move the fan outwards....Hmmmm.
08-17-2015, 06:22 PM
#957
Registered User
Thread Starter
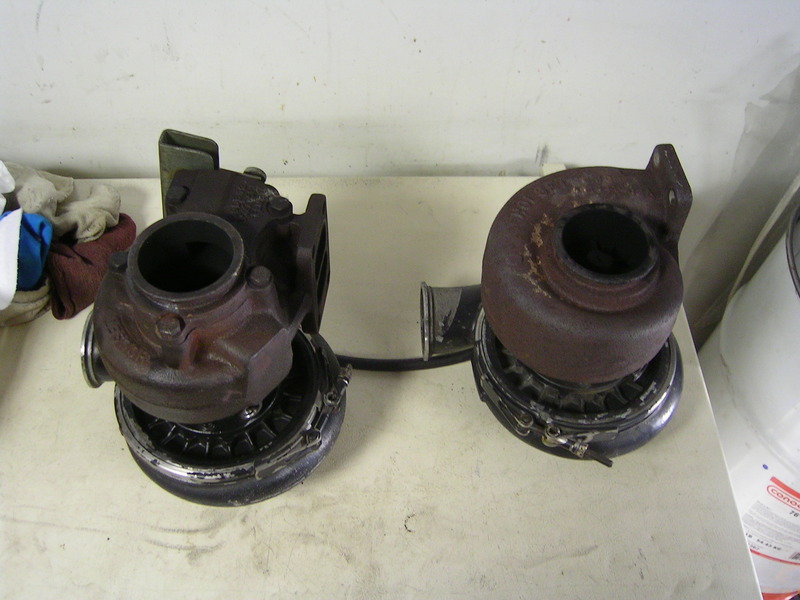
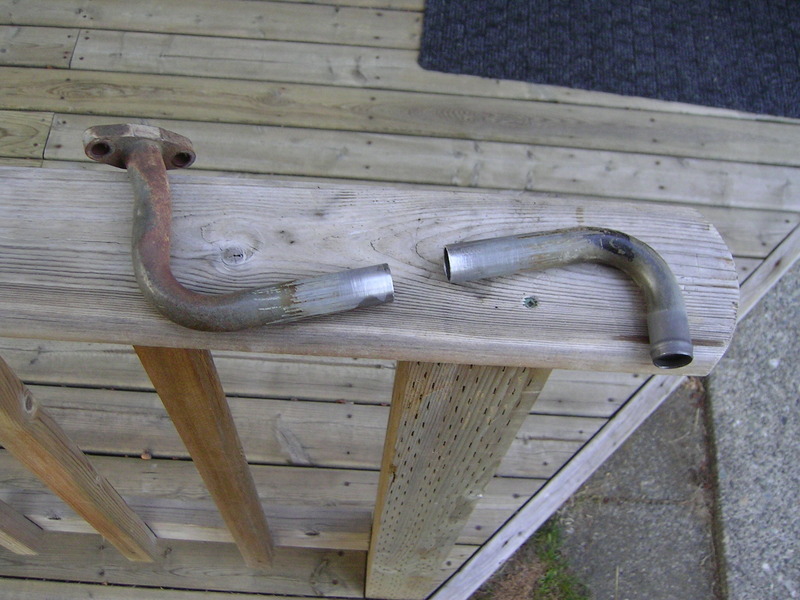
Well last night I decided to install my "new to me" turbo. It's a H1C with a 14cm exhaust housing. A generous local 1st gen owner gave it to me...Thanks Daniel!
Took about 20 minutes to pull the old turbo...then about 90 min to get the new one in and running.
Old vs new
Once the turbo was in and mounted I ran into my first problem. The 1993 turbo drain would not clear the waste gate actuator. Thankfully I had a 24V unit to use. It cleared the turbo fine, but would not quite make it to the drain tube connection off the block.
24V drain tube...
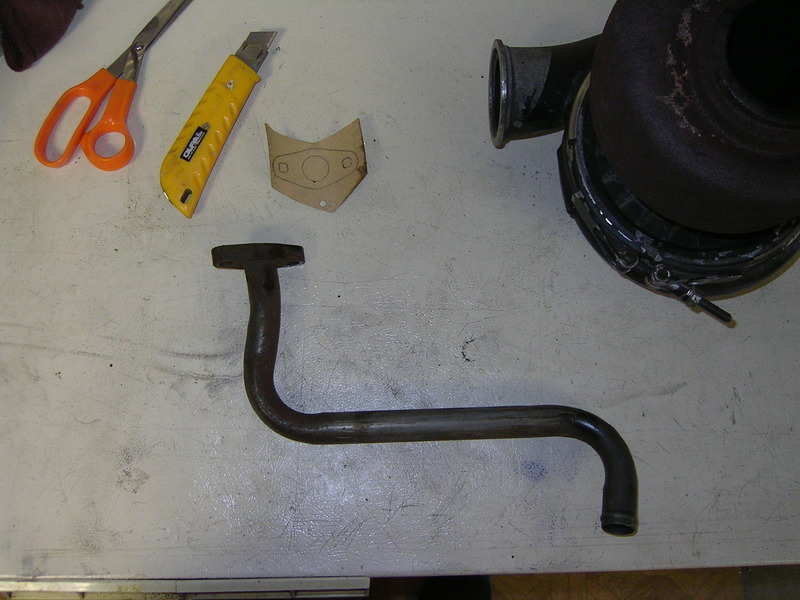
Solution for it being just a bit short, and helped with proper alignment as well.
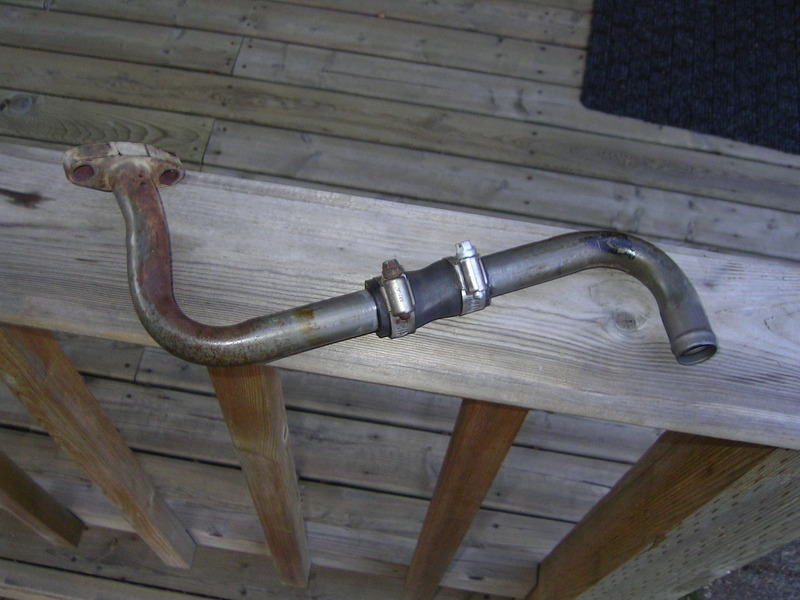
Then I had to remove my exhaust system to get everything lined up and mounted properly. That took a while. Got it running last night and went for a drive. Not as much boost as I thought it might make, but I have not touched the IP except for rotating the stock fuel pin....more fuel might help there. But it definitely spools up quicker on my shifts. Truck doesn't bog and struggle as much either.
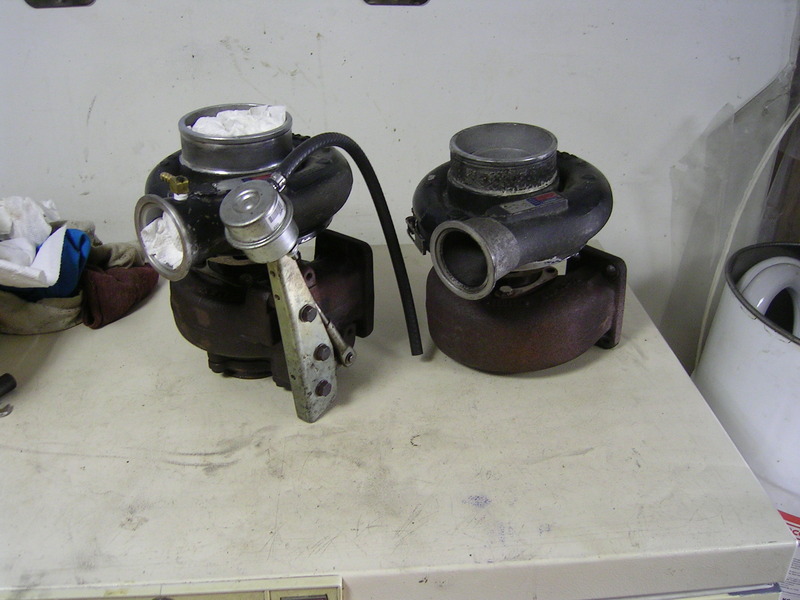
Here is a pic of it this morning all installed....
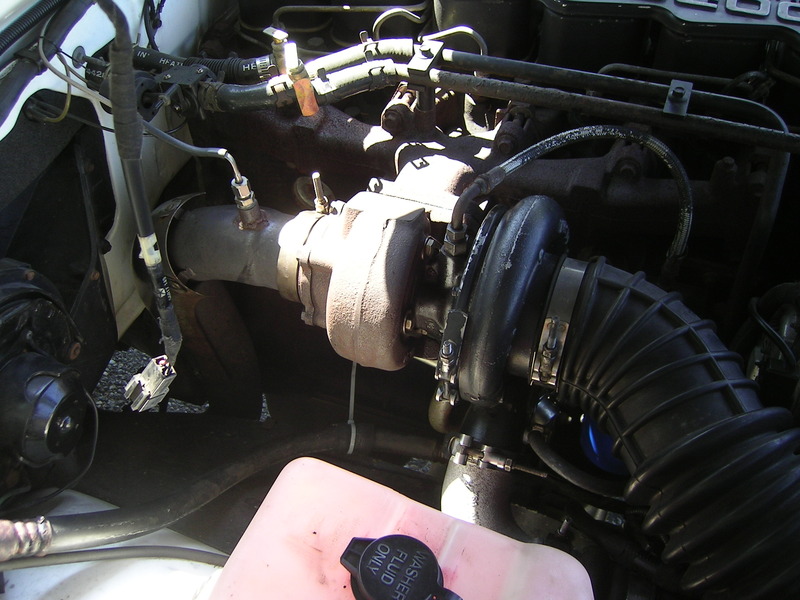
Over all I'm pretty happy with it so far.
Took about 20 minutes to pull the old turbo...then about 90 min to get the new one in and running.
Old vs new


Once the turbo was in and mounted I ran into my first problem. The 1993 turbo drain would not clear the waste gate actuator. Thankfully I had a 24V unit to use. It cleared the turbo fine, but would not quite make it to the drain tube connection off the block.
24V drain tube...

Solution for it being just a bit short, and helped with proper alignment as well.


Then I had to remove my exhaust system to get everything lined up and mounted properly. That took a while. Got it running last night and went for a drive. Not as much boost as I thought it might make, but I have not touched the IP except for rotating the stock fuel pin....more fuel might help there.
But it definitely spools up quicker on my shifts. Truck doesn't bog and struggle as much either.Here is a pic of it this morning all installed....

Over all I'm pretty happy with it so far.
08-17-2015, 11:33 PM
#958
Registered User
Wow I completely forgot that I didn't use the stock oil drain tube.. sorry for not letting you know!
Glad you're liking it so far
Edit: You might want to mess with the adjustable boost elbow, or pinch it off to test it if you're not making much boost. I made around 35 psi with stock injectors and maxed pump.
Glad you're liking it so far
Edit: You might want to mess with the adjustable boost elbow, or pinch it off to test it if you're not making much boost. I made around 35 psi with stock injectors and maxed pump.
08-21-2015, 11:39 AM
#959
Registered User
Thread Starter
I turned the adjustable elbow in all the way....I'm guessing it closes off any boost pressure? I'm going to drive it "as is" for a couple tanks of fuel to see how it effects my fuel mileage. If all is good then I might start turning up the fuel.
No worries about the drain tube. I would have just put the stock turbo back on if I hadn't had that 24V tube. Sometimes hoarding parts comes in very handy....
No worries about the drain tube. I would have just put the stock turbo back on if I hadn't had that 24V tube. Sometimes hoarding parts comes in very handy....
08-21-2015, 11:40 AM
#960
Registered User
Thread Starter
I replaced the coupler I used on my turbo drain last night. I had just used some old hose I had lying around....it fit so on it went. I was informed by a friend that the turbo drain does in fact have pressure, and a lot of heat. So I should be using a hose that is oil resistant, and capable of withstanding pressure, and 150*C (300*F) heat minimum.
With that crummy cheap hose I was using I was running the risk of it failing and then loosing all my oil. Motor would be cooked before all the oil pressure gauge registered the loss.
So I used the coupler off my spare 89 motor....the turbo drain, to crank case hose coupler. Clearly this part is rated for the job, so off t came, cleaned it up and installed it last night. I can now drive without having to watch my mirrors looking for oil spraying out from under the truck. 
With that crummy cheap hose I was using I was running the risk of it failing and then loosing all my oil. Motor would be cooked before all the oil pressure gauge registered the loss.
So I used the coupler off my spare 89 motor....the turbo drain, to crank case hose coupler. Clearly this part is rated for the job, so off t came, cleaned it up and installed it last night. I can now drive without having to watch my mirrors looking for oil spraying out from under the truck.