
Crewcab update...
 01-18-2014, 01:30 PM
#481
Registered User
Join Date: Dec 2010
Location: Land of the Toxic Avenger
Posts: 6,789
Received 1,647 Likes
on
1,120 Posts

If you don't heat up the goo, and get it to bubble out, the caps can get stuck to the point you bend the assembly in a press.
Yeah, I found out the hard way.
 01-20-2014, 07:46 AM
#484
Registered User

Heat and compressed air always gets them out. If the melted plastic doesn't pop like a pimple then keep the heat to it and blast the go out with compressed air. It's all about heat.
Nice looking paint, I wish we had a princess auto.
Nice looking paint, I wish we had a princess auto.
01-20-2014, 12:18 PM
#485
Registered User

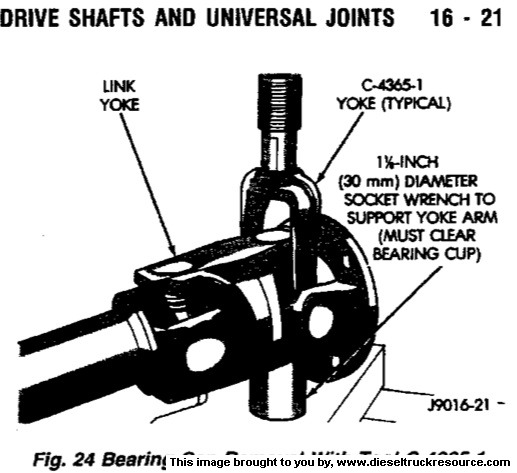
This is what the manual suggests. I've never had any trouble getting the plastic to shear doing it this way. Since you are only pressing against one ear of the joint's yoke at a time, and that ear is directly supported, you don't squeeze or spread the spacing between the ears.
I don't have the "C-4365-1" tool in the picture, so I use blocks under the joint to support the arms of the cross, and put the socket on top. I've watched guys use the heat method, and using the press is a lot easier. Not to mention the Spicer service manual "WARNING: Never heat components, never use sledge hammers, and never use floor jacks to disassemble driveshafts.This can result in damaged,weakened, or bent components."
The fenders are looking good. They're going to be covering up a big chunk of your work, though
 01-25-2014, 01:19 AM
#486
Registered User
Thread Starter
Been up to a few things on the crewcab.
Go the cowl crack area bracing welded in. I was originally going to make big patch panels to cover everything...but I was down at the parts store and spotted some HD band strapping.


The nice thing about this strapping is you could tack one end...then beat it into shape and move along. Worked really well....I'm pretty happy with the way it turned out.


And the holes in the strapping were big enough to have the fender mounting bolts go through...so a little added tie into the fender
01-25-2014, 01:22 AM
#487
Registered User
Thread Starter
Cleaned up the access plate area at the bottom of the rockers.
Before...

After...

I will spray on some new undercoating before I put the front end back together.
Before...

After...

I will spray on some new undercoating before I put the front end back together.
01-25-2014, 02:06 AM
#488
Registered User
Thread Starter
I can not even tell you how much I hate PHOTOBUCKET right now!! I've been uploading photos and it has been randomly placing them wherever in my folder. I re-organize and it then shuffles them around AGAIN!
When i got the truck originally the box was missing the two mounts on the LH side of the frame. In fact the box was welded to the frame! I eventually removed and cleaned up the area, and made my own brackets.


But since I had the original brackets form the donor 93 I figured I way as well install the proper brackets. I had to re-drill because these brackets used 3 mounting holes. I then installed them with the same 1/2" x20 Grade 8 Flange head bolts and matching flange head stover nuts....overkill...probably, but I feel better knowing it's this way.


I also ordered enough bolts to replace the ones on the LH rear body mount.

Not sure what happened in the crewcabs life to cause the two box brackets, and this body mount to be missing and replaced? But now at least things are closer to the way it should be.
01-25-2014, 02:11 AM
#489
Registered User
Thread Starter
I also ran the brake lines. Found out that with the 2nd Gen adapter and starter to run the NV4500 that the brake line would be in right between the starter and the frame rail...with little to no clearance. So I had to re-route it along the top of the frame and then down once under the cab.
Got the RWAL valve mounted, and the lines bent up for it.

Got the RWAL valve mounted, and the lines bent up for it.
 01-25-2014, 02:19 AM
#490
Registered User
Thread Starter
And I cleaned up and repaired a bunch of the body /chassis wiring. Had to modify the box a wee bit to get the taillight connector through the hole down inside the box.

Seems this hole got bigger probably whenever they decided to go with the big water tight 4 wire connection.

So a little pounding with a bar opened it up enough to get the wiring connector through.


Seems this hole got bigger probably whenever they decided to go with the big water tight 4 wire connection.

So a little pounding with a bar opened it up enough to get the wiring connector through.
 01-25-2014, 04:45 AM
#491
Registered User
