
BC's Twin Install / AKA: "I'm Gonna Blow Up My Heap!" (updated as it occurs)
 08-06-2008, 10:44 PM
#16
1st Generation Admin
Thread Starter
I see you are going to stick with the stock style heat exchanger, where are you thinking of putting the remote tranny cooler?? I am thinking of doing this before I get mine all back together.. I was thinking of getting rid of the heat exchanger al together and going with just the remote cooler... But it is nice to know that you can still get the factory heat exchanger...
Using some aluminum traffic signs from the scrap iron yard, I'm thinking of fabricating a bracket that would allow me to locate the new cooler, such that it'd be looking forward, angled down a little (for clearance). The fan/cooler is of the pull-through design, so having the fan just ahead of the fuel tank, normal driving air-flow should contribute to the air-flow total through the cooler. The in/out fittings will be on the top of the assembly, right there at the bottom surface of the cab/bed floor (I can't remember which right now).
Hold 0n . . .
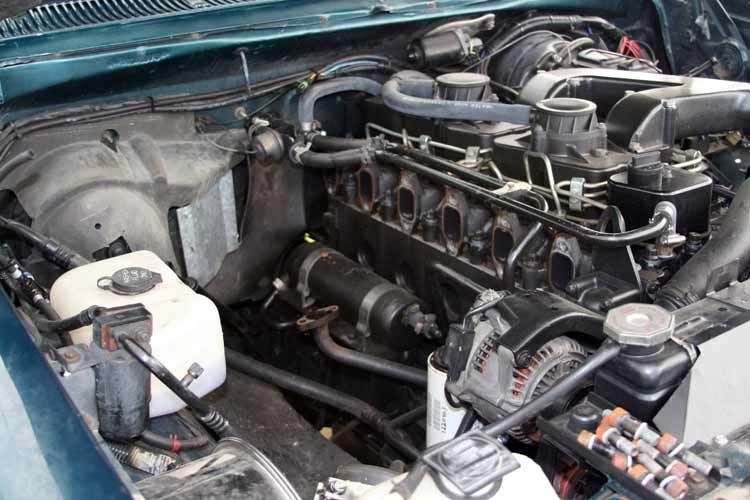
In the above photo, the forward end of the fuel tank is to the left, just out of the image. In that area, the cooler will go. The new trans fluid heat exchanger will be mounted on the frame where that filter is now. The filter will be put in the remaining space. Again, I'm hoping to fabricate a frame for it all.
That filter head has two more ports on the opposite end, allowing a number of configurations. Compared to the in/out on one side as you see it now, I'm gonna set it up such that the inlet will be on the right (as you see it), and the outlet on the left (presumably on it's way to the new cooler). No matter how I set that up, I'll still have two unused ports available. I've got a thermostatic switch that will screw into one of those unused ports so as to control the coolers fan when an in-cab switch is set in the "Auto" mode. That switch will also have a forced "On" mode as well.
DNRC, I have fretted over that heat exchanger a while. One day, loose it. The next, "Nah, better keep it". I'm thinking the regular, around-town winter driving will need the warm fluid for better transmission life. On the other hand, That 180*f (+/-) fluid is rather thin compared to 100*F fluid and that equates to one tenth of a second in my heap in the 8th mile. Realizing that, I'm gonna incorporate a quarter-turn ball valve in one of the the coolant lines to shut off the flow of hot engine coolant when going to the track.
Today, I'm still stuck on what I'm gonna do about the stock/OEM cooler up at the radiator (front of the truck). I'm leaning toward leaving it in service if only to allow the new cooler's fan to not have to run under regular unloaded driving. I need to find the durn bypass pipe assembly thing that is in the lines just before that cooler and reinstall them. I've just got to figure out where I put them.

Um . .. when I bought that new heat exchanger, it was one of only two left at Reliable Goods. http://www.reliablegoods.com/cgi-bin...x.cgi?cart_id=
Yesterday afternoon, I was running in and out of a medically assisted living rest home's attic space. The cool area up there was 136*F.
Today I was in a machine room above a middle school's gym. Replacing a compressor in a pain-in-the-behind water source heat-pump. It was hot there too.
As I type this (11:30pm EST), it's 82*F @ 74% relative humidity.
I got nothing done to the truck tonight.


 08-14-2008, 05:12 PM
#19
Registered User
Join Date: Aug 2007
Location: Maricopa, Arizona
Posts: 170
Likes: 0
Received 0 Likes
on
0 Posts
I feel your pain in the A/C department...usually spend my days on a roof until 4 or 5 in the afternoon working to keep the people inside happy! 'It's 78* by my thermometer, if it hits 80*, I'm going home!' Reality check: it's 115* on the roof and you're complaining? Hope the duals go well, lots of guys interested, including myself!
08-14-2008, 06:19 PM
#20
1st Generation Admin
Thread Starter
Well, I went to the beach this past weekend. Went fishing all day on a Head-boat Saturday. Caught five or six decent Pink Snappers. Got most of my land-legs back by Sunday evening. 
Between work and rain, I've not accomplished near that I wanted to by now.
Anyhoot, I took a 1/2hp air die grinder with a knarly looking bur and did a little whittling on the hot-pipe/primary exhaust housing adapter. While the adapter is very well made, it seems to me that the exhaust housing's casting cores may shift a little resulting in a less than perfect match of the two port wise.
In my case, the adapter was narrow by about 1/16" on the short sides, and narrow a good 1/8" on the outer long side (all as compared to the exhaust housing inlet).
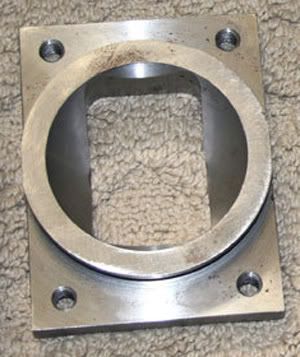
I bolted the adapter to the exhaust housing and Match-Ported the two. As the adapter comes, it apparently is 100% machined (as seen above) and as such presents with a few minor corners as it transitions. I blended them in as well. I then knocked off the four outer corners to be a little purdier.
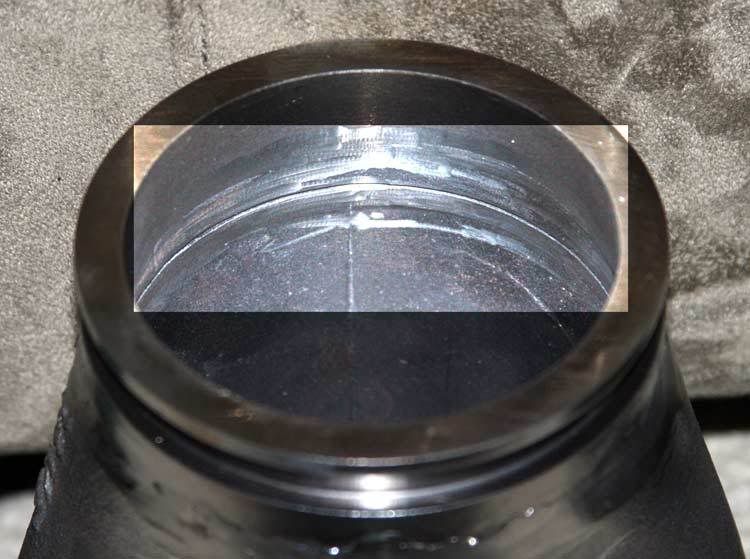
Sorry about the goofy image. I tried highlighting the grindage area.
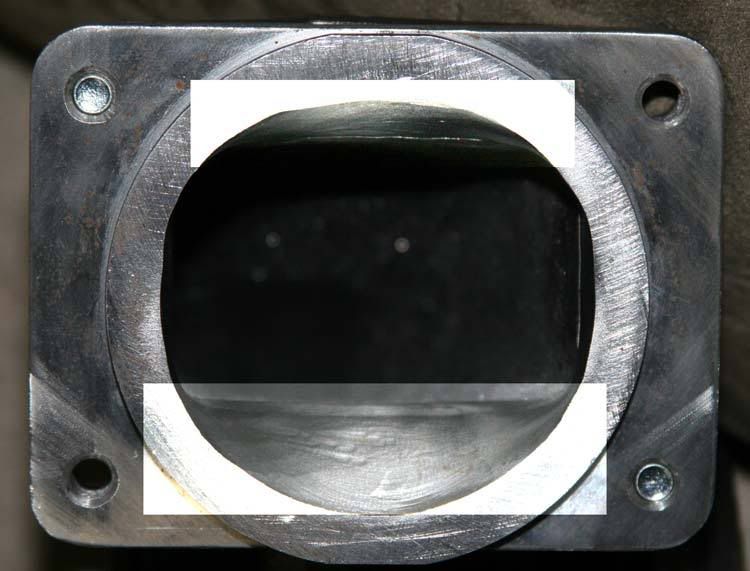
I then did a little porting of the hot-pipe by radiusing/blending all the internal stuff I could get to. That boy's cast iron.
I've still got to tear down the truck.
Between work and rain, I've not accomplished near that I wanted to by now.
Anyhoot, I took a 1/2hp air die grinder with a knarly looking bur and did a little whittling on the hot-pipe/primary exhaust housing adapter. While the adapter is very well made, it seems to me that the exhaust housing's casting cores may shift a little resulting in a less than perfect match of the two port wise.
In my case, the adapter was narrow by about 1/16" on the short sides, and narrow a good 1/8" on the outer long side (all as compared to the exhaust housing inlet).
I bolted the adapter to the exhaust housing and Match-Ported the two. As the adapter comes, it apparently is 100% machined (as seen above) and as such presents with a few minor corners as it transitions. I blended them in as well. I then knocked off the four outer corners to be a little purdier.
Sorry about the goofy image. I tried highlighting the grindage area.
I then did a little porting of the hot-pipe by radiusing/blending all the internal stuff I could get to. That boy's cast iron.
I've still got to tear down the truck.
 08-17-2008, 09:05 PM
#22
1st Generation Admin
Thread Starter
OK, I finally got to it.
- Got the grass cut around the outdoor plywood work platform. (The steering of the riding mower then promptly stripped out. The parts will be here next week. )
)
- Got the tarp/tent thing put up to keep the rain of the soon to be here remnants of TS Fay off of things. Did I mention it sprinkled the better part of the day here? Nice and steamy.
- Removed the fan and associated shroud. Yes, . . .. I wrestled with it for about ten minutes before I figured out I was turning the nut the wrong way.
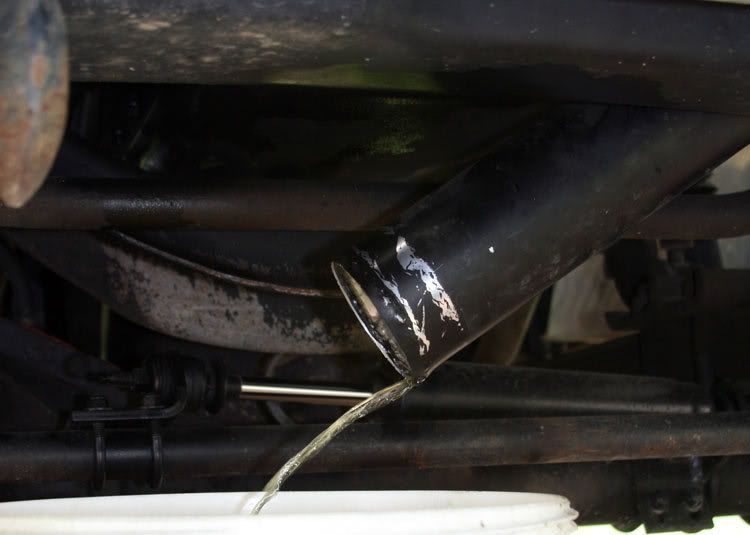
- I then drained the antifreeze into a clean bucket for reuse. Did you know the turbocharger's outlet pipe and connected charge-air tubing make a convenient means of catching the antifreeze?
- Then went about removing the existing exhaust manifold, turbocharger and down-pipe.
- Then removed the transmission fluid heat exchanger, its mounting bracket, and all associated plumbing.
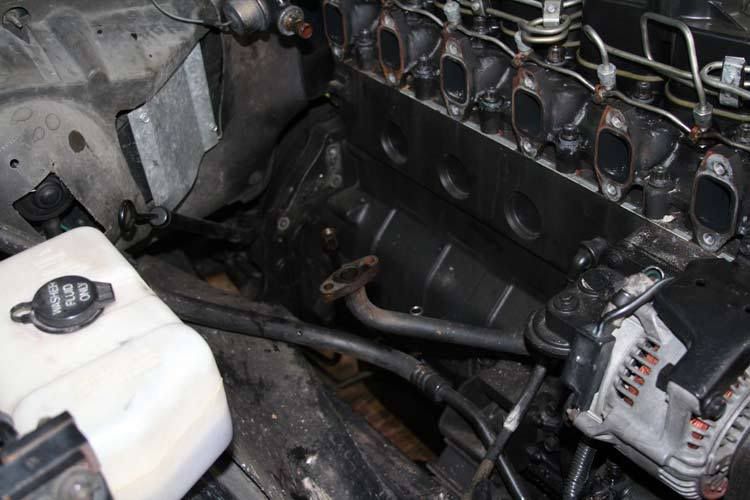
- I then drained the transmission of fluid while removing the balance of the OEM fluid plumbing that served the heat exchanger. Here again, I collected all the fluid for later reuse ($10 a quart!)
At the end of the day, I got all this mess out from under the hood.
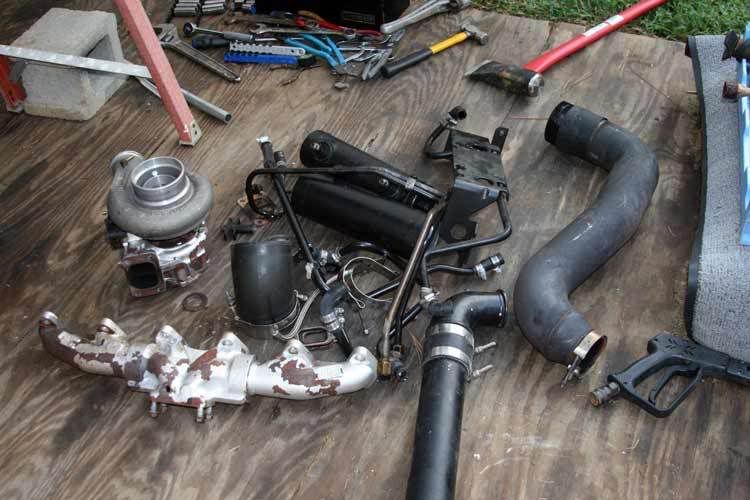
- To finish the work, I separated the exhaust housing from the turbocharger and removed the waste-gate actuator in preparation for Jet-Hot coating.
But before send it all off, I plan on relocating the pyrometer's probe to the opposite side of the exhaust manifold (so it's pointing up when complete for clearance reasons). With that, I'll need to plug the original hole. I figure a standard black iron pipe plug will do.
But thinking more about it, I may just use that hole as a drive-pressure reference point. . . . . . Hmmmmm. . . .. ?
Tomorrow (on-call with work pending), I plan on pressure washing all that now exposed and begin cyphering a mount for the supplemental trans fluid cooler. In my head, the voices suggest looking at some basic U-bolt and clevis type clamps to hold the heat exchanger up against the truck frame in it's new location. Your basic muffler pipe clamps.
. . . . . We'll see . . .
- Got the grass cut around the outdoor plywood work platform. (The steering of the riding mower then promptly stripped out. The parts will be here next week.
)- Got the tarp/tent thing put up to keep the rain of the soon to be here remnants of TS Fay off of things. Did I mention it sprinkled the better part of the day here? Nice and steamy.
- Removed the fan and associated shroud. Yes, . . .. I wrestled with it for about ten minutes before I figured out I was turning the nut the wrong way.
- I then drained the antifreeze into a clean bucket for reuse. Did you know the turbocharger's outlet pipe and connected charge-air tubing make a convenient means of catching the antifreeze?
- Then went about removing the existing exhaust manifold, turbocharger and down-pipe.
- Then removed the transmission fluid heat exchanger, its mounting bracket, and all associated plumbing.
- I then drained the transmission of fluid while removing the balance of the OEM fluid plumbing that served the heat exchanger. Here again, I collected all the fluid for later reuse ($10 a quart!)
At the end of the day, I got all this mess out from under the hood.
- To finish the work, I separated the exhaust housing from the turbocharger and removed the waste-gate actuator in preparation for Jet-Hot coating.
But before send it all off, I plan on relocating the pyrometer's probe to the opposite side of the exhaust manifold (so it's pointing up when complete for clearance reasons). With that, I'll need to plug the original hole. I figure a standard black iron pipe plug will do.
But thinking more about it, I may just use that hole as a drive-pressure reference point. . . . . . Hmmmmm. . . .. ?
Tomorrow (on-call with work pending), I plan on pressure washing all that now exposed and begin cyphering a mount for the supplemental trans fluid cooler. In my head, the voices suggest looking at some basic U-bolt and clevis type clamps to hold the heat exchanger up against the truck frame in it's new location. Your basic muffler pipe clamps.
. . . . . We'll see . . .
08-20-2008, 08:36 PM
#24
1st Generation Admin
Thread Starter
At this point I've delivered all the hot parts so as to be coated (http://www.jet-hot.com/). Should be a week to ten days.
Messed around under the truck this evening for a couple of hours and pulled this out from under it.
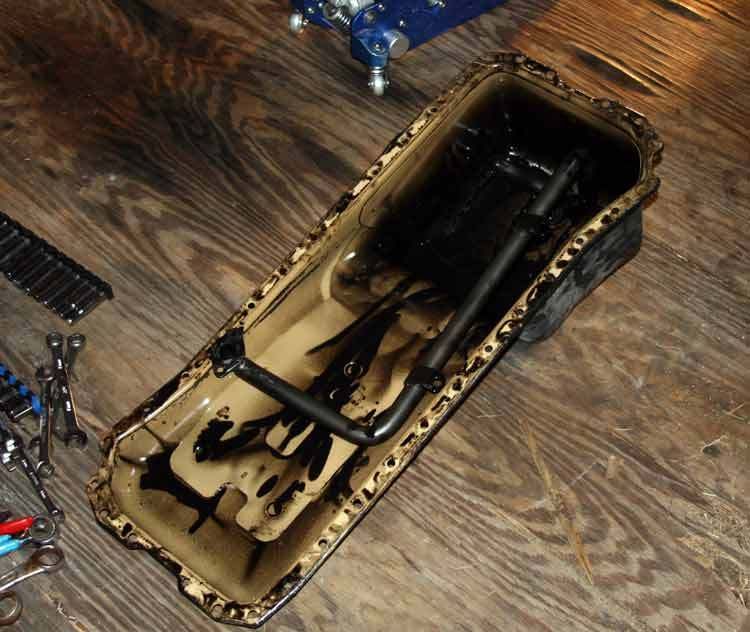
More interestingly, found this in the bottom of the pan. Anybody lose something?
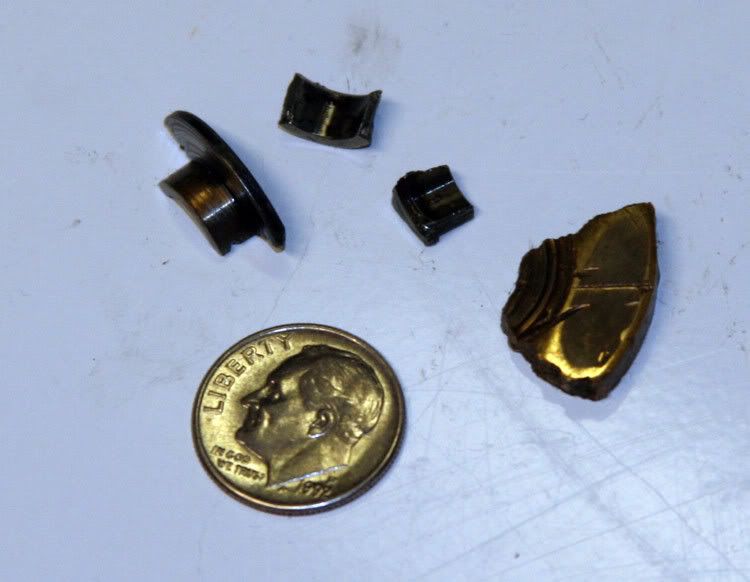
That item to the right appears to be made of brass or bronze. It's pushing an eight of an inch thick.
Messed around under the truck this evening for a couple of hours and pulled this out from under it.
More interestingly, found this in the bottom of the pan. Anybody lose something?
That item to the right appears to be made of brass or bronze. It's pushing an eight of an inch thick.
 08-20-2008, 11:51 PM
#28
Registered User
Join Date: Apr 2007
Location: Piedmont of NC
Posts: 393
Likes: 0
Received 0 Likes
on
0 Posts
Being completely unfamiliar with the guts of these engines, looks to be the remains of a flanged bushing. Any chance it's part of an auxiliary driven assy... maybe guts of a topend part filtered down into the pan?


 08-21-2008, 03:09 AM
#30
DTR's "Cooler than ice cubes 14 miles North of North Pole" member
Join Date: Oct 2006
Location: 14mi North of North Pole
Posts: 1,797
Likes: 0
Received 9 Likes
on
8 Posts